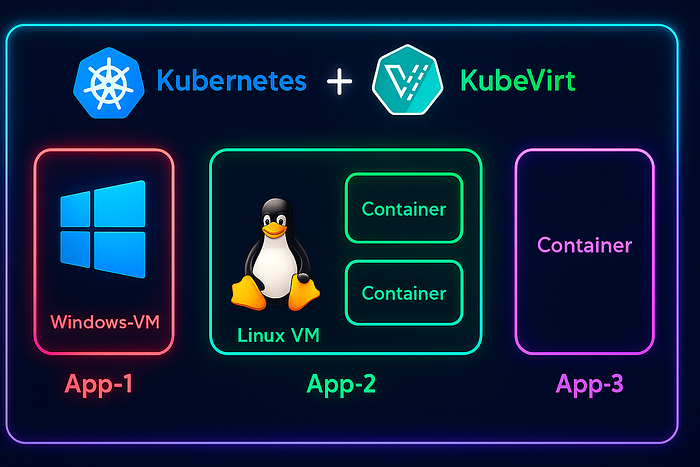

Yes, you read that right, we're going to run a Windows Server virtual machine inside a Kubernetes cluster. And no, this isn't one of those K8s operators that just talk to a cloud provider API and translate YAML into VM instructions. The VM will actually run inside the Kubernetes cluster itself, as a POD.
In this Blog, I will explain, how I migrated an existing, windows server(domain controller) to Kubernetes.
HOW?
It's easier than you think. KubeVirt is an open-source tool that lets you run virtual machines as pods inside Kubernetes. When you create a VM, KubeVirt launches a special pod that runs the VM using QEMU/KVM, managing its disks, network and lifecycle. This approach allows you to run both Linux and Windows VMs seamlessly inside your Kubernetes cluster, bringing traditional virtual machines into the cloud-native world.
But WHY?
Running a Windows Server with Active Directory inside a Kubernetes cluster is unconventional. This blog serves as an experimental demonstration to show that it's possible, but it's not recommended for production environments.
But here's the real use case, while most applications are moving to Kubernetes, some legacy apps are hard to containerize. KubeVirt lets you run these apps as virtual machines on Kubernetes, giving you a consistent environment while developers continue working on containerizing them.
Let's get started!
For this demo, I'll be using a Nutanix cluster as my core infrastructure. However, you can achieve the same setup on your laptop using Oracle VirtualBox to create the Active Directory server, which we'll later migrate to Kubernetes using KubeVirt.
STEP-1 Creating the VM Disk Image:
I've already pre-created my Windows Server VM and set up a domain with a few test users. To migrate our VM, the first step is to power it off, so we can export the VM disk image.
Note: It is recommended to have VirtIO drivers installed, on the windows machine, before creating the image. Refer this link for instructions:
https://github.com/virtio-win/virtio-win-pkg-scripts/blob/master/README.md
Exporting VM Image on Nutanix:
- Log in to Prism Central.
- Navigate to Menu → Compute → Images → Add Image.
- Choose VM Disk and select the Active Directory VM you created for this demo.
4. To download the image, go to the Images page, select the image you just created, and choose Actions → Download Image. Save it locally in a separate folder, and make sure to add the .qcow2 extension at the end.
For Oracle VirtualBox, see the link below:
You might want to export the OVF and convert it to qcow2 format, please refer to the below link for instructions.
https://linuxconfig.org/converting-virtualbox-ova-to-qcow2-for-qemu-kvm-deployment
After exporting, place the converted qcow2 image in a separate folder.
STEP-2 Launch a quick HTTP file server:
From the same directory containing the image, run the command below to start a local HTTP file server. We will use this server as a source, to import the VM image into a PVC on the K8s cluster.
python3 -m http.server 8000Leave this terminal running in the background and open a new terminal to perform the remaining steps, as closing this would stop the file server.
Note: Ensure that Python3 is installed on your system for the above command to work.
STEP-3 Creating a K8s cluster:
Now that the Windows VM image is ready, the next step is to set up a Kubernetes cluster, to host our Windows AD VM.
Since this is just for testing, I'll spin up a Kind Kubernetes cluster on an Ubuntu virtual machine. You can either use your own laptop to run the Kind cluster or create a new Ubuntu VM on Oracle VirtualBox.
Depending on your operating system, follow the instructions in the link below to install Kind and start a local Kubernetes cluster.
https://kind.sigs.k8s.io/docs/user/quick-start/#installation
For Linux OS (for other OS refer link above):
# For AMD64 / x86_64
[ $(uname -m) = x86_64 ] && curl -Lo ./kind https://kind.sigs.k8s.io/dl/v0.29.0/kind-linux-amd64
# For ARM64
[ $(uname -m) = aarch64 ] && curl -Lo ./kind https://kind.sigs.k8s.io/dl/v0.29.0/kind-linux-arm64
chmod +x ./kind
sudo mv ./kind /usr/local/bin/kind
To create the KIND cluster:
Before creating the Kind K8s cluster, create an empty directory on the local host, which will be mounted to the Kind node. This directory will be used for a PVC to store the VM disk image, make sure to update the path in the YAML configuration accordingly.
# Kind-config.yaml

kind: Cluster
apiVersion: kind.x-k8s.io/v1alpha4
nodes:
- role: control-plane
  extraMounts:
    - hostPath: <UPDATE LOCAL PATH HERE (/root/images)>
      containerPath: /mnt/images
      readOnly: false
      selinuxRelabel: false
      propagation: None
Now to create the cluster, run the below command and your k8s cluster should be ready, within few seconds.
kind create cluster --name kubevirt --config kind-config.yaml
STEP-4 Deploying KubeVirt on K8s:
KubeVirt runs as a deployment on the same Kubernetes cluster, so installing it is straightforward. Simply run the commands below and the required components will be created, using kubectl.
export VERSION=$(curl -s https://storage.googleapis.com/kubevirt-prow/release/kubevirt/kubevirt/stable.txt)
echo $VERSION
kubectl create -f "https://github.com/kubevirt/kubevirt/releases/download/${VERSION}/kubevirt-operator.yaml"
To deploy the KubeVirt Custom resources(CRD):
kubectl create -f "https://github.com/kubevirt/kubevirt/releases/download/${VERSION}/kubevirt-cr.yaml"Verify that the deployment was successful, the PHASE should be shown as Deployed.
kubectl get all -n kubevirt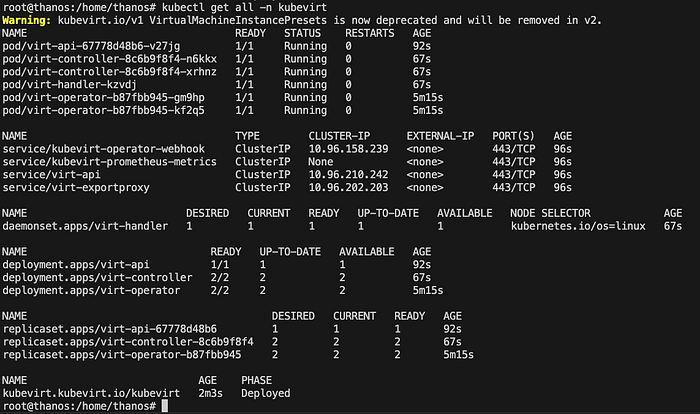
If you're running your KIND cluster inside a VM, take a look at the note below on nested virtualisation.
Nested Virtualization is a technology that allows you to run a VM inside another VM, with hardware acceleration. The method to enable it depends on your underlying hypervisor or cloud provider, so be sure to check the vendor-specific documentation to enable nested virtualization or CPU passthrough for your VM.
For Nutanix AHV, to enable CPU passthrough:
# get the VM UUID
acli vm.list | grep <vm_name>
# Update the VM
acli vm.update <vm_uuid> cpu_passthrough="true"
If you're unsure or just experimenting, no worries, you can run the command below to enable hardware emulation. However, this is not recommended for production, as performance will noticeably drop compared to CPU passthrough.
kubectl -n kubevirt patch kubevirt kubevirt --type=merge --patch '{"spec":{"configuration":{"developerConfiguration":{"useEmulation":true}}}}'STEP-5 Install VirtCtl:
virtctl is a command-line tool for interacting with KubeVirt virtual machines, similar to kubectl but designed specifically for VMs. It allows you to start, stop and access the console of a running VM.
VERSION=$(kubectl get kubevirt.kubevirt.io/kubevirt -n kubevirt -o=jsonpath="{.status.observedKubeVirtVersion}")
ARCH=$(uname -s | tr A-Z a-z)-$(uname -m | sed 's/x86_64/amd64/') || windows-amd64.exe
echo ${ARCH}
curl -L -o virtctl https://github.com/kubevirt/kubevirt/releases/download/${VERSION}/virtctl-${VERSION}-${ARCH}
chmod +x virtctl
sudo install virtctl /usr/local/bin
STEP-6 Put the VM Disk Image into a PVC:
To store the VM disk image in a PVC, we use a tool called Containerized Data Importer (CDI). CDI acts like a downloader, it fetches a file from an external source and saves it into a PVC, allowing pods to attach and access the data later. In our case, we already have an HTTP file server hosting the VM image. Using CDI, we will create a DataVolume and import the image into our Kubernetes cluster.
First to Install CDI:
CDI is just another deployment in the same K8s cluster, you can create the application components by running the below commands.
export TAG=$(curl -s -w %{redirect_url} https://github.com/kubevirt/containerized-data-importer/releases/latest)
export VERSION=$(echo ${TAG##*/})
kubectl create -f https://github.com/kubevirt/containerized-data-importer/releases/download/$VERSION/cdi-operator.yaml
kubectl create -f https://github.com/kubevirt/containerized-data-importer/releases/download/$VERSION/cdi-cr.yaml
Create a Persistent Volume:
First, apply the PersistentVolume (PV) manifest below to create a PV in your cluster, pointing to the hostPath.
# Persistent Volume

apiVersion: v1
kind: PersistentVolume
metadata:
  name: winad-pv
spec:
  capacity:
    storage: 32Gi # UPDATE THE STORAGE AS PER THE SIZE OF YOUR QCOW2 IMAGE
  accessModes:
    - ReadWriteOnce
  hostPath:
    path: /mnt/images
Next, we will create a DataVolume. The DataVolume will automatically create a PersistentVolumeClaim (PVC) that requests storage from the cluster and it will bind to the PV we just created. This ensures that your VM disk has a dedicated storage volume ready for use.
# DataVolume.yaml

apiVersion: cdi.kubevirt.io/v1beta1
kind: DataVolume
metadata:
  name: windows-ad
spec:
  source:
    http:
      url: "http://192.168.5.4:8000/winad.qcow2"
  storage:
    accessModes:
      - ReadWriteOnce
    resources:
      requests:
        storage: 32Gi
    storageClassName: ""
Note: In the above DataVolume.yaml manifest, update the correct path for the http source url, pointing to the windows qcow2
Now the CDI should create a pvc, spin up a importer pod and then start the download process. You can monitor the progress using the below command.
watch kubectl get dv
Once the DataVolume phase changes to Succeeded, the Windows VM QCOW2 image has been successfully imported into the PVC. The only remaining task is to create a VM and attach it to this PVC.
STEP-7 Create the VM on K8s:
We've completed the hard part! The VM is now just another custom resource in KubeVirt and can be created by applying the manifest below.
# virtualmachine.yaml

apiVersion: kubevirt.io/v1
kind: VirtualMachine
metadata:
  generation: 1
  labels:
    kubevirt.io/os: windows
  name: windows-ad
spec:
  running: true
  template:
    metadata:
      creationTimestamp: null
      labels:
        kubevirt.io/domain: windows-ad
    spec:
      domain:
        cpu:
          cores: 2
        resources:
          requests:
            memory: 4096M
        firmware:
          bootloader:
            efi:
              secureBoot: false
        devices:
          disks:
          - disk:
              bus: sata
            name: pvcdisk
        machine:
          type: q35
      volumes:
        - name: pvcdisk
          persistentVolumeClaim:
            claimName: windows-ad
Wait until the VM's status changes to Running.
kubectl get vm
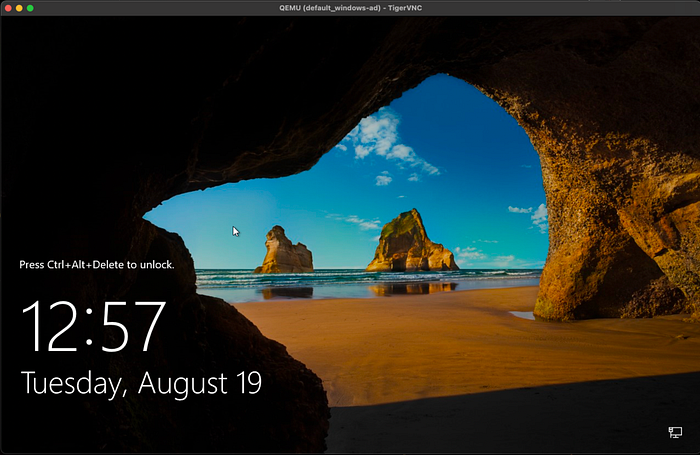
STEP-8 Take console of the VM:
To view the VM's graphical console, you'll need a VNC viewer client. There are several clients available, but for this lab, we'll use TigerVNC. Refer to the link below to download the latest version for your operating system.
Let's start the vnc session for our windows-ad VM, using virtctl.
virtctl vnc windows-ad --proxy-only --address 0.0.0.0Make a note of the port shown in the output, as we will use it to connect to this vnc session.

To connect, open TigerVNC Viewer and enter the IP address of the machine where you ran the virtctl command, followed by the port number.
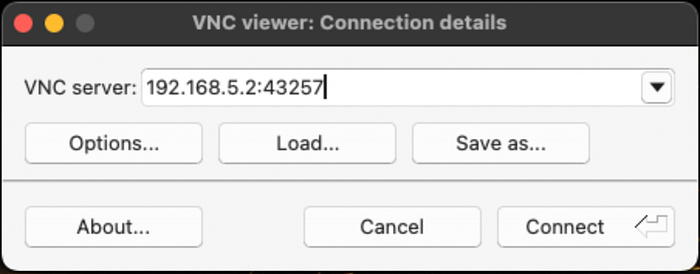
Once you click Connect, the magic happens, you'll see a fully running Windows server VM right inside your Kind Kubernetes cluster, ready to use.
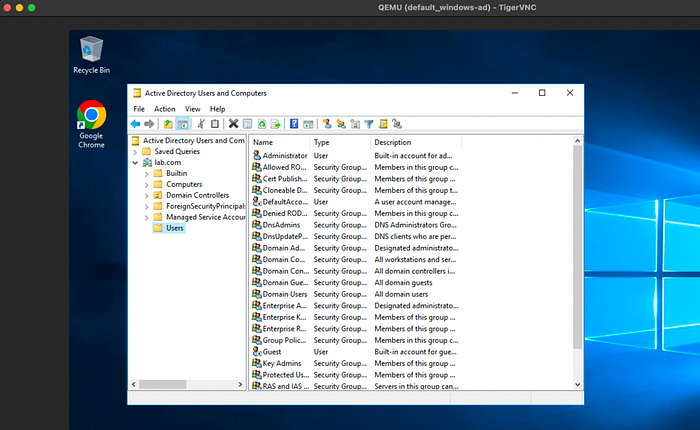
We've successfully migrated a Domain Controller VM to a Kind Kubernetes cluster. As mentioned earlier, running a domain controller on Kubernetes is not recommended, this was more of a fun experiment. The real power of KubeVirt lies in running legacy applications alongside containerized workloads, enabling a unified platform for all your apps. It's also useful for testing, development or gradually modernising monolithic systems without a full re-architecture.
Hope you enjoyed the blog! I'd love to hear your thoughts or questions, feel free to share them in the comments so we can start a discussion.
Further Reading & Resources:
KubeVirt: https://kubevirt.io/quickstart_kind/
Containerized Data Importer(CDI): https://kubevirt.io/user-guide/storage/containerized_data_importer/
Accessing a VM: https://kubevirt.io/user-guide/user_workloads/accessing_virtual_machines/