

Connection Pool Configuration in Spring Boot.
In another post, I have introduced and explained how the Connection Pool could help to increase application performance. And now, in this article, I will show you how to apply the connection pool in Spring Boot application with the common connection pool libraries out there. Below items are what I'm going to cover in this article:
- HikariCP
- Tomcat-JDBC
- Apache common-dbcp
- C3P0
HikariCP
Before starting configuring, I want to have a quick introduction to you about HikariCP. This library is also known as the fastest connection pool library. "Fast, simple, reliable, lightweight" is four words used to describe it. The official site of HikariCP has detailed documents and explanations about the configuration so I wouldn't be going through details in this post. Here's the official site https://github.com/brettwooldridge/HikariCP
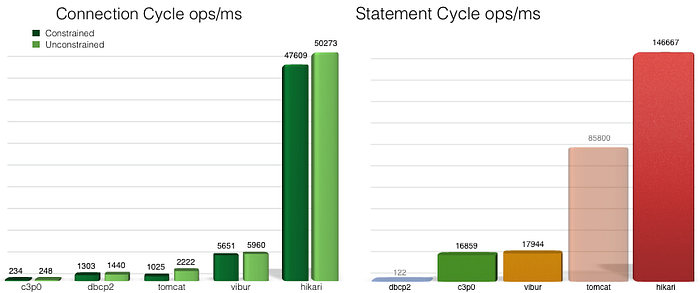
Here's the link you can clone and run the benchmark from GitHub repository
Configure HikariCP
Luckily for us, Spring Boot has been supporting HikariCP since 2.x and already has included HikariCP dependency inside it so we can configure HikariCP easily by adding a few properties. All remaining things will be done by Spring-Boot-AutoConfigure.
Look at the snippet above, you can see that I set spring.datasource.type to com.zaxxer.hikari.HikariDataSource. This setting tells Spring-Boot-AutoConfigure that. Hey guy, I need HikariCP, configure it for me with the following values. The autoconfigure looks up all the configurations of HikaricCP which starts with spring.datasource.hikari then configuring the HikariDataSource according to these configurations.
In case you do not specify any type of data-source, spring-boot autoconfigure will choose HikariCP automatically. You might wonder why it can. Let me explain. As I mentioned above, HikariCP is already included in our spring-boot application and the others are not. As a result, spring boot lookups class in the classpath and only HikariCP matched the condition. See the screenshot below to see the condition why HikariCP is chosen

Common-dbcp2
Apache common-dbcp2 is another connection pool library supported by The Apache Software Foundation. It is used in many Apache projects also. Here is the link you can read more about Common-dbcp2.
Let configure
First of all, we need to add the dependency to our project.
And now we have both common-dbcp and HikariCP on the application classpath, so which one will be chosen if you do not specify the data-source type? The answer is HikariCP. So the question is how to activate Apache common-dbcp2 to become our main connection pool.
- The first solution is that remove HikariCP from our classpath. To do this, we just add exclusion to spring-boot-starter-data-jpa. For instance, see the snippet.
- The second way is specify value for spring.datasource.type to org.apache.commons.dbcp2.BasicDataSource.
Also, Common-dbcp2 supports a ton of config for particular situations, therefore I cannot mention all of it in this post so reading official documents might help us understand and avoid misconceptions. https://commons.apache.org/proper/commons-dbcp/configuration.html
Tomcat JDBC Connection Pool
Similarly with DBCP2, in order to configure, we need to add dependency tomcat-jdbc into the application via pom.xml.
In the same way as common-dbcp2, after adding the dependency we have two options:
- Exclude HikariCP from spring-boot-starter-data-jpa or
- Specifying datasource type to org.apache.tomcat.jdbc.pool.DataSource
Above I just show you a few popular properties of tomcat-jdbc. You can find more properties at the official site of Tomcat-JDBC here.
C3P0
C3P0 is one of the most used connection pool libraries in the world of java. Unfortunately, spring-boot does not support auto-configure for it. Therefore, we have to configure it by writing lines of code.
In order to make C3P0 available in the application, we must include the dependency on pom.xml. Of course.
And now we will configure a bean called DataSource, you can configure this bean at any configuration class you want. I do it in the main class. Before adding the bean, I create a properties class to keep the configuration property for C3P0 which is marked by @Configuration
@ConfigurationProperties(prefix = "c3p0").
Setting configuration value in application.properties(you can set these values in other files).
And now we define dataSource bean. I inject the properties class as a parameter.
Now you can start your application, see the console logs and you can see some lines like
Initializing c3p0-0.9.5.5 [built 11-December-2019 22:18:33 -0800; debug? true; trace: 10]
2020-07-18 16:38:44.653  INFO 9192 --- [           main] o.s.s.concurrent.ThreadPoolTaskExecutor  : Initializing ExecutorService 'applicationTaskExecutor'
2020-07-18 16:38:44.672  INFO 9192 --- [           main] c.m.v.c.i.AbstractPoolBackedDataSource   : Initializing c3p0 pool... com.mchange.v2.c3p0.ComboPooledDataSource [ acquireIncrement -> 3, acquireRetryAttempts -> 30, acquireRetryDelay -> 1000, autoCommitOnClose -> false, automaticTestTable -> null, breakAfterAcquireFailure -> false, checkoutTimeout -> 0, connectionCustomizerClassName -> null, connectionTesterClassName -> com.mchange.v2.c3p0.impl.DefaultConnectionTester, contextClassLoaderSource -> caller, dataSourceName -> 1hgee12abqzsy4f9cii6v|39909d1a, debugUnreturnedConnectionStackTraces -> false, description -> null, driverClass -> com.mysql.cj.jdbc.Driver, extensions -> {}, factoryClassLocation -> null, forceIgnoreUnresolvedTransactions -> false, forceSynchronousCheckins -> false, forceUseNamedDriverClass -> false, identityToken -> 1hgee12abqzsy4f9cii6v|39909d1a, idleConnectionTestPeriod -> 0, initialPoolSize -> 3, jdbcUrl -> jdbc:mysql://localhost:3306/employees, maxAdministrativeTaskTime -> 0, maxConnectionAge -> 0, maxIdleTime -> 500, maxIdleTimeExcessConnections -> 0, maxPoolSize -> 20, maxStatements -> 0, maxStatementsPerConnection -> 0, minPoolSize -> 1, numHelperThreads -> 3, preferredTestQuery -> null, privilegeSpawnedThreads -> false, properties -> {password=******, user=******}, propertyCycle -> 0, statementCacheNumDeferredCloseThreads -> 0, testConnectionOnCheckin -> false, testConnectionOnCheckout -> false, unreturnedConnectionTimeout -> 0, userOverrides -> {}, usesTraditionalReflectiveProxies -> false ]
Cool.
Through this post, I have shown how we can add and configure for most popular libraries. I hope this post will be useful to you. Thanks for reading.
Call to action
I would like to invite you to register Medium Membership to read all medium articles. If you feel interested, you can register via the link below. I will earn a bit of money from Medium when you register through the referencal program. Big thanks in advance.