

However, while LeetCode offers a native editor for you to code the solution on, it was hard finding a working solution to be able to seamlessly code and submit from the terminal.
In this tutorial, I want to show you all how I managed to finally get a great working solution so you can use LeetCode from the terminal as well!

There are actually quite a few open-source projects that solve this exact problem, but many of them don't work anymore (as of September 30th, 2021), since LeetCode recently changed the way their authentication worked. After hours of digging and trying out various of them, I finally found one that works really well and is still currently maintained (though I needed to go through a few extra steps to get it working).
Installation Guide
If you are on MacOS/Linux/Ubuntu, then the instructions below will work perfectly fine. However, if you are on Windows, I highly recommend you install WSL (Windows Subsystem for Linux), as it will make the installation process much simpler. I'll link a guide here to installing WSL.
I've done it both on my Macbook and my windows computer through WSL, so I know the method below works.
Introducing: Clearloop/leetcode-cli
The open-source package that we'll be installing isclearloop/leetcode-cli. Essentially, you'll be able to run simple commands from your terminal and it will open up a text editor of your choice (vim, emacs, nano, etc.) that is prepopulated with the question, as well as commands for submitting the file directly to LeetCode.
You can check it out below on GitHub.
Note that the instructions on the README.md of the repository do not work well. This is why I have provided alternate instructions below. If they fix it, I will remove sections of the tutorial that are not relevant.
Step 1: Installing Rust
Since the project is coded in Rust, you will need to first install that programming language. To do so, go to the following link and install it. The website will automatically detect your OS and give you the appropriate command to run on your terminal:
https://www.rust-lang.org/tools/install
Step 2: Install Nightly
After you have installed Rust from the terminal, make sure to close it and reopen a new instance. Now, install Nightly with the following command (Note: specifying the 2021–05–16 version is EXTREMELY important, as the most up-to-date version will not work at the time of this writing).
rustup install nightly-2021-05-16Step 3: Install leetcode-cli
Now, on the repository, they tell you that you can simply run cargo install leetcode-cli . However, it didn't work on my end(I still got a bunch of error messages).
Instead, to make it work, we will change the Cargo.toml file. First, clone the repository by running the following command inside your terminal:
git clone https://github.com/clearloop/leetcode-cli.gitThen, go into the directory:
cd leetcode-cliWe will need to change the Cargo.toml file. Open it using the editor of your choice, I will use nano as an example:
nano Cargo.tomlUnder [dependencies], add proc-macro2="1.0.26"
It should look like this now:
[dependencies]
async-trait = "0.1.41"
tokio = "0.2.22"
clap = "2.33.0"
colored = "1.9.1"
dirs = "2.0.2"
env_logger = "0.7.1"
escaper = "0.1.0"
keyring = "0.8.0"
log = "0.4"openssl = "0.10.26"
pyo3 = { version = "0.8.5", optional = true }
rand = "0.7.2"
serde = { version = "1.0.104", features = ["derive"] }
serde_json = "1.0.44"
toml = "0.5.5"
regex = "1"
proc-macro2="1.0.26"
Then, save the file.
Finally, install the three following packages by running:
sudo apt install libssl-dev
sudo apt install libdbus-1-dev
sudo apt install libsqlite3-dev
You are now ready to install the leetcode-cli. Make sure that you are within the leetcode-cli repository from your path, and run
cargo install --path .The installation should take around 10 mins. After it is done, you can start using the leetcode command from your terminal!
Make sure to close your terminal and open up a new instance before proceeding to the next step.
Authenticating on the Leetcode-Cli
You are not quite done after installing. You now need to authenticate with your LeetCode account. This is note quite as simple as providing a username and password, as LeetCode has changed the way their authentication works through 3rd-party apps.
Open the LeetCode configuration file, found at ~/.leetcode/leetcode.tomlwith your editor of choice (using nano in this example) by running :
nano ~/.leetcode/leetcode.tomlThen under [cookies], you need to add the appropriate csrf and session strings.
On your chrome browser, paste in the following URL:
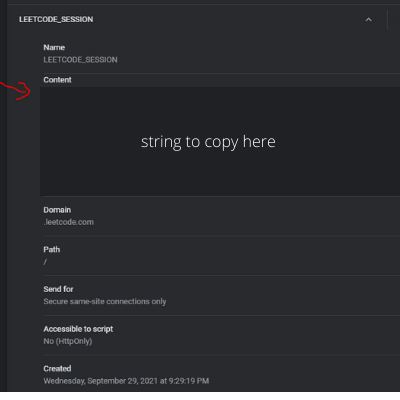
chrome://settings/cookies/detail?site=leetcode.comUndercsrftoken , copy the Content string to csrf in your configuration file, and underLEETCODE_SESSION , copy theContent string to session on your configuration file.
[cookies]
csrf = "${csrftoken}"
session = "${LEETCODE_SESSION}"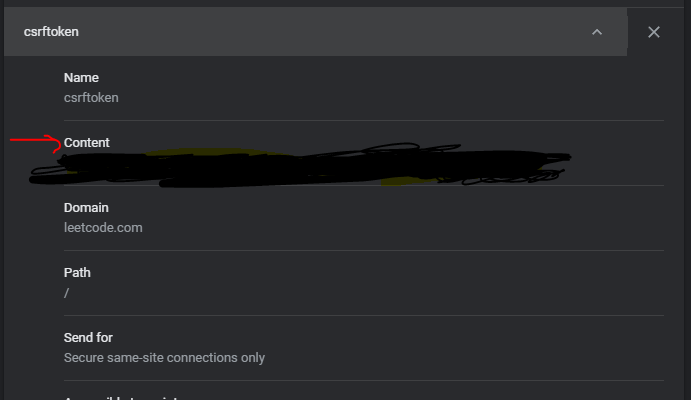
After you are done copy-pasting, save and exit the configuration file.
You should now be good to go!
A Quick Guide on the LeetCode-Cli
All this information can be found on the README.md here, but I will still do a quick rundown of the commands I use everyday.
To list all the Leetcode problems, use the leetcode list command.
To display your stats of Leetcode, run leeetcode stat .
Once you've found a problem that you want to solve, you can expand it by running
leetcode pick <leetcode-problem-number>To edit the submission file of a particular problem, you can run
leetcode edit <leetcode-problem-number>Notice that the problem file is written in a particular programming language. To change it to another language, you will need to edit the configuration file (instructions on how to do that at the end of the article).
After you've coded your solution, you can test it by running
leetcode test<leetcode-problem-number>Finally, to submit your solution, run
leetcode exec <leetcode-problem-number>It's as simple as that!
How to change the default editor and programming language of Leetcode-cli
open your configuration file, found under ~/.leetcode/leetcode.toml
Under the code section, you will be able to change it. Here are my settings (I use vim and c++)
[code]
 editor = "vim"
 lang = "cpp"
Conclusion
And that's it! You've successfully installed leetcode-cli and are now set up to code LeetCode from the terminal! I hope you found value from this tutorial, and if you did, you can give me a clap and a follow :))