1. What is a Scheduler Lock?
First, let's revisit scheduled tasks to better understand what a scheduler lock is. Scheduled tasks are routines set to run at specific times, like weekly, daily, or every 5 minutes. They work great for single-instance applications. But, when dealing with multiple instances, these tasks will run more than once. It could be a problem with events occurring multiple times. In this scenario, we can use a scheduler lock, ensuring that your scheduled task runs only once.
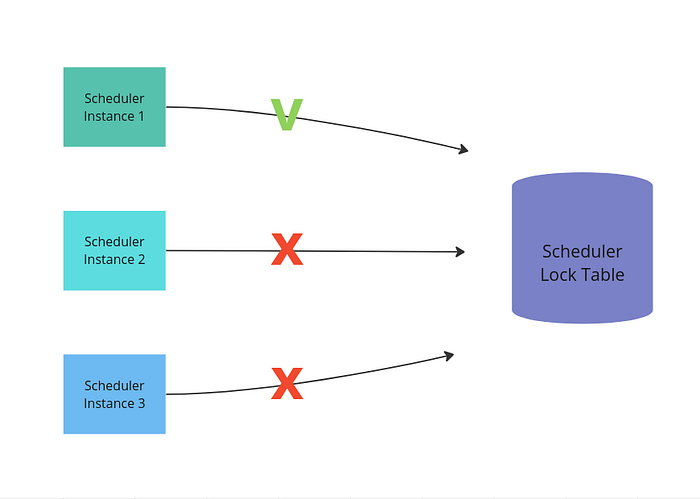
The diagram above illustrates the way a scheduler lock works. When a scheduled task starts, it ensures that only one instance of the application executes the task. The first instance that starts, temporarily locks the task's execution, preventing other instances from running the same task. We will see in this article how to implement it.
2. Start a new project with Spring Initializr
Let's start a new project using Spring Inializr. Below are the settings for our project:
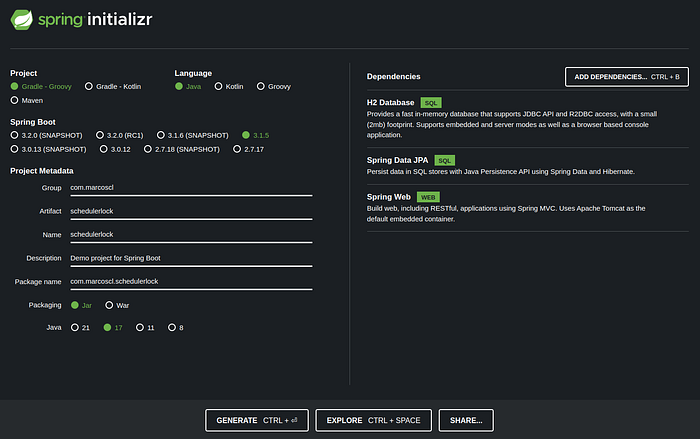
We will use the H2 Database as our database to store the information about the task lock. Ps: You are free to use a different Java version, Spring boot version, or Maven instead of Gradle.
3. Dependencies
Beyond the dependencies already included during the project's creation, we will need one more library, the Shedlock library:
Add inside the build.gradle file:
implementation 'net.javacrumbs.shedlock:shedlock-spring:5.8.0'
implementation 'net.javacrumbs.shedlock:shedlock-provider-jdbc-template:5.8.0'
If you are using Maven, then add the following in your pom.xml file:
<dependency>
    <groupId>net.javacrumbs.shedlock</groupId>
    <artifactId>shedlock-spring</artifactId>
    <version>5.8.0</version>
</dependency>
<dependency>
    <groupId>net.javacrumbs.shedlock</groupId>
    <artifactId>shedlock-provider-jdbc-template</artifactId>
    <version>5.8.0</version>
</dependency>
4. Configuration classes
Now, we should configure our class SchedulerlockApplication, application.properties, and create a new class called SchedulerlockConfig. For our SchedulerlockApplication, we have to use two annotations to enable scheduled tasks and scheduler lock:
@EnableScheduling
@EnableSchedulerLock(defaultLockAtMostFor = "PT60S")
@SpringBootApplication
public class SchedulerlockApplication {

 public static void main(String[] args) {
  SpringApplication.run(SchedulerlockApplication.class, args);
 }

}
The parameter defaultLockAtMostFor provides a default limit of time to lock our tasks, but we can override it in the task's declaration.
We have to create our SchedulerlockConfig class, which will provide a database bean for the scheduler lock:
@Configuration
public class SchedulerlockConfig {
    @Bean
    public LockProvider lockProvider(DataSource dataSource) {
        return new JdbcTemplateLockProvider(dataSource);
    }
}
5. Database settings
After configuring the classes, now we have to set up our database. Then, first, add in our applications.properties the H2 settings:
spring.datasource.username=sa
spring.datasource.url=jdbc:h2:mem:mydb
spring.datasource.driverClassName=org.h2.Driver
spring.datasource.password=password
spring.h2.console.enabled=true
spring.h2.console.settings.web-allow-others=true
spring.jpa.database-platform=org.hibernate.dialect.H2Dialect
the settings spring.datasource provides the information to access the H2 database.
spring.h2.console.enabled: allows access h2 console through a browser.
spring.h2.console.settings.web-allow-others: allows access to h2 console when the application is running inside a container.
If you are using an application.yml file instead of an application.properties, then use the following settings:
spring:
  datasource:
    username: sa
    url: jdbc:h2:mem:mydb
    driverClassName: org.h2.Driver
    password: password
  h2:
    console:
      enabled: 'true'
      settings:
        web-allow-others: 'true'
  jpa:
    database-platform: org.hibernate.dialect.H2Dialect
Lastly, create a new file called schema.sql inside the folder resources. This file contains the script to create the default shedlock table, this table will provide the information if a task is locked or not:
CREATE TABLE IF NOT EXISTS shedlock (
name VARCHAR(64),
lock_until TIMESTAMP(3) NULL,
locked_at TIMESTAMP(3) NULL,
locked_by VARCHAR(255),
PRIMARY KEY (name)
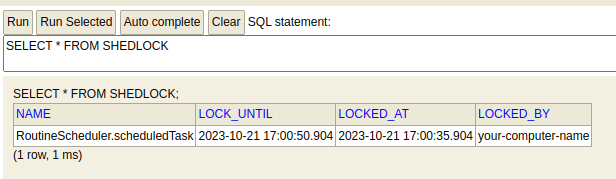
);We will use the default names, but, if you want, you can change the default names through the Shedlock configuration, for more information read the lib docs. the column name is unique and indicates the name of the task.
lock_until: indicate the maximum time the task will be locked.
locked_at: the moment the task was locked.
locked_by: name of the instance that locked the task, here will appear your computer name or container ID (we can configure to show a customized name too, see the docs).
6. Create a Scheduler Task class
Finally, let's create our scheduler. For this, we have to create a new class called RoutineScheduler and a scheduledTask method:
@Component
public class RoutineScheduler {

    @Scheduled(fixedRateString = "15", timeUnit = TimeUnit.SECONDS)
    @SchedulerLock(name = "RoutineScheduler.scheduledTask", lockAtLeastFor = "PT15S", lockAtMostFor = "PT30S")
    public void scheduledTask() {
        System.out.println("Scheduler open: " + LocalDateTime.now());
    }
}
Scheduled annotation: indicates a method is a task that will run repeatedly. Here we are informing that our task will run every 15 seconds. We can alter the time unit, and we can use other ways to inform the time interval, like crons.
SchedulerLock annotation: indicates a scheduled task that should be locked. name: indicates the name of the task, the name has to be unique, in general, the class name plus the method name is enough to ensure this. The name is used to lock the task, it is not allowed tasks with the same name running at the same time.
lockAtLeastFor: indicates the minimum time the task will be locked, here we are using the ISO 8601 date pattern.
lockAtMostFor: indicates the maximum time the task should be maintained locked in the case the application dies, if this parameter is not informed here, it will be used the parameter informed in the annotation EnableSchedulerLock(defaultLockAtMostFor = "PT60S")
7. Run the application
Run your application using your IDE or terminal. After this, access your h2 console through the browser: http://localhost:8080/h2-console/ You will see the following:
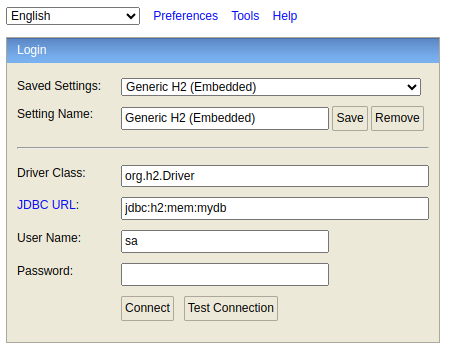
Type the password: password. Then access the shedlock table (if not appearing the other settings, then copy from the application.properties):
8. Conclusion and next steps
In this article, we learned how to implement a scheduler lock using the Shedlock spring. In the next article we will do the same, but using a Postgresql database and running three instances of the same application to see which instance will lock the task.
The source code is available on my GitHub.