
iOS17 brought a lot of amazing new SwiftUI features to us developer. One of the coolest is definitely the ability to perform an incredible powerful drag and drop inside your apps. In this article we will see how to implement it.
As usually, you can find all the code and the downloadable PDF version of this article in my Patreon page. Subscribe and support me if you like.
Download Beezly. On AppStore

https://apps.apple.com/en/app/beezly-family/id6499353470
The Final Result
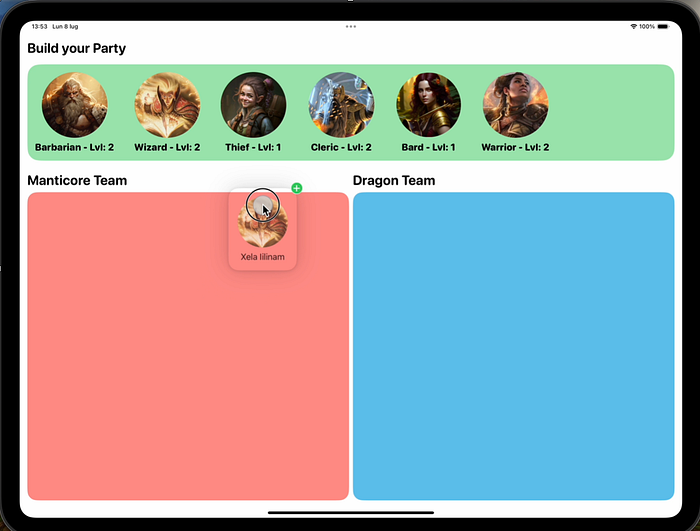
Let's start from the end (clever uh?) and let's see the resulting app that we will have once our job will be done, to understand the power of this tool:
As you can see we have a list of items shown with a character view that can be dragged around and added or removed to other lists. The character view in the top list will be different from the one shown in the two team lists and different from the one shown in the drag and drop phase.
The new SwiftUI apis make this very very easy.
As you can see we have a list of items shown with a view that can be dragged around and added or remove to other lists changing the final presentation view.
The new SwiftUI apis make this very very easy.
The Basic App
First of all I would like to show you the starting app that I coded. I imaged something to create a list of heroes to battle in a rpgish game. You have a list of characters and you need to create two squads with them.

As you can see, at the top, there is a view for selecting characters. Once a character is selected, you can drag and drop he/she into one of the two teams. For now, the heroes will not be removed from one list and added to another. We will implement this feature later once the drag and drop mechanism is created.
Since this is not a tutorial for simple SwiftUI views I will go fast on the building of the UI.
Let's take a look at the code first:
First thing first, let's create at the Character model:
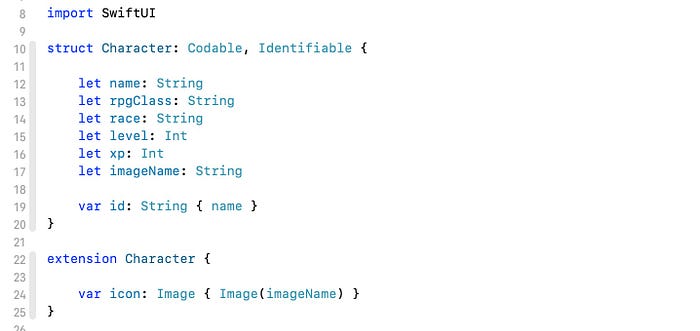
The characters will be shown in a list so the model must conform to the Identifiable protocol. For the sake of simplicity I returned the name of the character as id.
I have also added an extension where I have created some static vars with a list of premade characters to help me with the preview.
Here is an example:

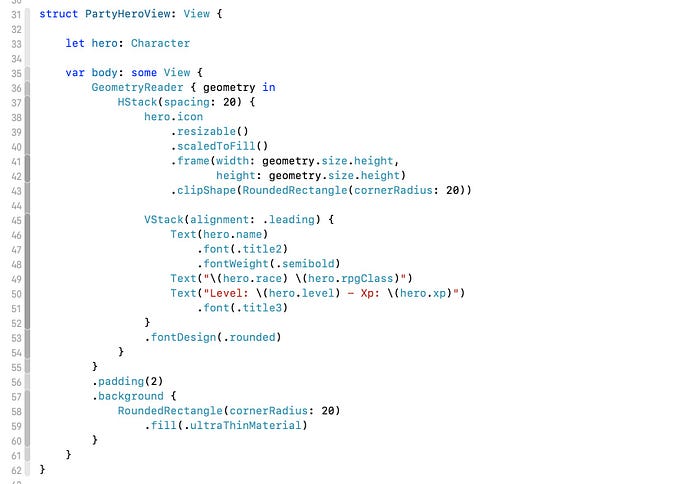
Step two. The Character view. The one that you can see in the horizontal scrollView on the top selector.

Step three. The Character view in the team container. The one that you see inside the two teams (Manticore and Dragon) vertical columns.
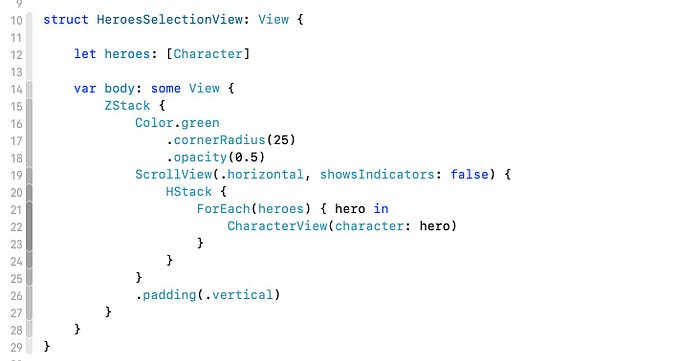
Step four. The Horizontal scrolling selector:
Step five. The generic Team container:

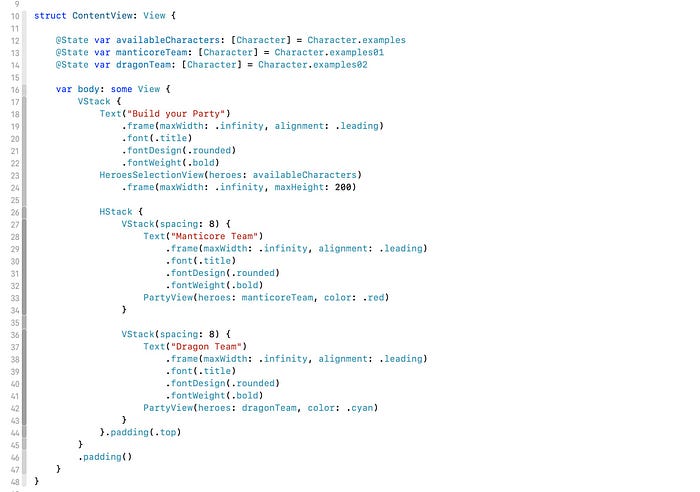
And finally, put it all together in the ContentView:
Very good. Once the basic UI is done, it is time to work on the new stuff but first…
The Custom Uniform Type
In order to drag and drop an item, we need to make it conform to a new Foundation protocol the Transferable protocol. By definition this is
…a protocol that describes how a type interacts with transport APIs such as drag and drop or copy and paste…
Or more simply the type of the representation used to import and export the item. Anyway just adding the protocol to our model in not enough. The model will need to implement the transferRepresentation static var, but in order to do so, we need to do one more thing: creating a custom Uniform Type Identifier.
First of all we need to create a new UUType, let's give a small definition.
In Swift, UTType (Uniform Type Identifier) is a structure provided by the Uniform Type Identifiers framework, which is part of the Core Services framework. It is used to represent the type of data and files in a standardized way across macOS, iOS, watchOS, and tvOS. This allows for a consistent way to handle various types of data, such as images, documents, audio, and more.
UTType provides a way to:
- Identify the type of data using a standardized identifier.
- Query the properties and relationships of types.
- Determine type conformity and hierarchy (e.g., checking if a type is a kind of another type).
Basically it is a structure that represents a type of data to load, send, or receive… it is what you would do if you wanted to create a special extension for the files used in your app.
In our case we will not export/import a file but we will use it to transfer the model between views.
Let's add a little extension:

Please note that you need to change the text in exportedAs with the bundle identifier of your app. This is needed to let other Apps understand who is the source of the data you are importing. Even if we will not export models to other apps, this step is required.
Very well, we have created our new extension called rpgCharacter.
If you wan to know more about uniform Type Identifier, take a look at this WWDC video:
Now we have to update our Info.plist in order to use our custom UUType.
To do that, go on Project -> Targets -> Info and select Exported Type Identifier and create a new one:

Since we are using custom objects, we need to to fill the field Conforms to with the value:
com.public.data
Everything is explained with more details in the video linked before, if you are really curious abut that.
If otherwise we had to import an object from another application via drag and drop or copy and paste, we would have created an Imported Type Identifier and filled in the relevant fields. But that is not our case.
The Transferable Protocol
In Swift, the Transferable protocol is part of the Uniform Type Identifiers framework, which is used to represent data that can be transferred between different parts of an app or between apps, such as through drag and drop or copy and paste operations. This protocol allows you to define how data is encoded, decoded, and represented during transfer.
In order to enable the drag and drop feature for an object, its model must conform to the Transferable protocol. It basically tells the views how to encode/decode and an object.
The first step is adding the protocol conformance to our Character model.
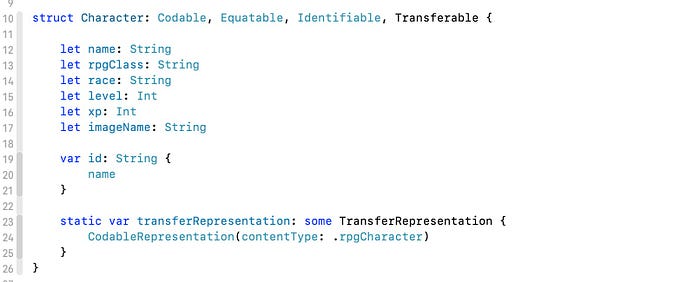
The protocol requires just the static var transferRepresentation.
In order to implement it, we must return a TransferRepresentation object. There are a bunch of ways to do that, but since our object is a Codable one, we can use the CodableRepresentation init. Please note the contentType that is the UUType we have created.
Sometimes you could use a premade contentType. Use the dot notation autocomplete to check if there is anything that fits with your object (the list is endless…):

Note also that the model now conforms the Equatable protocol… we will see later why.
The Draggable Modifier
Very well, our model is ready to be transferred between views. We must now update the views to accept it.
We need two things now, a source view and a destination view.
The source role is done adding a special modifier to views: .draggable
This is the definition in Swift:

We can see two parameters: a generics, the Transferable object, and a preview view.
The Transferable object is pretty self explanatory being the object we want to move. The preview instead is a view that will appear under the user's finger in the drag phase. This is a UX trick to let us understand that something is moving.
Let's update our HeroSelectionView, the selector on the top of the screen, adding the modifier:
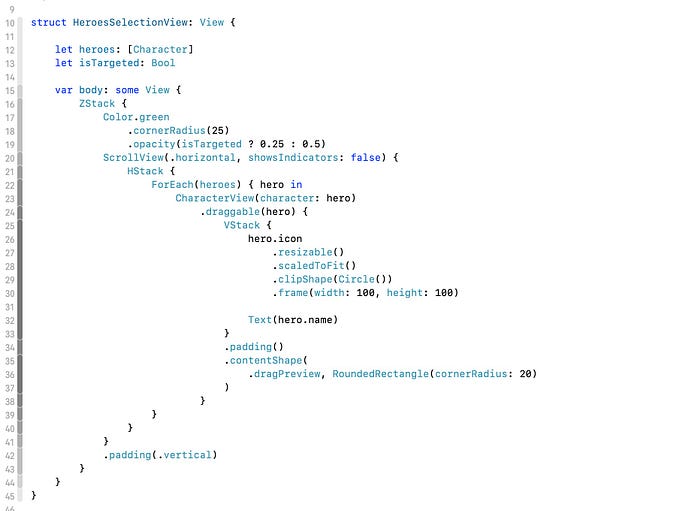
In the preview closure of the .draggable modifier I have added a View, the VStack stuff… The main parameter instead is the Transferable object, the Character hero itself.
You can move a Character from the HeroSelectionView to the PartyView and viceversa. You are clever enough to understand that the PartyView needs a .draggable modifier too.
Let's use the similar code:

Please note that in both view I have also added a isTargeted variable. Note that its value changes the opacity color of the views. Later we will see that it will be used to highlight a destination view when the object is hovering it. Basically it will say to the user "yes, you can drop you item to me!".
The Drop Destination Modifier
We have our source, we now need a destination view for our objects.
SwiftUI comes with a handy modifier:

It comes with a generic for our Transferable item and two closures: action and isTargeted
The action one has two output parameters: an array of Transferable items (you could drap and drop more than one item) and a location CGPoint if you need super precision for your drop phase (99% of the time you will not need it.).
In the action closure we will add all the logic to add and remove items from the lists (in our app, the available characters and the two teams). Please note that this closure must return a bool value that will decide if you can add the item in the related collection. You would need to add some logics that enable/disable the drop after the drag (ie: no more that one Warrior in you party). The value of the bool will eventually also add a plus icon on the dragged item.
The isTargeted closure will handle all the UI/UX logic concerning the whole drag phase. As we have seen before we will update some variables when the user is hovering over the view with the selected character.
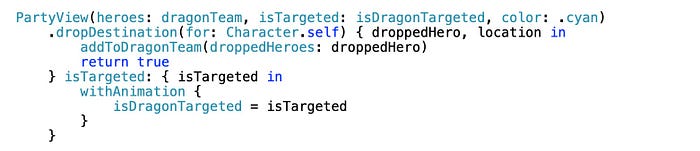
Enough talk, let's add some code starting with the PartyView (one of the main areas for the teams):
On ContentView struct modify the first team area:

Let's take a look at the .dropDestination modifier:
The main parameter is the object type, the Character.self.
The action closure simply adds the dropped hero in the team. The addToManticoreTeam function adds the item in the team, removing duplicates (remember the Equatable stuff?). That's important because the drag and drop SwiftUI procedure do not moves the item bud creates a copy. So if you do not remove duplicates it will end up with a series of clones. Sometimes you may need it but this is not our case.
Finally the isTargeted closure updates the value of a property… you can see that its used with the partyView itself as stated before.
Something similar was made with the other team view:
…and of course on the HeroesSelectionView:
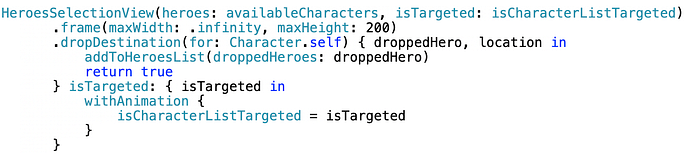
As said before I have also added three state variables to track the targeted state:

That's done! Our drag and drop is completed and working!
Conclusions
In this article, we have seen that by taking small, incremental steps, you can harness the power of SwiftUI to implement sophisticated and visually appealing drag and drop functionality. This approach not only simplifies the development process but also allows for the gradual enhancement of your app's interactivity and user experience. With careful attention to detail and a focus on seamless integration, you can create an advanced, polished feature that delights users and showcases the capabilities of modern iOS development. By building on these foundations, the possibilities for creating intuitive and engaging user interfaces are virtually limitless.
I hope you liked this article, if you did please clap it and consider to support me in my Patreon page, where you can find the full project of the code of this article, and download it in PDF.
If you are interested in learning more, a lot more about views in SwiftUI, I strongly suggest to take a look at this great interactive book:
Do you want to take a loot at my Apps? http://www.appstore.com/alessandromanilii
Download Beezly. On AppStore
https://apps.apple.com/en/app/beezly-family/id6499353470
Enjoy your coding!