

React (also known as React.js or ReactJS) is one of the most popular Javascript libraries created by Facebook. It differs from other libraries as it offers a unique component structure. These components are the building blocks of the application. In other words, components are the different parts of a website. React is known for making the process of creating strong user interfaces much easier for engineering teams particularly for large applications. Whether you are a beginner or a seasoned developer, React can be relatively easy to pick up.
Material.UI is a user interface library based on Google's Material Design. It is simply a set of components that have already been styled with Google's Material Design. Essentially, we are bringing Google's Material Design to our React app. It's also React's most popular UI package. Using Material.UI in addition to React creates a powerful combination where you have a fast, scalable, and easily and consistently stylized web application. Global companies such as Uniqlo and Scale.AI have been stated to use Material.UI. Check out Material UI's Showcase to see other examples.
The Image Grid
In this post, we will build a gallery web app (also known as an image grid) in three steps. This is particularly valuable for e-commerce websites, directories, portfolios, blogs, etc. It's an easy way to have media card components that allow you to showcase products, individuals, images, and illustrations.
If you'd like to see the source code on Github and demo of this project, you can access it here: demo | source code
Let's Get Started! 🚀
The Set-Up and Prerequisites:
- Install npm on your computer.
- Install the latest version of Node.js or higher on your computer
- Open your favorite text editor (IDE) such as Visual Studio Code to build our project.
- Basic understanding of HTML, CSS, Javascript, JSX, and the Terminal. If you need a React refresher, I'd recommend this list of free courses.
Step 1 — Create React App
We will begin by creating the initial app. It is extremely simple and we only need a few lines of code. Assuming npm is installed on your computer, run the following commands. We can do this by opening up the Terminal in Visual Studio Code.
npx create-react-app grid-app
cd grid-app
npm start
This should automatically open a web page. If this doesn't happen, type http://localhost:3000/ in your URL bar.

In only a few minutes, we now have a starter React app as a single webpage! This is a great jumping point where we can customize what's been given to build solutions to our needs!
For more information on create-react-app, click this link.
Step 2 — Adding Materials.UI to our React App
The next step is to install Material.UI which again takes a few lines of code.
npm install @material-ui/core — save
npm install -s @material-ui/icons
And we're done!
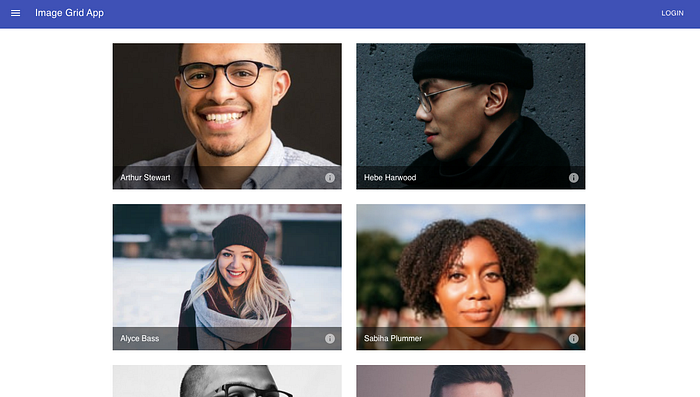
Step 3 — Navigation Bar
Go to the src folder and open up app.js. Delete the entire function. You can also delete the logo.svg and "import logo from './logo.svg'". Now you should only have…
import React from 'react'
import './App.css';
export default App;
Let's add our Navigation Bar. Basing our code from the Material.UI's documentation, we will be making a simple app bar.
We will start by importing the necessary components from Material.UI. We will apply the style, add the menu icon button, add text, and add the login button.
Step 4 — Tiles with Grid Layout
Let's organize and space out our image cards by adding a responsive grid layout.
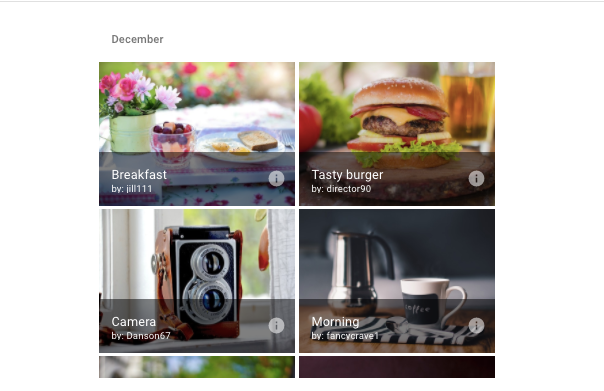
Grid list with title bars
This example demonstrates the use of the GridListTileBar to add an overlay to each GridListTile. The overlay can accommodate a title, subtitle and secondary action - in this example an IconButton. We can name this file Cards.js.
Step 5— Creating the Tile Data File
Let's customize it further — adding images.
We will create a file titled titleData.js. This file is imported into the Cards.js file since we are importing the images into the responsive grid formatted set of cards.
Step 6— App.js and Deploying It
Now, we can import all of our components in App.js and export out the final app.
Conclusion
Creating a new repository in Github, I pushed the React code from my local machine to this new repo. Using the commands "npm build" and "public" folder, I deployed and hosted the site on Netlify. If you prefer a different platform to deploy your React and Material.UI site, you can check out the official react documentation on deployment for your web application.
To see the demo, click here.
Thanks for reading! 👋