
Everyone needs assistants that understand their workflows, styles, and preferred tools. That's where personalized AI comes in. Whether you're writing Python scripts, configuring networks, or reviewing code, a custom assistant can make your work easier.
In this blog, we'll walk through how we used Continue.dev with the Gemini API to create a simple but powerful assistant inside our coding environment. This setup works well for us — but there are other great tools and APIs out there too. The main goal is to show how anyone can build their own assistant that fits into their workflow.
Generic chatbots and tools can only go so far. Developers often need help with very specific tasks — like explaining unfamiliar code, generating router configs, or debugging Python scripts. A custom assistant lets you define behavior, context, and response style, making it more useful for your actual work. We found that combining a flexible platform like Continue with a smart API like Gemini gave us just that.
Continue.dev is a tool that brings AI into your IDE. It sits alongside your code and responds as you type, edit, or debug. You can use it with editors like VS Code or JetBrains, and it supports various AI models like OpenAI, Gemini, and Claude. It stays out of your way but is always there when you need help.
Gemini is a solid choice for building smart assistants because it handles text and other formats (like images), thinks in real time, and is easy to connect to different apps. Also, its free tier is good enough for testing or personal projects. That made it a simple pick for our experiments, but it's just one option — plenty of other APIs work well too.
First, go to Continue.dev and sign up using your GitHub or Google account. Then install the Continue extension in your IDE (VS Code or JetBrains). Once that's done, you're ready to create your assistant.
To use Gemini, you'll need an API key from Google Cloud:
1. Go to the Google AI Studio Console.
2. Create a new project.
3. Open the API Library and enable the Gemini API.
4. Go to "Credentials" and generate an API key.
5. Copy it and keep it safe.
You'll add this key to your assistant configuration later.

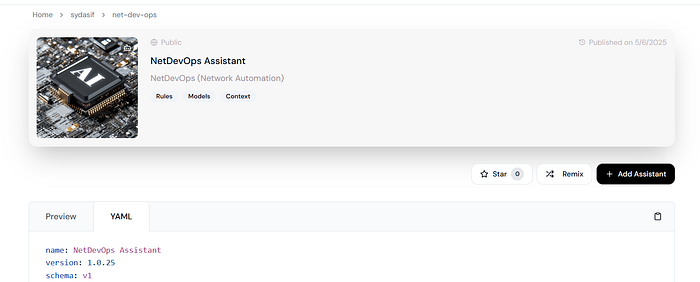
Now comes the fun part — making your assistant. You do this using a YAML or JSON file that tells Continue how your assistant should behave, which models it should use, and what kind of context it should understand.
Here's an example setup we used:
name: NetDevOps Assistant
version: 1.0.0
schema: v1
models:
  - uses: ollama/qwen2.5-coder-1.5b
    override:
      roles:
        - autocomplete
  - uses: google/gemini-2.5-pro
    with:
      GEMINI_API_KEY: ${{ secrets.GEMINI_API_KEY }}
  - uses: google/gemini-2.0-flash
    with:
      GEMINI_API_KEY: ${{ secrets.GEMINI_API_KEY }}
context:
  - uses: continuedev/code-context
  - uses: continuedev/terminal-context
  - uses: continuedev/file-context
  - uses: continuedev/current-file-context
rules:
  - uses: sydasif/automation
This assistant helps with NetDevOps tasks like generating configurations and analyzing network scripts. You can create assistants for other things — like code review, documentation help, or explaining APIs — by changing the context and rules.
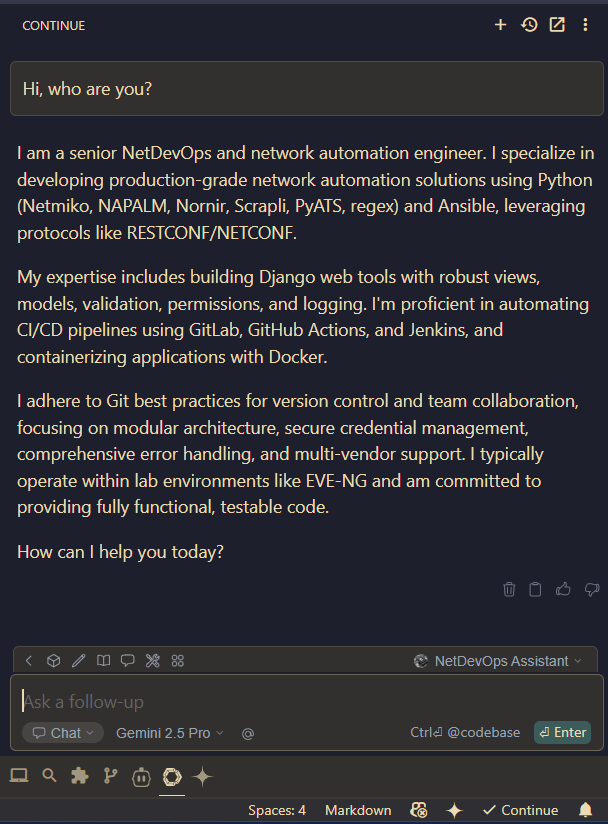
Once your assistant is active in your IDE, try it out. Ask questions, give it tasks, and see how it responds. If it doesn't quite get it right, adjust your **rules** block. Maybe you need more context or different instructions. The process is simple: test, tweak, repeat.
Some tips:
- Keep your instructions clear.
- Use consistent naming.
- Add examples of good responses.
- Make sure context sources (like terminal or file) are enabled.
We've used the Gemini API along with the Continue extension to create our custom assistants. This setup works well for us, but there are many tools available, and what you choose depends on your needs. The most important part is taking control — building assistants that match how *you* work. Whether you write code, manage networks, or document APIs, a small amount of effort can lead to big productivity gains.