
If you've been reading about workflow automation and thinking "this sounds useful but complicated," I get it. Most automation tutorials either assume you're already technical or they oversimplify to the point of being useless.
This tutorial is different. We're going to build something real that you can actually use — a workflow that captures Google Form responses and automatically sends them to Slack. No prior experience required. No coding necessary (unless you want to).
By the end of this 15-minute tutorial, you'll understand how automation actually works, not just how to copy someone else's template.
What We're Building
The scenario: You have a Google Form collecting feedback, signups, requests, whatever. Right now, you probably check it manually, copy responses, and paste them into Slack to notify your team. Maybe you also log them in a spreadsheet.
What we're automating: The moment someone submits your form, n8n will automatically send the response to your Slack channel and (optionally) log it in Google Sheets. No checking. No copying. No pasting. It just happens.
Why this is useful: This exact pattern of "when X happens, do Y and Z automatically" is the foundation of basically every workflow automation. Master this, and you can build way more complex stuff.
What You'll Need
Before we start, grab these:
- An n8n instance — You have two options here:
- Cloud (Easiest for beginners): Sign up for n8n's cloud service at n8n.io. They offer a free tier to get started, and you can upgrade as needed. This is the fastest way to begin — no technical setup required.
- Self-hosted (More control, requires setup): If you prefer to run n8n on your own infrastructure, you can follow this guide on self-hosting n8n using Docker. Fair warning: this involves Docker, command line work, and server management. I'll be publishing a detailed tutorial on self-hosting n8n soon, but if you're brand new to automation, I'd recommend starting with the cloud version and migrating later if needed.
- A Google Form (or create one for testing)
- A Slack workspace where you can add integrations (if you're not an admin, you might need permission)
Don't worry about having the "right" form or the "perfect" use case. We're learning the mechanics here. You can apply this to your real work later.
A note on timing: This tutorial is designed to take 15 minutes once you're set up, but if this is your first time connecting Google Sheets or Slack to an automation tool, the credential setup steps might take an additional 10–15 minutes. That's completely normal. The authentication process involves clicking through permissions and copying tokens — it's not complicated, just a bit tedious the first time. Once your credentials are saved, you won't need to do this again for future workflows.
Step 1: Set Up Your Google Form (3 minutes)
If you haven't already, let's create your test form from scratch:
- Go to forms.google.com
- Click the "+" to create a new form
- Give it a name: "Automation Test Form" or whatever you prefer
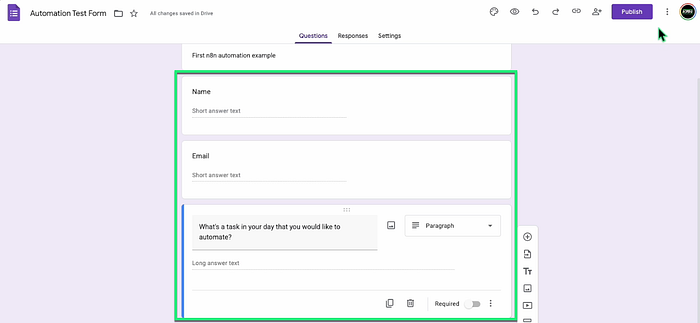
4. Add these fields (keep it simple):
- Name (short answer)
- Email (short answer)
- Question: "What's your biggest automation challenge?" (paragraph)
5. In the Form editor, click the "Responses" tab at the top
6. Click the green Google Sheets icon to link the form to a new spreadsheet
7. Select "create a new spreadsheet" and click "create" button.

8. Click "Share" in the top right and grab the link. you'll need this for testing
Don't overthink the form content. We're testing the automation mechanics, not collecting real data yet.
Detail: The Sheet's tab name will be used in n8n. If you haven't changed it, the name is likely "Form Responses 1".
Step 2: Set Up Your Slack App Scopes (3 minutes)
To avoid the "Problem activating workflow" error, your Slack App needs specific permissions (scopes) and must be installed properly.
- Visit the Slack API dashboard and create a new App (select "From scratch" when prompted).
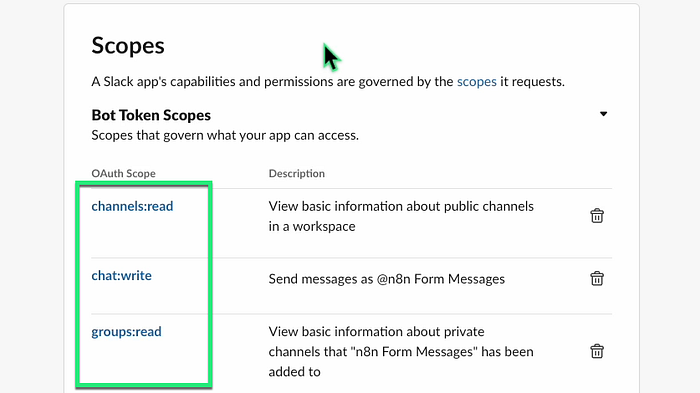
- In the left sidebar, go to OAuth & Permissions.
- Scroll down to Scopes and add the following Bot Token Scopes:
- channels:read (Allows reading channel information for channel selection)
- groups:read (Allows reading private channel information)
- chat:write (Allows the bot to send messages)
4. Scroll back to the top of the OAuth & Permissions page and click "Install App to Workspace" (or "Reinstall App" if you've done this before) to activate the new scopes.
Step 3: Create Your n8n Workflow & Trigger (4 minutes)
Now let's build the actual automation:
- Log into n8n at n8n.io (or sign up if you haven't)
- Click "New Workflow" in the top right
- You'll see a blank canvas with a single 'Add first step'" blank node
Understanding the canvas: This is where you build. Each box (called a "node") does one thing. You connect nodes together to create a workflow. Data flows from left to right.
Add your trigger:
- Click the "+" button on the canvas
- In the search box, type "Google Sheets"
- Select "Google Sheets Trigger"

4. You'll see a configuration panel open on the right
Note: We're using the Google Sheets Trigger instead of the Google Forms Trigger because the direct Forms trigger is deprecated.
Connect your Google account:
- Click "Connect Account" (or the credential dropdown if you see it)
- Click "Create New Credential"
- You'll need Google to authorize n8n — setup the permissions
- Once authorized, you're back in n8n
Note: If this is your first time connecting Google Sheets to n8n, follow the authentication guide in the n8n documentation to set up OAuth2 credentials. Ensure the account owns the spreadsheet.
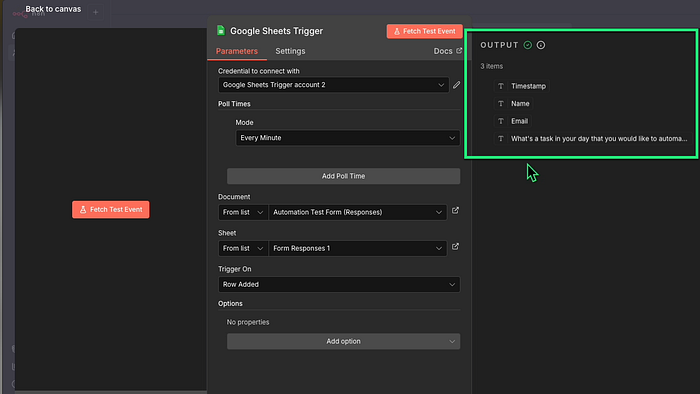
Configure the trigger:
- Trigger On: Set to "Row Added"
- Document: Select your "Automation Test Form (Responses)" spreadsheet
- Sheet: Select "Form Responses 1" (or whatever your tab is named)
- Leave everything else as default

What just happened: You told n8n "watch this specific Google Sheet and capture any new rows added." The trigger is now waiting.
Important: Keep this browser tab open. We need to test the trigger before moving forward.
Step 3.5: Test Your Trigger (2 minutes)
Before we build the rest, let's make sure n8n is actually seeing your form submissions:
- Open your Google Form link in a new browser tab
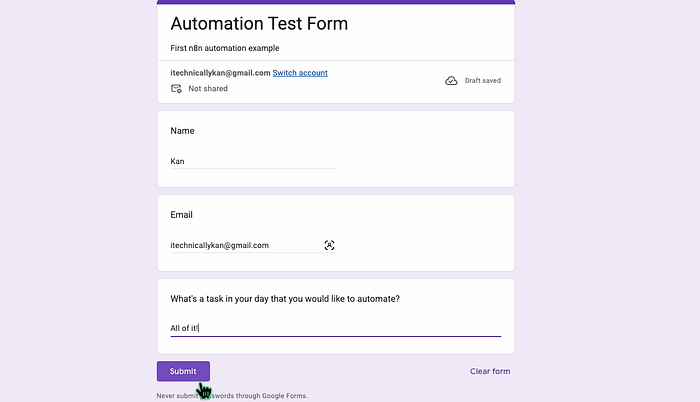
- Fill it out with test data:
- Name: "Test User"
- Email: "test@example.com"
- Answer: "I want to automate everything"
3. Click "Submit"
4. Go back to your n8n tab
5. Look at your Google Sheets Trigger node — you should see data appear in the output section below it
What you're looking at: That's the actual data n8n captured from your form submission. You'll see field names and the values you entered. This data is now available to use in the next steps.
If you don't see data:
- Make sure you clicked "Fetch Test Event"
- Try submitting the form again
- Check that you selected the correct form in the dropdown
- Verify your Google account connected properly
Once you see the data, you're golden. This is the hardest part, and you just did it.
Step 4: Send to Slack (5 minutes)
Now let's do something useful with that form data — send it to Slack automatically.
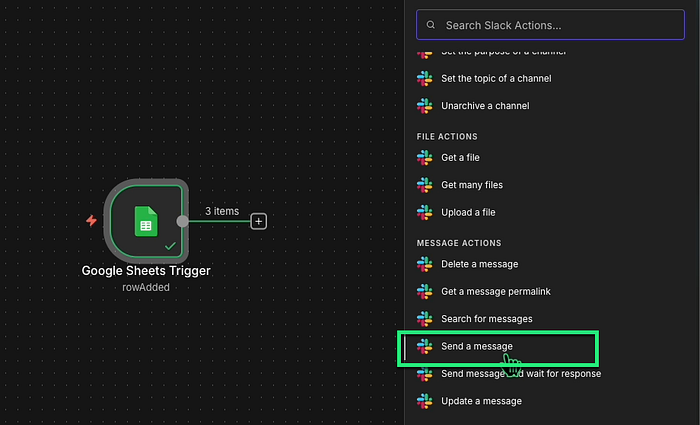
Add the Slack node:
- Hover over the right side of your Google Sheets Trigger node
- Click the "+" button that appears
- Search for "Slack"
- Select "Send a message"
Connect your Slack account:
- Click "Connect Account" in the credential section
- Click "Create New Credential"
- You'll need to have Slack authorize n8n
- Select your workspace and click "Allow"
- Once done go back to n8n with Slack connected
When prompted, you'll need to provide your Bot User OAuth Token (the one starting with xoxb-) from your Slack App's OAuth & Permissions page. If you need help finding this token, check the n8n Slack node documentation for step-by-step guidance.
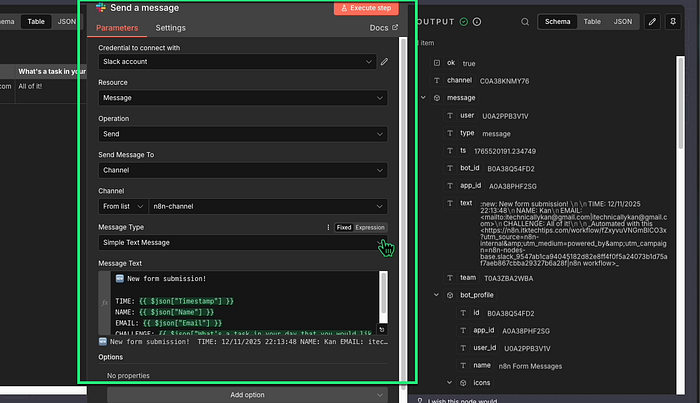
Configure the message:
- Resource: Should already be set to "Message"
- Operation: Should already be set to "Post"
- Channel: Click the dropdown and select where you want messages to go
- If you don't see your desired channel, try typing #channel-name
- For testing, your personal DM with yourself works fine
Message Text — Mapping form data:
This is where it gets interesting.
- Click in the message text box.
You'll notice a small icon that lets you insert data from previous nodes. Here's a template you can use:
🆕 New form submission!

*Name:* {{$json["Name"]}}
*Email:* {{$json["Email"]}}
*Challenge:* {{$json["What's your biggest automation challenge?"]}}
Important: The field names inside the {{}} need to match what Google Sheets calls them. Look at the output from your trigger node to see the exact field names. They might be something like {{$json["What's a task in your day that you would like to automate?"]}} if that's your literal question text.
Quick tip: You can format Slack messages with:
- *bold* for bold text
- _italic_ for italics
- Emojis like 🆕 ✅ 🎯 work great for visual interest
Test it:
- Go back to the workflow canvas and click "Execute workflow"
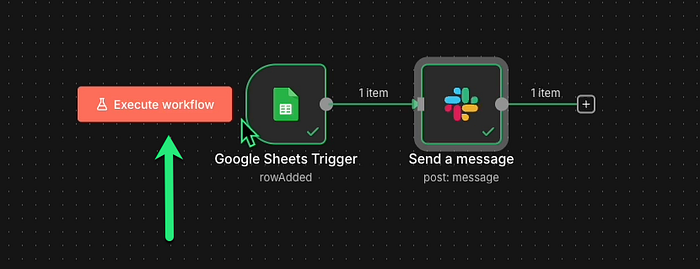
2. Check your Slack channel — you should see your test message appear
3. Open your Google Sheet — you should see a new row with your test data
If it worked, you now have two automations running from one trigger!
If the test fails:
- Check that you have permission to post in that channel
- Verify the field names in your {{}} expressions match the trigger output
- Make sure you're using the right syntax: {{$json["field_name"]}}
Step 6: Invite the Bot and Activate (2 minutes)
The final activation sometimes fails with an error like: "not_in_channel". This is solved by inviting the bot directly in Slack.
Invite the Bot in Slack (Crucial Step):
- Open your Slack channel (e.g., n8n-channel)
Type the command to invite your bot (which is named @n8n Form Messages in your setup):
2. /invite @n8n Form Messages
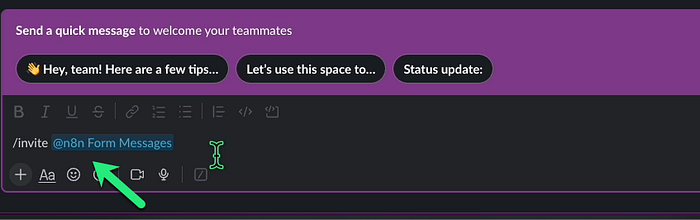
3. Hit Enter. You must see a confirmation that the bot has joined.
Activate the Workflow:
- Go back to n8n
- Save your workflow (Ctrl+S or Cmd+S)
- Look at the top right corner of the screen
- Find the toggle that says "Inactive"
- Click it to switch to "Active"
- You'll see the toggle turn green
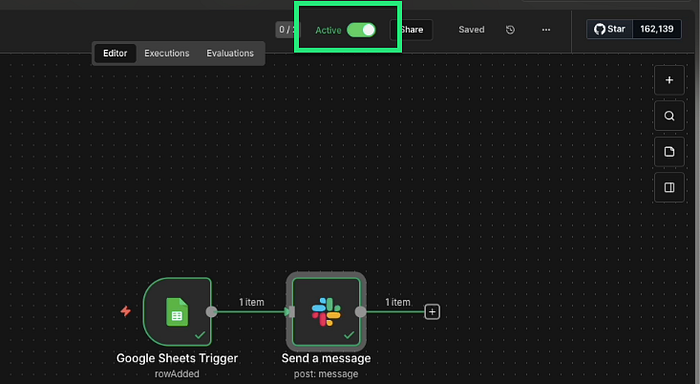
Your workflow is now live!
Step 7: Test Live (2 minutes)
Everything's working in test mode. Now let's make it live:
Test it for real:
- Open your Google Form in a new tab
- Submit a completely new response (use different test data)
- Within seconds, check:
- Your Slack channel — new message should appear
- Your Google Sheet — new row should be added
If it works, you're done. You just built a real automation that's running right now.
What You Just Learned (And Why It Matters)
Let's break down what you actually did here:
1. Triggers vs. Actions
- Trigger: The "when this happens" part (form submission)
- Action: The "do this" part (send to Slack, log to sheet)
- Every workflow starts with a trigger and has one or more actions
2. Data flow
- Data from the trigger (form fields) becomes available to all subsequent nodes
- You map that data using {{$json.field_name}} expressions
- The same data can go to multiple places
3. Testing before going live
- Always test individual steps before activating
- Use test data so you're not polluting real systems
- The "Test step" button is your friend
This same pattern scales infinitely. Replace "Google Forms" with "new customer order" and "Slack/Sheets" with "update inventory, send email, create invoice, notify warehouse" — same mechanics, different nodes.
Troubleshooting Common Issues
"My trigger isn't capturing form submissions"
- Verify the workflow is "Active" (toggle in top right)
- Check you selected the correct form in the trigger settings
- Try disconnecting and reconnecting your Google account
- Make sure the form is actually receiving submissions (check Google Forms directly)
"Slack messages aren't sending"
- Confirm you have permission to post in that channel
- Check for typos in your {{$json.field}} expressions
- Try sending to your personal DM first to isolate permission issues
- Review the execution log (click "Executions" in the left sidebar)
"Field names don't match"
- Click on your trigger node and examine the output data structure
- The names inside {{}} must match exactly what Google Forms provides
- Sometimes Google uses the full question text as the field name
- Use the expression editor to see all available fields
"Google Sheets is adding blank rows"
- Make sure you're mapping to the correct columns
- Check that your expressions are pulling data (not empty)
- Verify the sheet name matches exactly (case-sensitive)
"Everything worked in test mode but not when live"
- Check the executions panel to see if workflows are running
- Look for error messages in failed executions
- Sometimes credentials expire — try reconnecting accounts
- Verify the trigger is set to "Active" not just the workflow
Next Steps: Where to Go From Here
You've built your first automation. Here's how to build on this foundation:
Immediate modifications to try:
- Add conditional logic: Only send to Slack if a certain field contains specific text
- Format differently: Make your Slack messages fancier with blocks and formatting
- Add email notifications: Use the Gmail node to send confirmations to form submitters
- Create different paths: Send responses to different Slack channels based on the answers
Explore the template library:
- Go to n8n.io and browse their 7000+ pre-built workflows
- Find something close to what you need
- Copy it and modify it for your use case
- Reverse-engineer how it works to learn new techniques
Build something that solves a real problem:
- What repetitive task drives you crazy?
- What data do you copy-paste between systems regularly?
- What notifications do you manually send that could be automated?
Pick one real workflow and build it. You'll learn more from one practical automation than from ten tutorials.
Join the community:
- n8n has an active forum and Discord
- When you get stuck, people actually help
- Browse others' workflows for inspiration
- Share what you build
The Real Learning Starts Now
Here's the truth about automation: reading tutorials teaches you syntax. Building real workflows teaches you how to think in systems.
You now understand the basics — triggers, actions, data mapping, testing. But the real skill is recognizing patterns in your daily work and thinking "I could automate that."
Start noticing when you do the same thing twice. When you copy data from one place to another. When you send the same update to multiple people. Those are all automation opportunities.
n8n gives you the tool. The workflows you build? Those come from understanding your own processes well enough to break them into steps a computer can handle.
You're not trying to replace yourself. You're trying to free yourself from the boring, repetitive stuff so you can focus on work that actually requires human judgment and creativity.
Now go build something useful.
📚 Additional Resources
- n8n Documentation
- n8n Workflow Templates
- n8n Community Forum
- Google Sheets Trigger Documentation
- Slack Node Documentation
Questions or stuck on something? Drop a comment below. I'm active in the n8n community and happy to help troubleshoot.