
Designing Self-healing locator capability for automation framework
One of the major challenges of User interface (UI) Automation testing is the huge maintenance effort required and locators are one of the key contributors to this maintenance effort. Testing teams have always struggled to make their automation test stable by having a robust locator strategy and ensuring that locators are not changed across development phases.
However in the real-world environment, it is quite common to have frequent changes in our application code including element locators.
To overcome these challenges, Self-healing locators prove to be an effective solution. Self-healing locators is one of the desired capabilities by quality teams across the industry and many tools providing this capability - mostly paid are dominating the market.
In this article, I will try to help you understand the overall design approach for self-healing locator capability.
On a high level, there can be 2 different design approaches for this capability one using Machine learning(ML) and the other without ML. We will discuss both of these design patterns and their limitations below.
Pattern 1: Self-healing design without ML
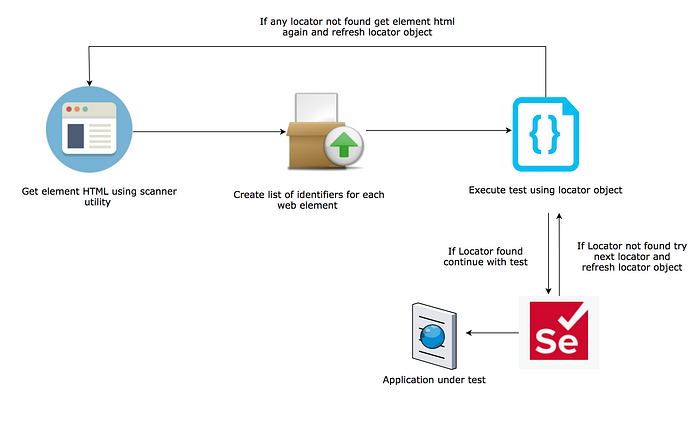
We will divide this design approach into 4 sections which work together to provide the self-healing capability :
For illustration, we will take the example of google.com as a test site and google search button as our test element which we want to make self-healing.
- Get page HTML: The first step involves fetching HTML code for the application page under test using a spider utility (a lot of open-source libraries are available for this purpose i.e. Scrapy ) and then extract HTML for different web elements from that page HTML. For our test example we get HTML of google.com and then extract the below HTML code for google search button:
<input class="gNO89b" value="Google Search" aria-label="Google Search" name="btnK" type="submit" data-ved="0ahUKEwji_q3m8OHvAhUtyYUKHa9dBwkQ4dUDCAs">2. Parse HTML code: Once we have HTML code for the web element we need to parse the HTML code (in our case google search button) and create a list of unique identifiers for the web element along with their rank based on uniqueness in the webpage.
We again have a choice of a lot of different open-source packages for doing this task i.e Jsoup for java, BeautifulSoup for python & DOMParser for Javascript.
For our google search button we will parse html into below identifier list with uniqueness rank .
{"input":[
{"value":"Google Search", "rank": "1"}
{"class":"gNO89b", "rank": "5"}
{"aria-label":"Google Search", "rank": "4"}
{"name":"btnK", "rank": "3"}
{"type":"submit", "rank": "6 "}
{"data-ved":"0ahUKEwji_q3m8OHvAhUtyYUKHa9dBwkQ4dUDCAs", "rank": "2"}
]}
3. Ranked Locator object: Once we have the identifier list for a web element we create a locator object for that element which can be used by selenium scripts for automation test execution. This object will have all possible combinations of locators for that web element along with their rank.
For our test example we will get create below locator object for google search button.
"Search_Box_btn": [
{"Locator_1": "//input[@value='Google Search']","rank": "1"},
{"Locator_2": "//input[@class='gNO89b']","rank": "5"},
{"Locator_3": "///input[@aria-label='Google Search']","rank": "4"},
{"Locator_4": "//input[@name='btnK']","rank": "3"},
{"Locator_5": "//input[@data-ved='0ahUKEwji_q3m8OHvAhUtyYUKHa9dBwkQ4dUDCAs']","rank": "2"},
{"Locator_6": "//input[@type='submit']","rank": "6"}
]
4. Execute Automation test: Once we have ranked locator object we use this in our selenium test execution, Whenever selenium test needs to interact with this web element ( google search button ) it goes to locator object and fetches the locator with the highest rank(1).
The automation test then checks if the locator having rank 1 (//input[@value='Google Search']) exists in our application. If locators exist automation test execution continues to the next step.
If we notice during our test execution that any of the locator is changed then our spider utility should again fetch the latest HTML code for that element to refresh locator object for the changes.
In case the locator with rank 1 does not exist we fetch the next locator from the object i.e. rank 2 and continue to loop till the last rank in case element is still not found. If all the locators in the object are not able to find the web element then the automation test will fail and there is very little we can do without using Machine Learning. We will discuss more about the use of ML for self-healing in pattern 2.
The limitation of using this pattern without ML is that when all locators for a web element are changed we have no mechanism to avoid test failure. However, it will be a very rare scenario which many teams might not want to invest their effort into.
Pattern 2 : Self-healing locator design using Machine learning
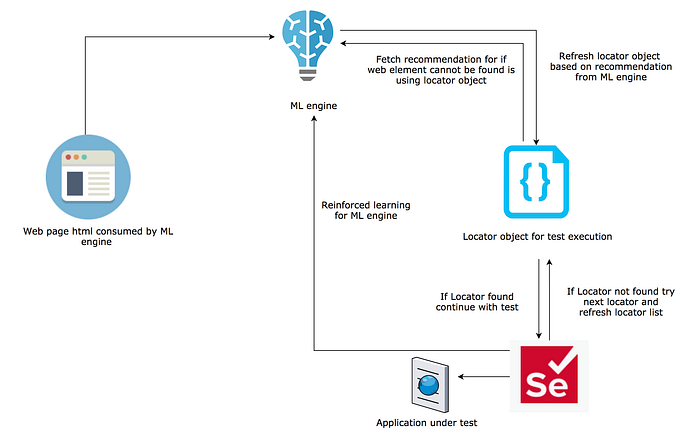
The second pattern to design a self-healing locator solution is using ML capability. This pattern does add an extra layer of complexity but provides us a mechanism to continue test execution even if all locators for a web element are changed.
In this approach, we will have one extra item in the locator list which will be a suggestion by ML engine for an element that we should interact with if all other locators for our existing web element have changed.
We will have to feed test execution data along with image screenshot for reinforced learning of our ML engine. The ML engine can then use pattern-based image matching to find the most appropriate element which should be interacted with in case none of the locator for the web element we had identified are working. ( I am not going into details of model training and working as i hope to dedicate a separate blog for the same)
Although these predictions may not be always accurate but it does give an edge and prevents the automation test from failing.
I hope the above would have helped you to understand how these new capabilities are designed and working on a high level, It may also inspire you to create one for your automation project.