


So, basically oidc and oauth 2.0 are used for identity and access management (IAM). IAM consists of verifying the identity of the user who's requesting to access the resource and their level of access. So, to verify the user identity we call that process Authentication while checking the access level of the user called Authorization.
Some people use authN and authZ interchangeably and that's not true. Together they make a strong identity and access management, not one replacing the other. Although you can use authZ only for securing microsevices with OAuth 2.0 which we will visit at the end of this story.
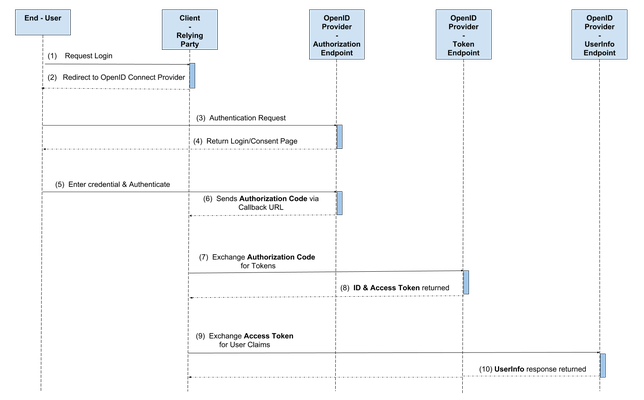
OpenID Connect workflow
oidc represents the authN while oauth represent authZ. Now oidc works on top of oauth in other words it works before the authorization step occurs.
as it shows below:
- user tries to login to a website via social login (sso)
- the website (client or relay party) will redirect the user to the oidc sso with a callback url
- the user enter their credentials
- the oidc endpoint (/auth) authenticates the user and send authorization code to the website page
- the website send to oidc endpoint (/token) the authorization code with the preferred scope in exchange of id token and access token
- the website sends to oidc endpoint (/userinfo) the access token for the user claims, roles, etc
After knowing the workflow we should circle back to some terminologies.
ID token is a Json Web Token. These ID tokens consist of a header, payload, and signature. The header and signature are used to verify the authenticity of the token, while the payload contains the information about the user requested by your client. The ID token is the core extension that oidc makes to OAuth 2.0. ID tokens are issued by the authorization server and contain claims that carry information about the user.
worth to mention, id_token will not be returned unless you specify the scope to openid when contacting the oidc endpoint.
Access Token is a unique token that tells the resource server that this user is authorized to access it with this limited scope.
Authorization code is the authorization code is a temporary code that the client will exchange for an access token. The code itself is obtained from the authorization server where the user gets a chance to see what the information the client is requesting, and approve or deny the request
Hands-on: apigee oauth 2.0 policy implementation
First create a proxy and select which ever flow you like, for me i'll go with proxy pre-flow and place OAuthV2 policy.

Now to make this endpoint (flow) generates an access token you need to choose your preferred grant type for the sake of this tutorial will go with client_credentials grant type.
since we're making this endpoint generates an access token we need to specify that on operation in the policy xml as shown below. you can also override the default value of the token life from ExpiresIn. If the scope was given in the xml then the token will be limited to this scope. Otherwise, it'll be scoped to whatever your client application is subscribed to whatever product.
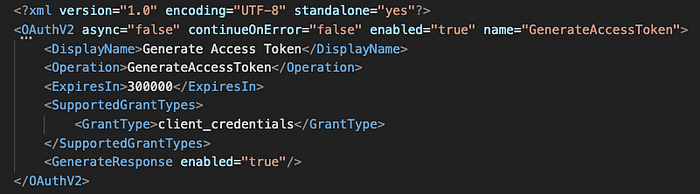
after building your policy all what you need now is to hit that endpoint with your client id and client secret (username and password).
Resources