
In this article we will create different map items like boundaries, lines, circles and points on google maps flutter.
Setup
- We will use the google maps flutter plugin available on pub.dev. The plugin can can be accessed at the link below.
- I am assuming that you have already done google map setup in your app. If not please refer to the google map flutter installation guide to do that.
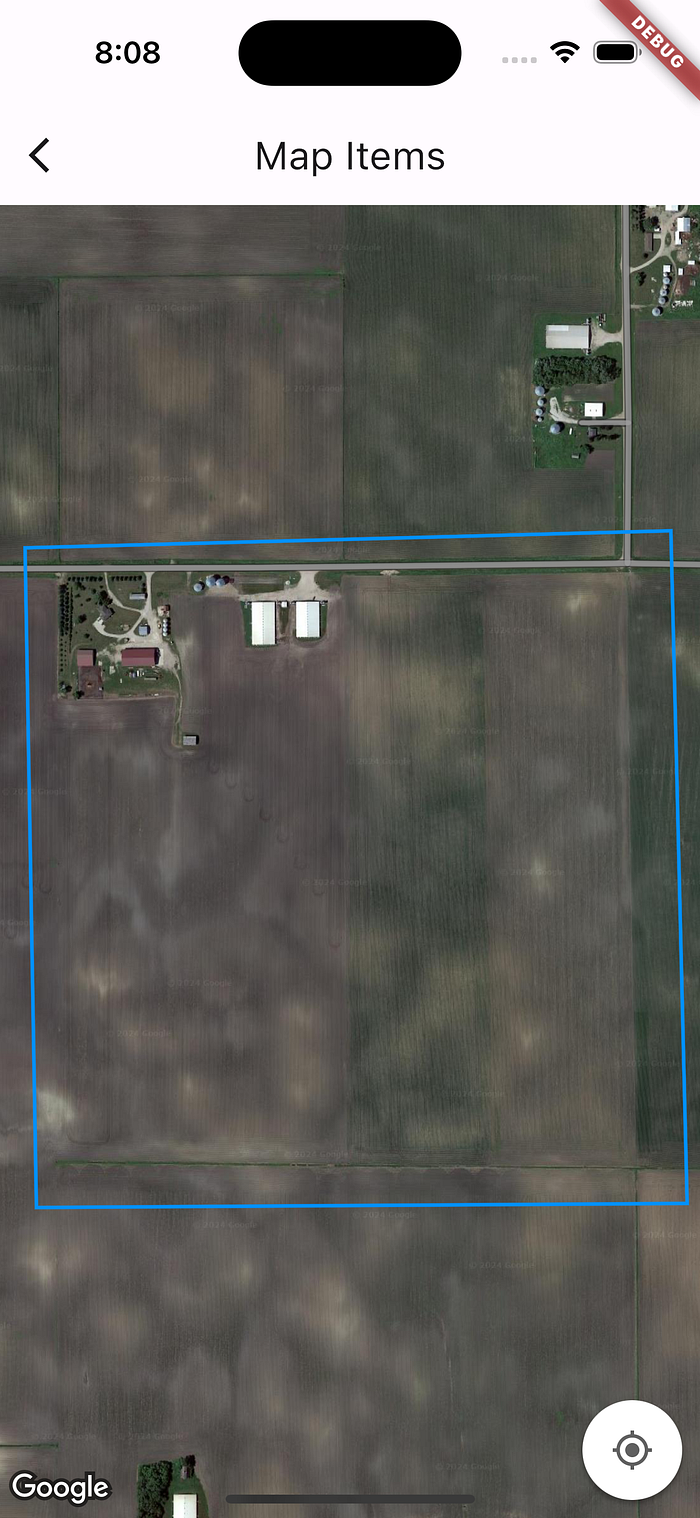
Adding Polygons (boundary)
We can add polygons with the code below
import 'package:flutter/material.dart';
import 'package:google_maps_flutter/google_maps_flutter.dart';

class MapItemsPage extends StatelessWidget {
  const MapItemsPage({super.key});

  @override
  Widget build(BuildContext context) {
    return Scaffold(
      appBar: AppBar(title: const Text('Map Items')),
      body: GoogleMap(
        mapType: MapType.hybrid,
        initialCameraPosition: const CameraPosition(
          target: LatLng(43.22326495922838, -94.3490369617939),
          zoom: 15.5,
        ),
        polygons: {
          Polygon(
            polygonId: const PolygonId('polygonId'),
            points: const [
              LatLng(43.22682131349118, -94.35395814478397),
              LatLng(43.226887518297765, -94.34428777545689),
              LatLng(43.21943572815587, -94.34409566223621),
              LatLng(43.219487281322955, -94.35394775122406),
            ],
            strokeColor: const Color(0XFFFF0000),
            strokeWidth: 1,
            fillColor: const Color(0X77000000),
            onTap: () {},
          ),
        },
      ),
    );
  }
}- For creating polygons on a map, we can pass a set of Polygon widgets to the Google Map widget.
- Each Polygon widget takes an array of point where each point is a LatLng widget consisting of latitude and longitude of a point.
- We can set the boundary (stroke) color, boundary width and the fill color of a polygon.
- Each polygon also has a onTap callback which can be used to execute a function.

Adding Polylines (Line)
We can add polylines using the code below
import 'package:flutter/material.dart';
import 'package:google_maps_flutter/google_maps_flutter.dart';

class MapItemsPage extends StatelessWidget {
  const MapItemsPage({super.key});

  @override
  Widget build(BuildContext context) {
    return Scaffold(
      appBar: AppBar(title: const Text('Map Items')),
      body: GoogleMap(
        mapType: MapType.hybrid,
        initialCameraPosition: const CameraPosition(
          target: LatLng(43.22326495922838, -94.3490369617939),
          zoom: 15.5,
        ),
        polylines: {
          Polyline(
            polylineId: const PolylineId('PolylineId'),
            points: const [
              LatLng(43.227369760734064, -94.34356994926928),
              LatLng(43.21901865898815, -94.3432930111885),
              LatLng(43.218968082743984, -94.35437925159931),
              LatLng(43.22715771133842, -94.35457304120064),
              LatLng(43.227369760734064, -94.34356994926928),
            ],
            color: const Color(0xFF0091FF),
            width: 2,
            onTap: () {},
          ),
        },
      ),
    );
  }
}- For creating polylines on a map, we can pass a set of Polyline widgets to the GoogleMap widget.
- Each Polyline widget takes an array of point where each point is a LatLng widget consisting of latitude and longitude of a point.
- We can set the line color and line width of a polyline.
- Each polyline also has a onTap callback which can be used to execute a function.
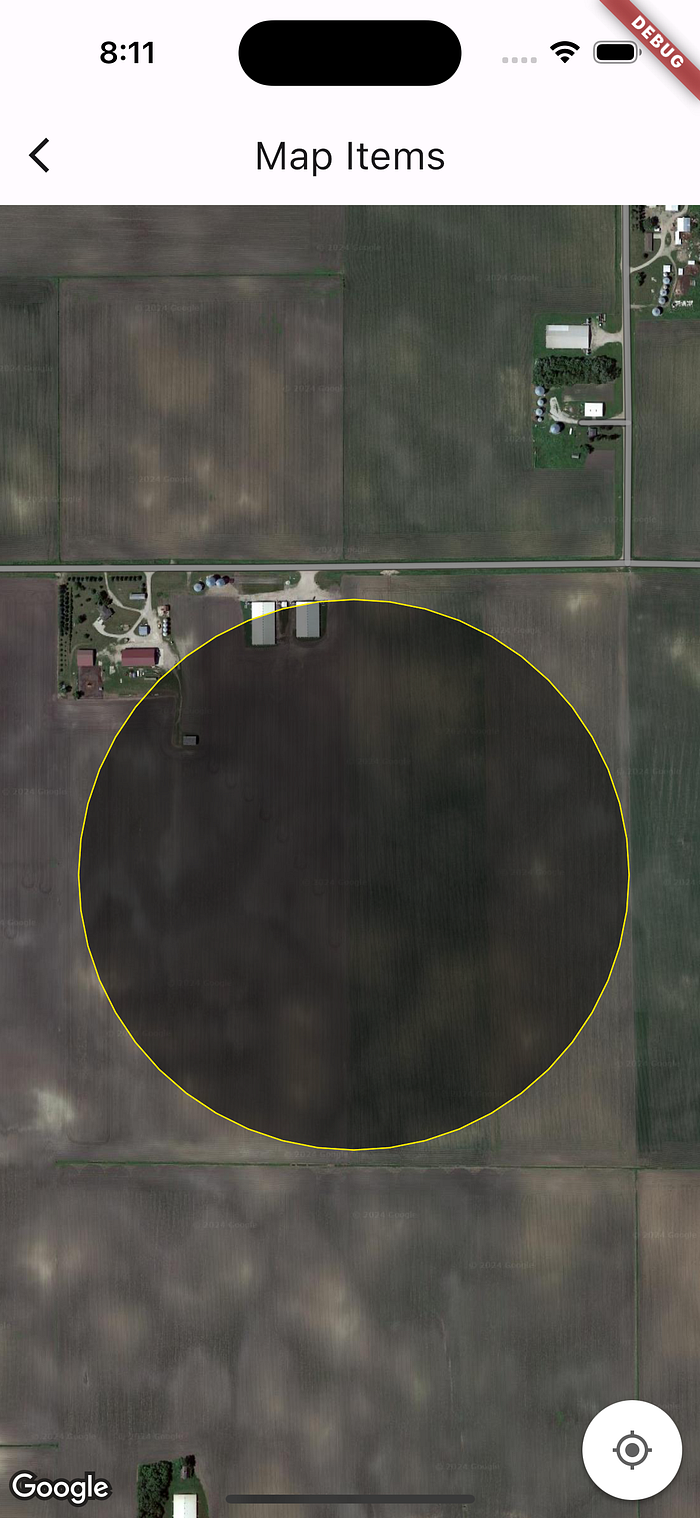
Adding Circles
We can add circles with the code below
import 'package:flutter/material.dart';
import 'package:google_maps_flutter/google_maps_flutter.dart';

class MapItemsPage extends StatelessWidget {
  const MapItemsPage({super.key});

  @override
  Widget build(BuildContext context) {
    return Scaffold(
      appBar: AppBar(title: const Text('Map Items')),
      body: GoogleMap(
        mapType: MapType.hybrid,
        initialCameraPosition: const CameraPosition(
          target: LatLng(43.22326495922838, -94.3490369617939),
          zoom: 15.5,
        ),
        circles: {
          Circle(
            circleId: const CircleId('CircleId'),
            center: const LatLng(43.22309907077149, -94.34897124767303),
            radius: 380,
            strokeColor: const Color(0xFFFFEA00),
            strokeWidth: 1,
            fillColor: const Color(0X77000000),
            onTap: () {},
          ),
        },
      ),
    );
  }
}- For creating circles on a map, we can pass a set of Circle widgets to the GoogleMap widget.
- Each Circle widget takes a LatLng widget as the center of the circle and a double value as the radius of the circle.
- We can set the stroke color, stroke width and the fill color of a circle.
- Each Circle also has a onTap callback which can be used to execute a function.
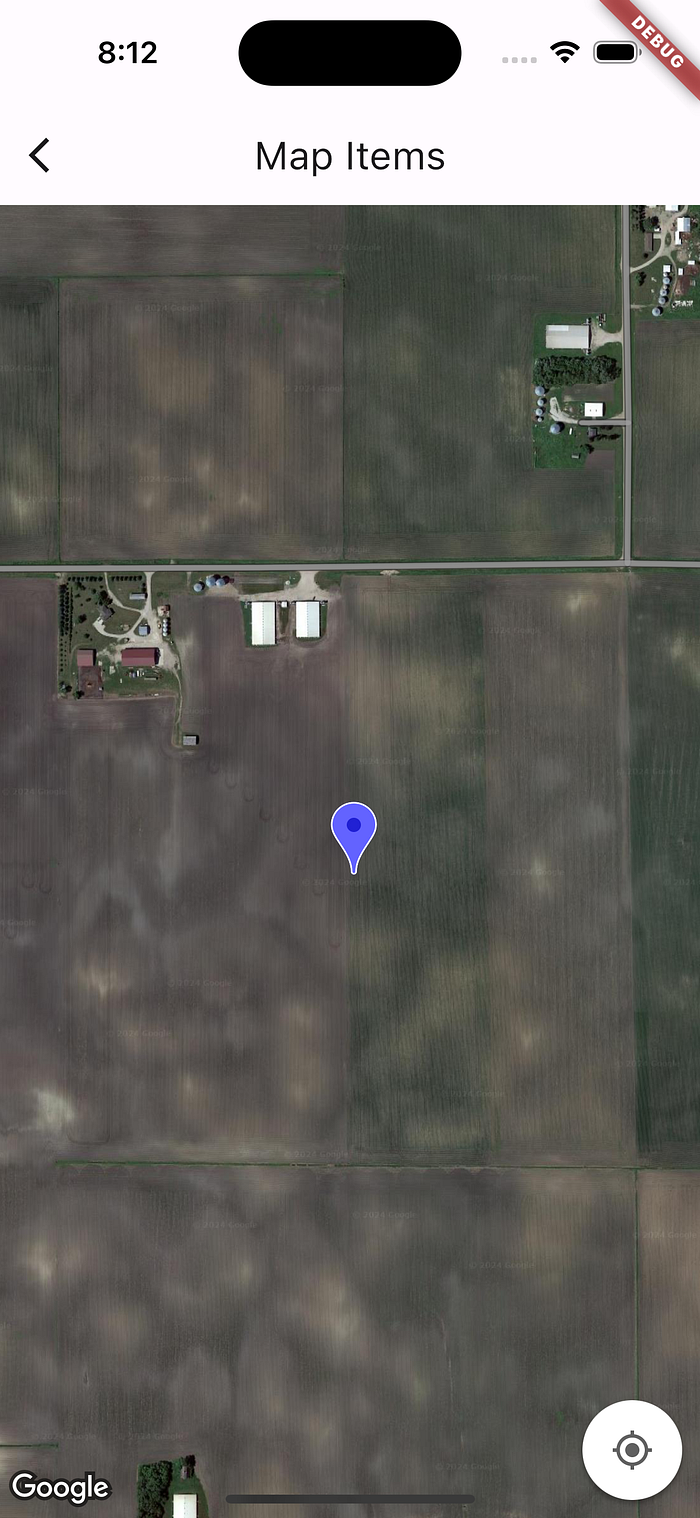
Adding Markers (Points)
We can use the code below to create markers on a map
import 'package:flutter/material.dart';
import 'package:google_maps_flutter/google_maps_flutter.dart';

class MapItemsPage extends StatelessWidget {
  const MapItemsPage({super.key});

  @override
  Widget build(BuildContext context) {
    return Scaffold(
      appBar: AppBar(title: const Text('Map Items')),
      body: GoogleMap(
        mapType: MapType.hybrid,
        initialCameraPosition: const CameraPosition(
          target: LatLng(43.22326495922838, -94.3490369617939),
          zoom: 15.5,
        ),
        markers: {
          Marker(
            markerId: const MarkerId('MarkerId'),
            position: const LatLng(43.22309907077149, -94.34897124767303),
            icon: BitmapDescriptor.defaultMarkerWithHue(BitmapDescriptor.hueBlue),
            consumeTapEvents: true,
            draggable: true,
            onTap: () {},
            onDrag: (coordinate) {},
            onDragEnd: (coordinate) {},
            onDragStart: (coordinate) {},
          ),
        },
      ),
    );
  }
}- For creating Markers on a map, we can pass a set of Marker widgets to the GoogleMap widget.
- Each Marker widget takes a LatLng widget as the point of the marker.
- We can change the color of the Marker by using the icon property.
- Each Marker also has four callback properties which can be used to execute a function. These can be enabled by setting the consumeTapEvents and the draggable property to true.
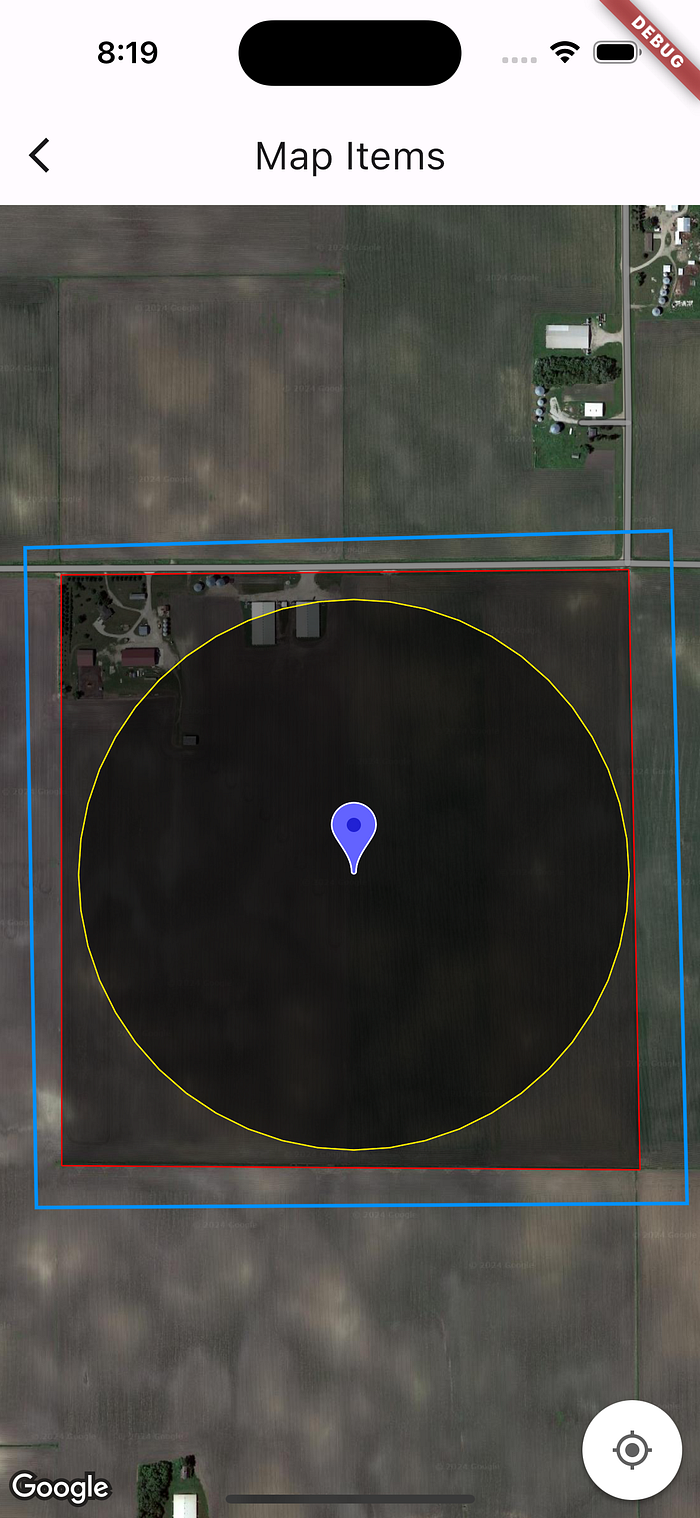
Show all map items
We can use the code below to show different map items at ones on google map
import 'package:flutter/material.dart';
import 'package:google_maps_flutter/google_maps_flutter.dart';

class MapItemsPage extends StatelessWidget {
  const MapItemsPage({super.key});

  @override
  Widget build(BuildContext context) {
    return Scaffold(
      appBar: AppBar(title: const Text('Map Items')),
      body: GoogleMap(
        mapType: MapType.hybrid,
        initialCameraPosition: const CameraPosition(
          target: LatLng(43.22326495922838, -94.3490369617939),
          zoom: 15.5,
        ),
        polygons: {
          Polygon(
            polygonId: const PolygonId('polygonId'),
            points: const [
              LatLng(43.22682131349118, -94.35395814478397),
              LatLng(43.226887518297765, -94.34428777545689),
              LatLng(43.21943572815587, -94.34409566223621),
              LatLng(43.219487281322955, -94.35394775122406),
            ],
            strokeColor: const Color(0XFFFF0000),
            strokeWidth: 1,
            fillColor: const Color(0X77000000),
            onTap: () {},
          ),
        },
        polylines: {
          Polyline(
            polylineId: const PolylineId('PolylineId'),
            points: const [
              LatLng(43.227369760734064, -94.34356994926928),
              LatLng(43.21901865898815, -94.3432930111885),
              LatLng(43.218968082743984, -94.35437925159931),
              LatLng(43.22715771133842, -94.35457304120064),
              LatLng(43.227369760734064, -94.34356994926928),
            ],
            color: const Color(0xFF0091FF),
            width: 2,
            onTap: () {},
          ),
        },
        circles: {
          Circle(
            circleId: const CircleId('CircleId'),
            center: const LatLng(43.22309907077149, -94.34897124767303),
            radius: 380,
            strokeColor: const Color(0xFFFFEA00),
            strokeWidth: 1,
            fillColor: const Color(0X77000000),
            onTap: () {},
          ),
        },
        markers: {
          Marker(
            markerId: const MarkerId('MarkerId'),
            position: const LatLng(43.22309907077149, -94.34897124767303),
            icon: BitmapDescriptor.defaultMarkerWithHue(BitmapDescriptor.hueBlue),
            consumeTapEvents: true,
            draggable: true,
            onTap: () {},
            onDrag: (coordinate) {},
            onDragEnd: (coordinate) {},
            onDragStart: (coordinate) {},
          ),
        },
        onTap: (coordinate) {
          print(coordinate);
        },
      ),
    );
  }
}
Thats it, congratulations on successfully completing this article. You have learned to create different types of map items in google map flutter.
You can also check the complete code on Github link below
https://github.com/rishi-singh26/google-map-items-flutter
Thanks for reading this article ❤️ If I got something wrong? Let me know in the comments. I would love to improve.
Clap 👏 If this article helps you.