
NOTE: It's not an update (it's a fact) I knew the following fact since 2019 WSC (windows server core) with Process isolation been announced, but it seems even if it's known to few people and discussed in few articles it's now very specific -
Windows 2019 Container needs to be build with same based server version of the host or it will not work, so if you wanna try windows container (process based not hyper-v based) better you do your build on 2019 not anything else, do not enable Hyper-v when you are installing docker if it has asked you to do so, then you are actually installing Docker Desktop experience, follow the Microsoft link which I have provided with this article
Not too long from my last Kubernetes related blog, but things have changed already and so are the steps and commands. Following write up rather an update and fix the error/ issues been reported as well as addition of certain changes to add windows worker node, than a blog and explanation.
NOTE: As things are changing super first, I will have a new github repository created, where I can keep updating the commands & scripts for the same
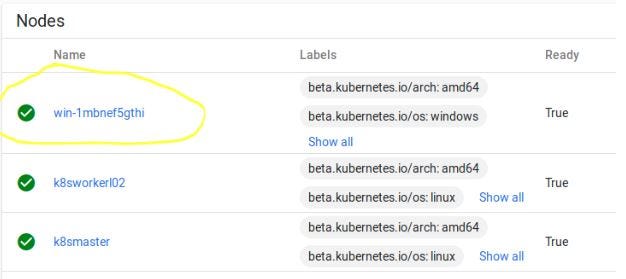
So I thought to bring down my existing one and to build a new one with Mix types of worker nodes, both windows and Linux.
Isn't it nice to see Linux and Windows tow brothers in arms and side by side!!

Again remember there are plenty of complete automation script to do the following setup! This is just an exercise.
This is not hard, it's with the same old kubeadm, but I could have used AKS, GKE or AWS container service but again, I have already walked that route and know how that can put weight on one's wallet, I can't work on a cluster 24 by 7, its part time , and I do not want to bring down my cluster every day.
Secondly every quarter one should build a new cluster, just to check what are the things have changed, that's the only way one can keep track of all the development around it.
There are very few links/documentations on windows latest Windows 2019 container to start with
- Following official link from Microsoft https://docs.microsoft.com/en-us/virtualization/windowscontainers/kubernetes/joining-windows-workers?tabs=ManagementIP
- And Official link from kubernets.io is a good point to start https://kubernetes.io/docs/setup/production-environment/windows/user-guide-windows-nodes/
Let's start with a few of my observations
- Consistency is key version mismatch is major killer, whatever you do specify the versions wherever possible
- First look windows node setup and preparation of windows node seems very fragile
- Any steps you missed it's hard to fix it rather re-do, a good things to keep snapshots of your node once an important steps is achieved
- My interest will be to build a fully functional CI/CD which seamlessly build & deploy -Windows and Linux nodes,Windows & Linux images,Without any inconsistency in version
- Limitation of only VXLAN support on Flannel for windows-Manual configuration of Flannel configuration on an existing cluster in Linux control-plane got to have other way around, I am curious -why there are specific port requirements?
- A lack of comprehensive documentation
Let's Start it would be a short 3 parts operations (I will have more detailed explanation of each of the commands in my github repository-coming shortly)
Build the linux-control plane and add a worker node (already lot of documentations and articles, but good to keep it handy in one place)
Networking of the lab- you are free to use whatever you think is best for your lab
But for virtual box each of the nodes should have NAT Networking (little different than only "NAT" Nat Networking basically add all of your Nodes to one switch and lease an IP so that nodes can connect to the Internet, you can only add NAT to a jumper and let all the other nodes to get internet from the same) & Host Only
(ideal could have only internal networking again it's on you how true you want to be with ideal scenario) so that you can operate on each of the noded from Host rather logging into each of them.
Linux Node preparation (Ubuntu 18.04)-Same for all the Linux nodes
sudo apt update && sudo apt upgrade

sudo apt-get install -y dkms build-essential linux-headers-generic linux-headers-$(uname -r)

sudo apt-get install virtualbox-guest-additions-iso

sudo swapoff -a

sudo nano /etc/netplan/50-cloud-init.yaml


#Check the netplan directory ".yaml" file name might be different for you.
#Make your internal (host only) Ip static for each of the nodes.
#make require changes to your hostname and hosts

sudo nano /etc/hostname
sudo nano /etc/hosts
Install docker-same for all the Linux nodes
sudo apt-get remove docker docker-engine docker.io containerd runc

sudo apt install \apt-transport-https \ca-certificates \curl \gnupg-agent \software-properties-common

sudo add-apt-repository "deb [arch=amd64] https://download.docker.com/linux/ubuntu $(lsb_release -cs) stable"

#Check available version of Docker of each of the components and make sure to #mention correct version string

sudo apt-cache madison docker-ce

sudo apt-cache madison docker-ce-cli

sudo apt-cache madison containerd.io
Install Kubernetes
curl -s https://packages.cloud.google.com/apt/doc/apt-key.gpg | sudo apt-key add -

echo "deb https://apt.kubernetes.io/ kubernetes-xenial main" | sudo tee -a /etc/apt/sources.list.d/kubernetes.list

cat <<EOF >/etc/apt/sources.list.d/kubernetes.list
deb http://apt.kubernetes.io/ kubernetes-xenial main
EOF

cat <<EOF > /etc/sysctl.d/k8s.conf
net.bridge.bridge-nf-call-ip6tables = 1
net.ipv4.ip_forward                 = 1
net.bridge.bridge-nf-call-iptables  = 1
EOF


sysctl --system
Following command will get you all the versions of all the components of kubernetes, but it's better to visit the following URL to check of your own https://packages.cloud.google.com/apt/dists/kubernetes-xenial/main/binary-amd64/Packages
curl -s https://packages.cloud.google.com/apt/dists/kubernetes-xenial/main/binary-amd64/Packages | grep Version | awk '{print $2}'Following are the versions I have selected mostly latest
- Package: kubernetes-cni /Version: 0.7.5–00
- Package: kubelet/Version: 1.16.1–00
- Package: kubeadm/Version: 1.16.1–00
- Package: kubectl/Version: 1.16.1–00
sudo apt-get install -y kubelet=1.16.1-00 kubectl=1.16.1-00 kubeadm=1.16.1-00 kubernetes-cni=0.7.5-00

sudo systemctl enable kubelet
Initiate the cluster -only in master Node
sudo kubeadm init --apiserver-advertise-address=<Master Node IP> --pod-network-cidr=10.244.0.0/16- Note: 10.244.0.0/16 for Flannel overlay
- Finally copy the token — you can get a new token just by following command anytime you want
kubeadm token create --print-join-command
#Run following required command before you can check the status of each pod
mkdir -p $HOME/.kube
sudo cp -i /etc/kubernetes/admin.conf $HOME/.kube/config

sudo chown $(id -u):$(id -g) $HOME/.kube/config
At this moment get all the pods by
kubectl get pods --all-namespacesYou should see all the nodes other than coredns in pending status
Deploy Flannel
kubectl apply -f https://raw.githubusercontent.com/coreos/flannel/master/Documentation/kube-flannel.yml

kubectl apply -f https://raw.githubusercontent.com/coreos/flannel/master/Documentation/k8s-manifests/kube-flannel-rbac.yml
Configure Flannel to be compatible with Windows Nodes (only in master Node)
Run following to edit kube-flannel
kubectl edit cm -n kube-system kube-flannel-cfg
#And make changes to net-conf.json and cni-conf.json so that they look like #following (careful about any typos, if opening in vi editor only saving the #changes will apply the updates)

---------------------------------------------------
net-conf.json: |
 {
      "Network": "10.244.0.0/16",
      "Backend": {
        "Type": "vxlan",
        "VNI"  : 4096,
        "Port" : 4789
      }
    }
-------------------------------------------------
cni-conf.json: |
    {
      "name": "vxlan0",
      "plugins": [
        {
          "type": "flannel",
          "delegate": {
            "hairpinMode": true,
            "isDefaultGateway": true
          }
        },
        {
          "type": "portmap",
          "capabilities": {
            "portMappings": true
          }
        }
      ]
    }
Then you need to apply a patch for the it's better to download the patch and then apply the patch.
wget https://raw.githubusercontent.com/Microsoft/SDN/master/Kubernetes/flannel/l2bridge/manifests/node-selector-patch.ymlkubectl patch ds/kube-proxy — patch "$(cat node-selector-patch.yml)" -n=kube-syFinally add any number of Linux Node just by the kubeadm join command and the token you got from kubeadm init
Finally prepare the windows node
- Obviously get a trial version of windows 2019 datacenter edition (standard also will do) and install with desktop (well my experience is not pleasant without that it's not easy on you with it's PS shell like linux)
- Then do what it says in Microsoft link to add your windows node to cluster
- Do not install older version of kubernetes even if it says so
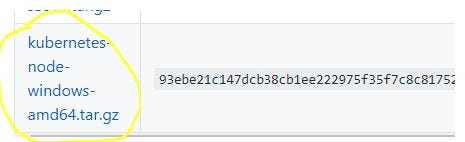
Following is the link for k8s 1.16.1 binaries and you only need to download the "Node Binaries" for windows https://github.com/kubernetes/kubernetes/blob/master/CHANGELOG-1.16.md1
You will get your kube/config at following path $HOME/.kube/config copy the same to your windows node installation directory

Contact me for any issues and provide your feedback on any correction and suggestions