


Before we start: a Word:
I have almost 7 years of experience using React Native. The best part about the framework is not the speed, or the ability to build once, and run everywhere, the developer experience, or the performance of the output of the code base. It is one thing: The Community, an amazing community.
When I started, it was amazing to work with it, but most of the tutorials, videos, and courses have one thing only: how to start. No one has shared how to get to the Lead Developer level, and what you should know. This is what I want to achieve by writing here in Medium about it.
I also created this Open Source Boilerplate, which has most of the new features and architectural decisions that any Developer needs to know. i will be sharing more about the Advanced topic later, so please don't forget to subscribe and share. The link is here: https://github.com/chohra-med/expo_boilerplate, and for the premium one here: http://aimobilelauncher.com/
Also, I have this website: https://reactnativetemplates.com/ for the community to share their code base, templates. It is all about one thing: share Learning.
I'm also launching a Newsletter where I teach Software engineers and Tech people how to stay relevant in the AI age. We can always read something that the AI will take our job, it won't be an AI alone, but a person who knows how to use AI. I will be sharing knowledge about that topic so you can be the guy that expert in AI usage. You can read more about it here: https://aimeetcode.substack.com/p/the-launch-of-code-meet-ai-newsletter
If you like this type of article, please share and give feedback. feedbacks are highly appreciated.
If you need to integrate Advanced functionalities in your Mobile app, create one from scratch, or need consulting in react native. Visit casainnov.com, check their mobile app page, and contact them there.
Introduction
I talked in the previous article about the benefits of Expo for mobile app development, instead of using Vanilla React native. Their ecosystem is amazing, and it helps you to ship faster, have a better development experience, and have a unified toolset.
If you are starting a project from scratch, it is straightforward, but what if you already have a React native project?
Let me show you how
Why Switch to Expo?
Before jumping into the how, it's worth knowing the why: because this is what justifies the migration. This is a summary of list why you should think about switching.
- Over-the-Air (OTA) Updates: Push instant updates to users without going through App Store or Play Store approvals.
- Simplified Setup: Expo handles native dependencies, Metro config, and build script. saving you time and avoiding "works on my machine" issues.
- EAS Build & Submit: Expo Application Services (EAS) lets you build, sign, and publish apps in the cloud with one command.
- Rich SDK: You get access to powerful prebuilt modules: camera, haptics, push notifications, biometrics, maps, etc.w ithout configuring native code.
- Faster Development Cycle: You can focus on your JS/TS codebase instead of managing iOS/Android native code.
Step-by-Step: Migrating from React Native to Expo
Step 1: Clean up your current app
Before you switch, make sure:
- Your app is using React Native 0.72+ (Expo SDKs are built on recent RN versions).
- You remove any custom native modules that are not supported by Expo (temporarily).
Tip: You can later add them using Expo Config Plugins.
Step 2: Create a new Expo project
npx create-expo-app@latest MyAppOr if you already have your project:
npx expo prebuildThis initializes the necessary Expo config files (app.json, metro.config.js, babel.config.js, etc.)
Step 3: Move your source code
Copy your existing React Native code into the Expo project:
/src
/components
/screens
/hooks
/navigation
/store
Update your App.tsx entry point if necessary.
Step 4: Install required dependencies
For example, if your bare RN app used:
npm install react-navigation react-native-reanimated react-native-gesture-handlerIn Expo, you can use:
npx expo install react-navigation react-native-reanimated react-native-gesture-handler⚠️ Use
expo installinstead ofnpm install. it ensures you get the correct version that matches your Expo SDK.
Step 5: Handle native modules
If your app uses native libraries (like react-native-video or react-native-background-fetch) that aren't supported by Expo, you have 3 options:
- Find an Expo alternative:
Example: use
expo-avinstead ofreact-native-video. - Use a Config Plugin: Example for background tasks:
npx expo install expo-task-manager expo-background-fetch3. Run in "Prebuild" (custom) mode: If you really need custom native code, you can still eject back with:
npx expo prebuild- This gives you full native folders (
iosandandroid) while keeping Expo management for OTA, builds, etc.
Step 6: Configure your app.json
Here's an example config:
{
  "expo": {
    "name": "MyApp",
    "slug": "myapp",
    "version": "1.0.0",
    "orientation": "portrait",
    "icon": "./assets/icon.png",
    "updates": {
      "url": "https://u.expo.dev/YOUR_PROJECT_ID",
      "fallbackToCacheTimeout": 0
    },
    "ios": {
      "supportsTablet": true
    },
    "android": {
      "adaptiveIcon": {
        "foregroundImage": "./assets/adaptive-icon.png",
        "backgroundColor": "#FFFFFF"
      }
    }
  }
}
Step 7: Run your app
npx expo run [android|ios]also
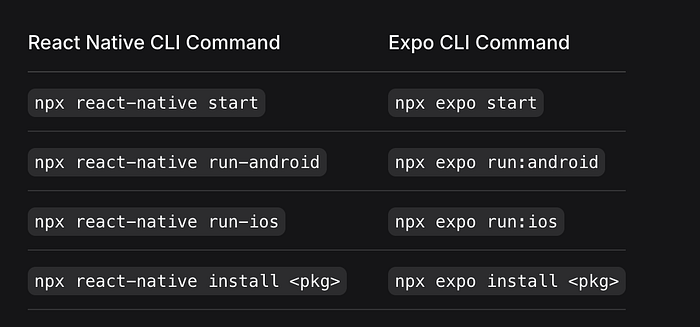
Step 8: Build your app (EAS Build)
To generate production builds without Xcode or Android Studio:
npx expo build:android
npx expo build:ios
or with EAS:
npx eas build --platform allYou can read more here: https://docs.expo.dev/bare/using-expo-cli/
Example Migration Case
Let's say you had a bare React Native boilerplate with Redux Toolkit and Reanimated:
- Replace
react-native-fs→ useexpo-file-system. - Replace
react-native-localization→ useexpo-localization.
Then configure Reanimated for Expo by adding to babel.config.js:
module.exports = function (api) {
  api.cache(true);
  return {
    presets: ['babel-preset-expo'],
    plugins: ['react-native-reanimated/plugin'],
  };
};
TL;DR: The Fast Path
If your app is mainly JavaScript/TypeScript (no deep native code):
npx expo install expo
npx expo prebuild
Then migrate your code, install Expo-compatible dependencies, and you're done.
If your app does need native customization, use the Custom (Prebuild) Workflow. You still get all Expo advantages (OTA, SDKs, EAS), but with native folders available.
A message from our Founder
Hey, Sunil here. I wanted to take a moment to thank you for reading until the end and for being a part of this community.
Did you know that our team run these publications as a volunteer effort to over 3.5m monthly readers? We don't receive any funding, we do this to support the community. ❤️
If you want to show some love, please take a moment to follow me on LinkedIn, TikTok, Instagram. You can also subscribe to our weekly newsletter.
And before you go, don't forget to clap and follow the writer️!