In this guide, I'll walk you through the process of setting up a virtual machine using VMware Fusion on an Arm64 devices (Like Apple Silicon or Nvidia Jetsons). We will install Ubuntu 22, configure it for ROS2, and manually install Gazebo, the popular robotics simulation platform. This process is particularly relevant for those who are working with ARM64 architecture, such as the Apple M1/M2 chips, where support for certain platforms is not readily available.
Why This Setup?
Apple's M1 and M2 chips bring significant processing power, but they run on ARM64 architecture, which can present challenges when installing software traditionally built for x86 systems. Specifically, installing and running Gazebo for robotics simulations requires a manual setup due to its lack of direct support for ARM64.
Step 1: Install VMware Fusion
The first step is to download and install VMware Fusion. VMware Fusion allows you to run a virtual machine on your Mac, making it possible to install and run Ubuntu.
Download VMware Fusion
You should first register an account like: https://profile.broadcom.com/web/registration
Then download VMware Fusion 13.6 from the following link: https://support.broadcom.com/group/ecx/productfiles?subFamily=VMware%20Fusion&displayGroup=VMware%20Fusion%2013%20Pro%20for%20Personal%20Use&release=13.6&os=&servicePk=522387&language=EN
Step 2: Install Ubuntu 22 ARM64
Download the ubuntu22 iso image: https://cdimage.ubuntu.com/jammy/daily-live/current/jammy-desktop-arm64.iso
Install Ubuntu on VMware Fusion
1. Open VMware Fusion and select Create a New Virtual Machine.
2. Drag the downloaded jammy-desktop-arm64.iso file into the virtual machine setup window.
3. Follow the prompts and select Erase Disk and Install Ubuntu.
4. Once installation is complete, click "Restart Now" and then press "Enter" when it shows "remove installation medium".
Step 3: Configure Ubuntu for VMware
To enhance the experience, you'll want to ensure that Ubuntu works smoothly within VMware. After installation, follow these steps:
- Open a terminal and run the following command to install VMware tools:
sudo apt-get install open-vm-tools-desktop2. Power off the Ubuntu virtual machine, and adjust the hardware settings in VMware: a. Increase the number of processors and memory. I assigned 6 cores and 8192MB for my 16GB m2 pro. b. Go to "Display" and make sure "Accelerate 3D graphics" is not enabled. c. Increase the disk space, click "Hard Disk NVMe", increase it to 30GB. d. Then turn on the ubuntu22. e. Open "Disks", and resize the partition ending with Ext4.
Step 4: Install ROS2
Now that Ubuntu is configured, the next step is to install ROS2. Follow the repository guide here for detailed steps.
If you don't have git installed, you can install it by running:
sudo apt install gitStep 5: Install Gazebo on ARM64
Gazebo, the simulation platform, doesn't directly support ARM64 architecture. As a result, we need to manually compile and install it.
- Install necessary dependencies:
sudo apt-add-repository ppa:dartsim
sudo apt update
sudo apt install libdart-dev libdart-utils-dev libdart-external-ikfast-dev libsdformat9-dev libfreeimage-dev libprotoc-dev libprotobuf-dev protobuf-compiler freeglut3-dev libcurl4-openssl-dev libtinyxml-dev libtinyxml2-dev libtar-dev libtbb-dev libogre-1.9-dev libxml2-dev pkg-config qtbase5-dev libqwt-qt5-dev libltdl-dev libgts-dev libboost-thread-dev libboost-system-dev libboost-filesystem-dev libboost-program-options-dev libboost-regex-dev libboost-iostreams-dev libsimbody-dev libignition-common3-dev libignition-fuel-tools4-dev libignition-transport8-dev libignition-math6-dev libignition-msgs5-dev
2. Clone the Gazebo source code from GitHub:
cd ~/Downloads/
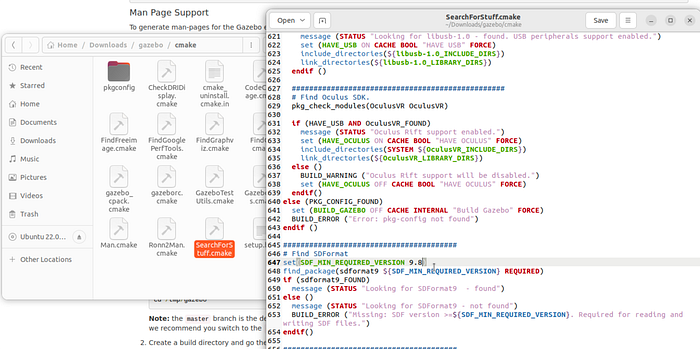
git clone https://github.com/osrf/gazebo3. Modify the line 647 of SearchForStuff.cmake in Downloads/gazebo/cmake. Change from 9.8 to 9.7 as the default libsdformat version of ubuntu22 is 9.7.
4. Compile and install Gazebo:
cd ~/Downloads/gazebo
mkdir build && cd build
cmake ../
make -j3
sudo make install
5. Add Gazebo to your environment path by modifying .bashrc:
export LD_LIBRARY_PATH=/usr/local/lib:$LD_LIBRARY_PATH
export PATH=/usr/local/bin:$PATH
export PKG_CONFIG_PATH=/usr/local/lib/pkgconfig:$PKG_CONFIG_PATH
Step 6: Compile TurtleBot3 Packages
- Create a workspace for the packages:
cd ~/Downloads
mkdir turtlebot_gazebo_ws && cd turtlebot_gazebo_ws
mkdir src && cd src
2. Clone the turtlebot3_simulations
cd ~/Downloads/turtlebot_gazebo_ws/src
git clone https://github.com/ROBOTIS-GIT/turtlebot3_simulations
cd turtlebot3_simulations
git checkout ros2
3. Clone the gazebo_ros_pkgs
cd ~/Downloads/turtlebot_gazebo_ws/src
git clone https://github.com/ros-simulation/gazebo_ros_pkgs
cd gazebo_ros_pkgs
git checkout ros2
4. Clone the turtlebot4 pkgs
cd ~/Downloads/turtlebot_gazebo_ws/src
git clone https://github.com/turtlebot/turtlebot4
cd turtlebot4
git checkout humble
5. Compile the workspace
sudo apt-get install ros-humble-camera-info-manager ros-humble-irobot-create-msgs
cd ~/Downloads/turtlebot_gazebo_ws
export MAKEFLAGS="-j 3"
colcon build
6. Add the following line to the end of .bashrc file
source ~/Downloads/turtlebot_gazebo_ws/install/setup.bashTest the installation
ros2 launch turtlebot3_gazebo turtlebot3_house.launch.py
ros2 launch turtlebot4_navigation slam.launch.py
ros2 launch turtlebot4_viz view_robot.launch.py
ros2 run teleop_twist_keyboard teleop_twist_keyboard