We all always need our code to be versioned irrespective of what type of code it is. even if it is a Bash Script, PowerShell Script and more often a terraform code.
Most of you must have creating a lot of terraform modules and would like to version them automatically.
Yes, you could use the conventional git commits and tools like standard version, release-please, to release new versions and actively use them.
However my workflow has Azure Repo as my repository and we have branch policies set in between the main branch (At least we have it for fancy 😬). My standard version setup and conventional git commit works charmingly on my feature branches and main branches when there is nothing to block my commits. A pull request to the main branch is a show stopper here 😟. And you cannot really tag the main branch with a release as the branch policies block you directly committing to the main branch.

You could find more ways when you have your code in GitHub, and use release-please instead of standard-version and directly add it with Github actions.

Enough with the long boring story ! Let's do this with Azure DevOps !!!!
Start with a new repository in azure repos ( Yes! you could use your existing repo as well )
Let us do some basic local settings before you clone your repository locally!
- Install standard-version globally in your device.
npm i -g standard-version- Now You could create a new branch out of the main branch and start working on your stuff
- create the file package.json and add the below npm run script in to the package.json
Keep the version to 0.0.0 , as I have seen standard version complaining for an initial version
$ git checkout -b feature/feature1

$ vi package.json
{
  "scripts": {
    "release": "standard-version"
  },
  "version": "0.0.0"
}
github.com/ visit to know more about standard version
- keep the below pipeline as part of your code repo. You could use the pipeline task as part of your existing build/release pipeline.
If you are managing multiple repositories and would like to version them all, I would definitely recommend to keep a separate pipeline just for the release versioning part with multiple repo checkout in it
trigger:
- main

pool:
  vmImage: windows-latest

jobs:
- job: releasePlease
  displayName: Release Please 🚀
  steps:
  - checkout: self
    persistCredentials: true
    clean: true

  - task: NodeTool@0
    inputs:
      versionSource: 'spec'
      versionSpec: '18.x'
      checkLatest: true
    displayName: Install Node

  - pwsh: |
    npm install -g npm@9.1.1
    git config --global user.email "<add user email>"
    git config --global user.name "<add user uname>"
    $commitMessage = "$(Build.SourceVersionMessage)"
    git fetch --all
    git switch $(basename $(Build.SourceBranch))
    npm i -g standard-version

    function releasenow {
      try {
        git push --follow-tags origin main
      } catch {
        Write-Host "An error occurred:"
      }
    }

    if ( $commitMessage -match "BREAKING CHANGE" -or $commitMessage -match "chore!" -or $commitMessage -match "feat!" ){
      write-host "Bump major version"
      $version = (Get-Content ./package.json | ConvertFrom-Json).version
      $currentMajorVersion = $version.Split(".")[0]
      Write-Host "Current Version : $currentMajorVersion"
      $bumpMajorVersion = [int]$currentMajorVersion + 1
      Write-host "Bumped Version = $bumpMajorVersion.0.0"
      # run npm release to set new version
      standard-version --release-as "${bumpMajorVersion}.0.0" --releaseCommitMessageFormat "$commitMessage [skip ci]"
      releasenow
    } elseif ($commitMessage -match "feat" -or $commitMessage -match "chore" -or $commitMessage -match "fix") {
      standard-version --releaseCommitMessageFormat "$commitMessage [skip ci]"
      releasenow
    } else {
      Write-Host "If you intend to do symantic release, Please follow conventional commits."
      Write-Host "You're commit is considered as a fix version"
      standard-version --release-as "patch" --releaseCommitMessageFormat "$commitMessage [skip ci]"
      releasenow
    }
  displayName: Release
  continueOnError: true
As you note, the pipeline is using the default windows-agent(It was my personal choice 😊), You can use ubuntu also as the default pool agent.
Azure devOps uses the azure devOps identities to checkout the code in the pipeline workspace, and a persist credentials flag allows you to contribute to the repo by reusing the credentials by its own.
We have to make some changes in the repository security settings for the git push to work without any issues. So, Keep reading!
Let us follow some discipline now onwards with the commits.

$ echo "Here comes the first feature" >> README.md

$ git add .

$ git commit -m "feat: The feature 1"

$ git push --set-upstream origin feature/feature1

No worries! if you are person who like to do your git stuff along with you'r
IDE Just like me !.. Just do it from your favourite IDE.
I am adding the conventional commits here for your best learning 😇 . You could use tools like commitlint to help you with commit conventions
Ok, Let's park it here for some time
Its time to do some Azure DevOps Administration (You need admin privileges in your project to follow the steps )
I am not including the steps to set up the branch policies, as it does not fall under this scope. I hope you have the branch policies set in place. No problem if you don't have branch policies exist in your project ☺️
- Navigate to the project settings in the left bottom, and select repository settings

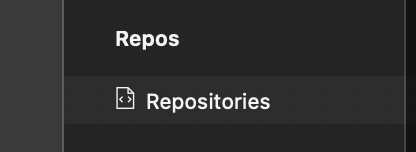
- Select repository of your choice to update the security changes (You could add securities and policies at the project level)

- Make sure "Project Collection Service Accounts" has the permission allowed for Contribute, Create Branch, Create Tag, Read set
The below permission allows the above pipeline code to execute the git commands
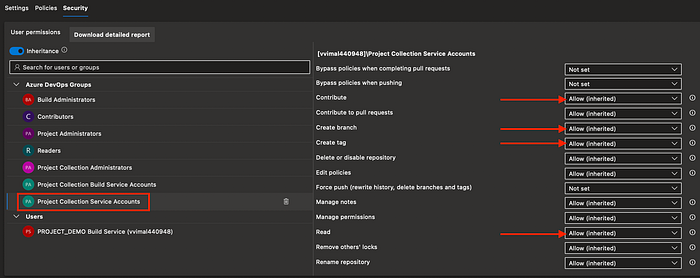
- Now, if you have branch policies set with the project or to the repository, You will not be allowed to push directly to the main branch. You will experience the same in the pipeline as well if you have not bypass the push
- Set the "[Project Name] Build Service" to allow the bypass policies when pushing , Contribute, Create Tag permissions.

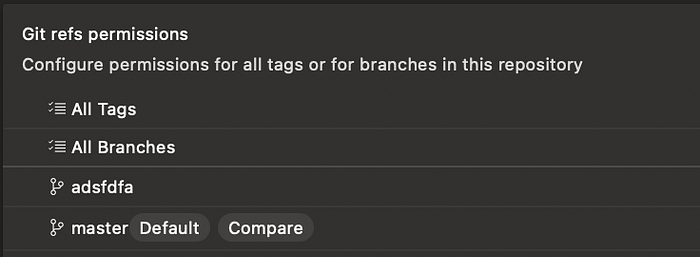
The above settings will be inherited to all the branches in the repository. To limit the permissions only to the main branch. select the main branch from the git refs permissions from the bottom and apply the same set of permissions
Ok, Now let's go back to where we pushed our feature branch….
Create a pull request to the main branch
- Make sure the title bar in the pull request form has the conventional commit header (feat,fix,chore…) in it.
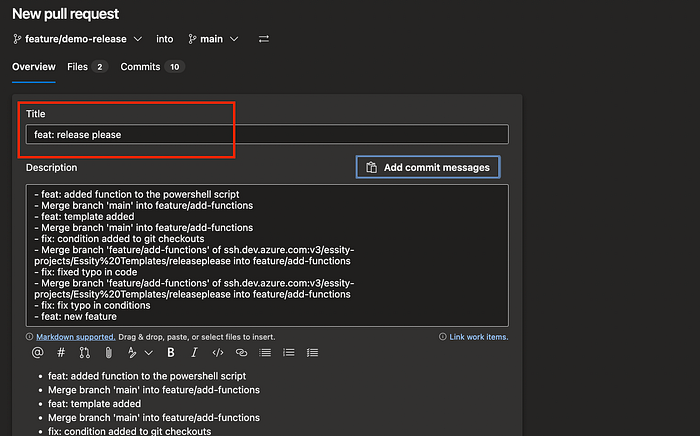
Azure DevOps always consider the PR title as the commit message, when you do a pull request. if you have not explicitly added a conventional commit header incase the title already doesn't have it, the pipeline always consider your PR as fix release (Change the logic in the PowerShell script if you wish to 😄).
- Now approve and complete your pull request
- let the build pipeline start running on completion of your PR.

- Check the logs of the PowerShell task in the pipeline to see more details, With the example below, I have a new minor version now and it leaves a new tag in the repo
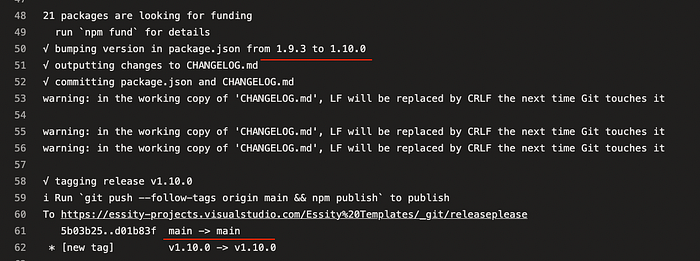

the standard version leaves an extra commit with a release tag on your main branch. I could not say it is a disadvantage (But that is how standard version works)
Now.. Start releasing your code with azure devOps 😇 😎
I am adding a bonus pipeline for those who wish to have a dedicated pipeline to release multiple repositories in the project
trigger:
- main

pool:
  vmImage: windows-latest


resources:
 repositories:
  - repository: "terraform-azure-vnet"
    type: "git"
    name: "vimal Templates/terraform-azure-vnet"
    trigger:
      - main
  - repository: "terraform-azure-subnet"
    type: "git"
    name: "vimal Templates/terraform-azure-subnet"
    trigger:
      - main
# add more repositories like the above ones, Donot forget to add the checkout steps

jobs:
- job: releasePlease
  displayName: Release Please 🚀
  steps:
  - checkout: self
    persistCredentials: true
    clean: true
  - checkout: terraform-azure-vnet
    condition: and(succeeded(), eq(variables['Build.Repository.Name'], 'terraform-azure-vnet'))
    persistCredentials: true
    clean: true
  - checkout: terraform-azure-subnet
    condition: and(succeeded(), eq(variables['Build.Repository.Name'], 'terraform-azure-subnet'))
    persistCredentials: true
    clean: true
# add checkout step for your repository

  - task: NodeTool@0
    inputs:
      versionSource: 'spec'
      versionSpec: '18.x'
      checkLatest: true
    displayName: Install Node

  - template: steps/release-please.yaml --> the powershell code goes here :)