
I was surprised to learn how many devices were connected to my home network. Looking at my router it identified 26 devices, both wired and wireless, that were connect. Many of them are part of a closed ecosystem that prevents me from gathering security or diagnostic information like my ecobee4's and Amazon Cloud cam. Others were logging only locally like my Netgear switches, my QNAP NAS or my Mac Mini's, or my raspberry pi's. I wanted to have a central location to view logging for both security alerts as well as potential hardware failures.
To address this, I initially considered setting up a syslog server, possibly on my NAS or one of the Mac mini's. After doing some research I ran across Graylog. Not only did it provide the central logging I was looking for, it also supported searches, filtering, and alerting. I've had an opportunity to use both Sumologic and Splunk and these are fantastic tools, but Sumologic's free tier has no alerting and the same is true with Splunk. I also looked at Papertrail, but this had no retention past 7 days and you could only search 48 hours. I did not do an exhaustive comparison of these tools, but there are a lot of articles that do. I've read a lot of good things in my research about Graylog and the setup was surprisingly easy.
Installation method
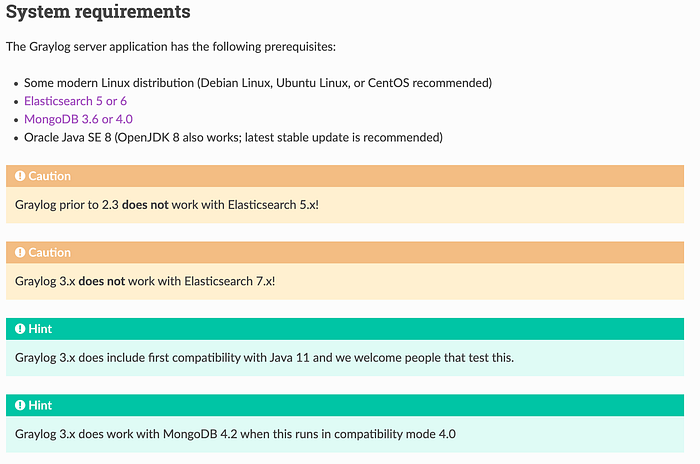
Reading through the options for installing Graylog, I was a little concerned. I didn't see Mac on the list. To further my anxiety, the system requirements looked fairly daunting as well.
I chose to follow the Manual Setup Steps, but first, lets tackle the system requirements.
System Requirements
I started with Elasticsearch. I was glad to see that, under package managers, brew was an option!
$ brew install elasticsearch
Updating Homebrew...
==> Auto-updated Homebrew!
Updated 1 tap (homebrew/core).
No changes to formulae.
==> Downloading https://artifacts.elastic.co/downloads/elasticsearch/elasticsear
######################################################################## 100.0%
==> /usr/local/Cellar/elasticsearch/6.8.6/bin/elasticsearch-keystore create
==> Caveats
Data:    /usr/local/var/lib/elasticsearch/
Logs:    /usr/local/var/log/elasticsearch/elasticsearch_monitor.log
Plugins: /usr/local/var/elasticsearch/plugins/
Config:  /usr/local/etc/elasticsearch/
To have launchd start elasticsearch now and restart at login:
brew services start elasticsearch
Or, if you don't want/need a background service you can just run:
elasticsearch
==> Summary
🍺  /usr/local/Cellar/elasticsearch/6.8.6: 133 files, 103.2MB, built in 11 seconds
I chose to have launchd start Elasticsearch
$brew services start elasticsearchCheck to see if Elasticsearch is running
$ ps -ef |grep elastic
  501   410     1   0 19Feb20 ??       1234:37.08 /Library/Java/JavaVirtualMachines/jdk1.8.0_181.jdk/Contents/Home/bin/java -Xms1g -Xmx1g -XX:+UseConcMarkSweepGC -XX:CMSInitiatingOccupancyFraction=75 -XX:+UseCMSInitiatingOccupancyOnly -Des.networkaddress.cache.ttl=60 -Des.networkaddress.cache.negative.ttl=10 -XX:+AlwaysPreTouch -Xss1m -Djava.awt.headless=true -Dfile.encoding=UTF-8 -Djna.nosys=true -XX:-OmitStackTraceInFastThrow -Dio.netty.noUnsafe=true -Dio.netty.noKeySetOptimization=true -Dio.netty.recycler.maxCapacityPerThread=0 -Dlog4j.shutdownHookEnabled=false -Dlog4j2.disable.jmx=true -Djava.io.tmpdir=/var/folders/hh/p8m5gd8n1vv04s631jx57rvw0000gn/T/elasticsearch-8715272758570032078 -XX:+HeapDumpOnOutOfMemoryError -XX:HeapDumpPath=data -XX:ErrorFile=logs/hs_err_pid%p.log -XX:+PrintGCDetails -XX:+PrintGCDateStamps -XX:+PrintTenuringDistribution -XX:+PrintGCApplicationStoppedTime -Xloggc:logs/gc.log -XX:+UseGCLogFileRotation -XX:NumberOfGCLogFiles=32 -XX:GCLogFileSize=64m -Des.path.home=/usr/local/Cellar/elasticsearch/6.8.6/libexec -Des.path.conf=/usr/local/etc/elasticsearch -Des.distribution.flavor=oss -Des.distribution.type=tar -cp /usr/local/Cellar/elasticsearch/6.8.6/libexec/lib/* org.elasticsearch.bootstrap.Elasticsearch
It's running and using JKD1.8. Now on to MongoDB. The link in the Graylog instructions take you to the Linux install page. Reading the sidebar navigation, there is a Mac OS install.

Reading the Mac OS install instructions, I'm thrilled to see that brew is also supported! Based on the graylog system requirements hints, I chose to install version 4.0.
$ brew install mongodb-community@4.0
==> Installing mongodb-community@4.0 from mongodb/brew
xcrun: error: invalid active developer path (/Library/Developer/CommandLineTools), missing xcrun at: /Library/Developer/CommandLineTools/usr/bin/xcrun
Error: An exception occurred within a child process:
CompilerSelectionError: mongodb/brew/mongodb-community@4.0 cannot be built with any available compilers.
Install GNU's GCC:
brew install gcc
I was a bit impatient, rereading the instructions, it indicates the dependency on XCode's command line tools. I tried a few different options to install the Xcode command line tools headless (from my ssh terminal), but none of them seemed to work. I gave up trying to do it headless and opened a remote desktop into the machine and installed the Xcode command line tools. This is the best documentation I could find to install the command line tools. The reason I couldn't do it headless is that the installation pops up a dialog box that requires you to acknowledge to proceed. Once the tools are installed, you can proceed with installation of Mongo DB.
$ brew install mongodb-community@4.0
==> Installing mongodb-community@4.0 from mongodb/brew
==> Downloading https://fastdl.mongodb.org/osx/mongodb-osx-ssl-x86_64-4.0.15.tgz
######################################################################## 100.0%
==> Caveats
mongodb-community@4.0 is keg-only, which means it was not symlinked into /usr/local,
because this is an alternate version of another formula.
If you need to have mongodb-community@4.0 first in your PATH run:
  echo 'export PATH="/usr/local/opt/mongodb-community@4.0/bin:$PATH"' >> ~/.bash_profile
To have launchd start mongodb/brew/mongodb-community@4.0 now and restart at login:
  brew services start mongodb/brew/mongodb-community@4.0
Or, if you don't want/need a background service you can just run:
  mongod --config /usr/local/etc/mongod.conf
==> Summary
🍺  /usr/local/Cellar/mongodb-community@4.0/4.0.15: 21 files, 222.0MB, built in 17 seconds
Always read the output from brew. I tend to copy the install results into Evernote as I go along. I chose to have mongodb automatically restart on re-boot.
$ brew services start mongodb/brew/mongodb-community@4.0Checking to see if mongodb is running
$ ps -ef |grep mongodb
  501   404     1   0 19Feb20 ??       514:17.81 /usr/local/opt/mongodb-community@4.0/bin/mongod --config /usr/local/etc/mongod.conf
Looks good. The system requirements are done. Let's do the core install
Installing Graylog
I chose to install the files in /usr/local. To simplify paths I also created a symbolic link from graylog->graylog-3.2.1.
$ curl -L https://downloads.graylog.org/releases/graylog/graylog-3.2.1.tgz --output graylog-3.2.1.tgz
$ tar xzvf graylog-3.2.1.tgz
$ sudo mv graylog-3.2.1 /usr/local
$ sudo ln -s /usr/local/graylog-3.2.1/ /usr/local/graylog
$ sudo mkdir -p /etc/graylog/server
$ sudo cp /usr/local/graylog/graylog.conf.example /etc/graylog/server/server.conf
I followed the remaining of the configuration section, but had an issue when I tried to set the root password.
$ echo -n "Enter Password: " && head -1 </dev/stdin | tr -d '\n' | sha256sum | cut -d" " -f1
Enter Password: -bash: sha256sum: command not found
The command sha256sum is part of coreutils and can be installed from brew.
$ brew install coreutils
Updating Homebrew...
==> Auto-updated Homebrew!
Updated 3 taps (homebrew/core, homebrew/cask and caskroom/cask).
==> Updated Formulae
manticoresearch
==> Downloading https://homebrew.bintray.com/bottles/coreutils-8.31.mojave.bottl
==> Downloading from https://akamai.bintray.com/05/05ae58c26a53c2dfa2d9d45943b9d
######################################################################## 100.0%
==> Pouring coreutils-8.31.mojave.bottle.1.tar.gz
==> Caveats
Commands also provided by macOS have been installed with the prefix "g".
If you need to use these commands with their normal names, you
can add a "gnubin" directory to your PATH from your bashrc like:
  PATH="/usr/local/opt/coreutils/libexec/gnubin:$PATH"
==> Summary
🍺  /usr/local/Cellar/coreutils/8.31: 476 files, 8.8MB
Now when I try to create the sha2 hash:
$ echo -n "Enter Password: " && head -1 </dev/stdin | tr -d '\n' | sha256sum | cut -d" " -f1
Enter Password: notmyrealpassword
ad626687605f1notarealhash20aa88aeabebd7d62795d36fde17eccbd96
I left the default value for elesticsearch_hosts. So it should connect to the local instance we just setup.
# Default: http://127.0.0.1:9200
#elasticsearch_hosts = http://node1:9200,http://user:password@node2:19200
Finally, I set the mongodb_uri to localhost as well (this was already set in the config file).
# MongoDB connection string
# See https://docs.mongodb.com/manual/reference/connection-string/ for details
mongodb_uri = mongodb://localhost/graylog
One final change I made was the bind address. The default configuration for graylog is for it to listen for web connection on the loopback or localhost address. This would mean I could only see the web based console from the machine I installed Graylog.
#### HTTP bind address
#
# The network interface used by the Graylog HTTP interface.
#
# This network interface must be accessible by all Graylog nodes in the cluster and by all clients
# using the Graylog web interface.
#
# If the port is omitted, Graylog will use port 9000 by default.
#
# Default: 127.0.0.1:9000
http_bind_address = 192.168.1.30:9000
#http_bind_address = [2001:db8::1]:9000
Start Graylog
After completing the system requirements, installing graylog, and editing the configuration file, I started the server.
sudo /usr/local/graylog/bin/graylogctl start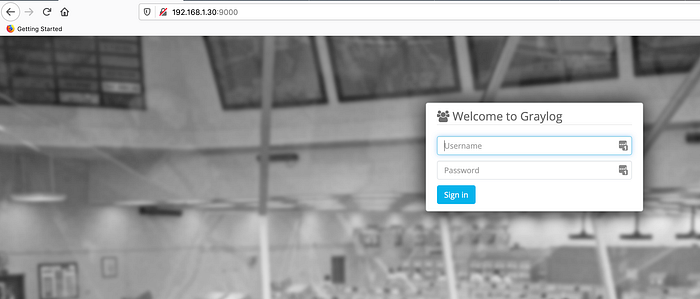
I was actually a bit surprised everything just worked. I'll dive into adding log sources in my next article. This helps me address part of the issue I mentioned in my borg backup article. Now I need to revisit my borg installs and get them logging to Graylog.