How many times have you been in a situation when you merge a branch into master and sadly, the pipeline turns red because of a failing SonarQube check?
Introduction
Let's have a formal introduction for SonarQube for the new people to the arena. SonarQube is an open-source platform developed by SonarSource for continuous inspection of code quality to perform automatic reviews with static analysis of code to detect bugs, code smells, and security vulnerabilities on 20+ programming languages. It can report duplicated code, coding standards, unit tests, code coverage, code complexity, and comments.
Generally, developers use this as a code quality check configured in master pipelines. But there may be scenarios where many developers are working simultaneously on feature branches and when all these branches are merged, It is difficult to correct the code smells/vulnerabilities collectively. To overcome this and make our lives easier, SonarQube introduced PR decoration.
Pull Request(PR) Decoration
It allows you to:
- See your PR's Quality Gate status in the SonarQube UI.
- Automatically decorate your PRs with SonarQube issues in your SCM provider's interface.
The PR quality gate:
- Focuses on new code — The PR quality gate only uses your project's quality gate conditions that apply to "on New Code" metrics.
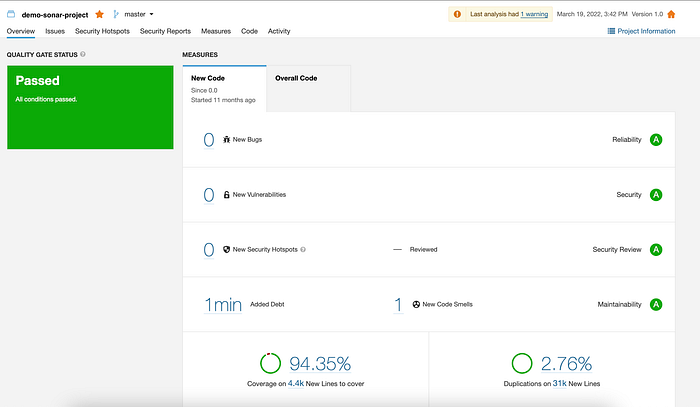
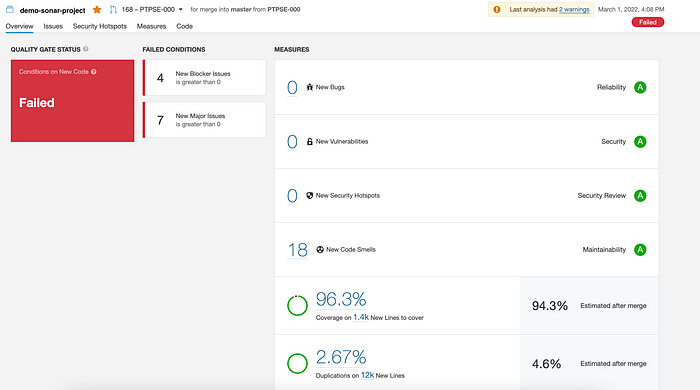
- Assigns a status — Each PR shows a quality gate status reflecting whether it Passed (green) or Failed (red).
When PR decoration is enabled, SonarQube publishes the status of the analysis (Quality Gate) on the PR.
Let's see how can we configure PR and master sonar checks in three simple steps using a common configuration.
Step 1: SonarQube Configuration
We'll be setting up PR decoration using a general SonarQube Gradle task. For pull request decoration to work you must provide the following keys in your scan:

Example:
sonarqube {
    properties {
        property "sonar.host.url", SONAR_HOST
        property "sonar.projectName", SONAR_PROJECT
        property "sonar.projectKey", "demo-sonar-project"
        property "sonar.projectVersion", "1.0"
        property "sonar.login", System.getenv("SONAR_TOKEN")
        property "sonar.sources", "src/main/java"
        property "sonar.tests", "src/test/java"
        property "sonar.coverage.jacoco.xmlReportPaths", "${project.buildDir}/jacocoTestReport.xml"
        property "sonar.junit.reportPaths", "${project.buildDir}/test-results/test"
        property "sonar.projectDate", "${new Date().next().format("yyyy-MM-dd'T'HH:mm:ssZ")}"
        if(System.getenv('CHANGE_ID') != null) {
            property 'sonar.pullrequest.base', "master"
            property 'sonar.pullrequest.github.repository', "sonar-demo-project"
            property 'sonar.pullrequest.key', System.getenv('CHANGE_ID')
            property 'sonar.pullrequest.branch', System.getenv('CHANGE_BRANCH')
        }
    }
}
Once this is configured, use your Jenkins script to set the required environment variables.
Step 2: Jenkins Configuration
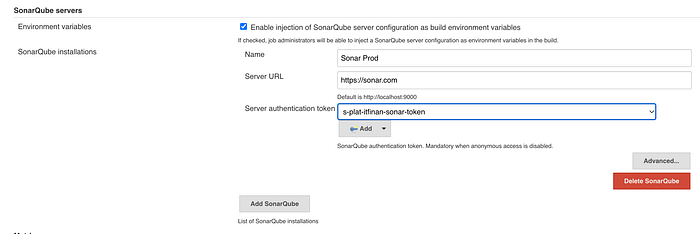
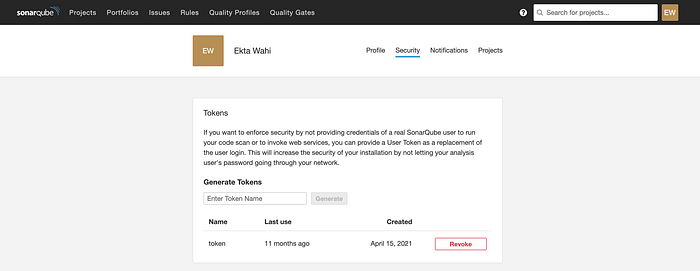
For the sonar authentication token, use your private token generated using the sonar server.
Step 3: Jenkins Script Setup
Once the above configuration is done, add the sonar task as part of your pipeline. An example snippet is given below:
steps {
    withSonarQubeEnv('Sonar Prod') {
        milestone 0
        sh './gradlew --stop'
        sh './gradlew sonarqube --info -Pversion=${VERSION}'
        git branch: 'master', credentialsId: 'github_credential', url: env.GIT_URL
        git branch: env.BRANCH_NAME, credentialsId: 'github_credential', url: env.GIT_URL
    }
    sleep(15)
    timeout(time: 10, unit: 'MINUTES') {
        waitForQualityGate abortPipeline: true
    }
}
This will ensure that sonarQube checks run for both PRs and the master pipeline.
Conclusion
Once you have this setup, you'll be able to see quality gate statuses of your master and PR branches as seen below: