

Build real-time apps using GraphQL, Django & React! Dive into Graphene, Django Channels for live backend data without refresh. Step-by-step guide!

In the ever-evolving world of technology, progress and innovation are constants. Just a few days ago, I delved into the intricacies of developing a live application purely with Django, harnessing the power of Django Channels.
But what happens when we wish to push the boundaries further? This time around, I aim to blend the robustness of Django with the flexibility of GraphQL and the reactivity of React. Moreover, we'll explore a functionality that fetches data seamlessly from the database, eliminating the need for the user to constantly refresh the page or make manual interventions. Join me on this exciting journey as we integrate these powerful technologies into one cohesive system.
Ever wondered what you can craft with the knowledge from this guide? Let me paint a picture for you!
- Chat Away! : Picture a digital room where friends or strangers type away and see messages pop up instantly, no refresh button in sight. Yep, like those old AOL chat rooms, but cooler!
- Together We Edit : Imagine working on a doc with pals from across the globe. You type a line, they add another, and it's as smooth as sipping your morning coffee. Sounds like magic? Nope, just tech!
- Data at Your Fingertips : Envision a sleek board that shifts and updates with fresh data as you watch. Whether it's the latest sales or keeping an eye on server health, it's all in real-time.
- Game On, Friends! : Dive into games where you and friends battle wits in quizzes or strategize moves. The catch? Everything's updated for every player right as it happens!
- Raise Your Voice (or Vote) : Think of a platform where you tap your choice, and voila! The tallies change right before your eyes.
- Teamwork Makes the Dream Work : Visualize a space where teams juggle tasks. As one finishes a task or adds a note, everyone's in the loop instantly.
- Learning Gets Live : Dream of a classroom without walls, where teachers and students mingle in real time. Pop quizzes? They're live, and scores light up as answers flow in.
Endless? Absolutely! That's the charm of real-time. It bridges gaps, connects dots, and brings vibrancy to the digital realm. Dive in and bring those ideas to life!
Setting Up Django and React
1. Installing Python:
- Mac users rejoice, your system already comes with Python! For our friends on Windows or Linux, just visit Python's official website. Make sure you go for a version from the 3.x family.
python3 --version # Confirm your Python version2. Getting Node.js and npm Ready:
- To harness the power of Node.js and npm (Node Package Manager), go to Node.js' official website. They've got easy-to-follow installation instructions tailored for your operating system.
node -v   # Check Node.js version
npm -v    # Verify npm version
3. A Clean Python Virtual Environment:
- Trust me on this one, keeping your Python workspace tidy can save you from many future headaches. Let's get that virtual environment up and running.
python3 -m venv my_venv
source my_venv/bin/activate # If you're on Windows, opt for `my_venv\Scripts\activate`- I'd recommend the Python versions like 3.6 through 3.10, especially since we're partnering with Django 3.2. Got another Python version and want to set up an isolated environment? Here's a neat trick:
python3.8 -m venv my_venvThis spell creates a fresh environment using Python 3.8. Adjust the version number as you see fit.
4. Starting with Django:
- Alright! With the environment ready, let's kick off our Django project.
pip install django==3.2.22
django-admin startproject my_react_django_project .
Quick note: That tiny dot at the end of the last command ensures manage.py remains outside the project folder. It's a small tweak that makes life a bit easier down the road. Inside, you'll find a treasure trove named my_react_django_project with Django goodies. One star of the show here is manage.py, a command-line utility you'll become best friends with.
Insider's Perspective: Before going code-wild, stroll through the settings.py inside your project folder. This file is the backstage pass to many of Django's wonders.
Congratulations! The foundations are now set. It's like having the pillars of a house ready. On top of this, we'll add the artistic flairs and high-tech gadgets.
In the next segment, we venture into marrying Django with React. I promise it's going to be more intriguing than any romance novel!
Marrying Django with React
1. Introducing React:
- Django's been waiting, and now it's time for React to join the party. React has transformed our UI expectations with its unique component-based charm. But how do these two, Django and React, become the ultimate power couple? Let's find out.
npx create-react-app frontend # 'frontend' will be your React app's nameThis command doesn't just bring in React; it also organizes a beautifully structured project within a frontend directory.
2. Fusing React with Django:
- Here's where the magic happens! We're going to let Django in on the secret that React is here. Dive into the
settings.pyof your Django project. Remember the TEMPLATES setting? That's where we start.
import os  # At the top, in case it's not already there

TEMPLATES = [
    {
        # ...
        'DIRS': [os.path.join(BASE_DIR, 'frontend/build')],
        # ...
    },
]

STATICFILES_DIRS = [
    os.path.join(BASE_DIR, 'frontend/build/static'),
]
These configurations signify the union; they ensure Django knows where to find React's outputs, making their collaboration seamless.
And as our story nears its pivotal moment, it's crucial to remember: Integrating Django with React is a significant leap, but it's not the final step. To perfect this harmonious relationship, there's another bridge to cross — setting up CORS (Cross-Origin Resource Sharing). Fear not, for this chapter awaits us just around the corner. Until then, relish the beauty of Django and React's newfound partnership.
Let's start the game now
- Start by Crafting a New Django App:
- The beauty of Django is its modular approach. You can think of an app as a module or a component of your entire project.
django-admin startapp appQuick Note: This command conjures up a new app named app. A sensible choice for simplicity, but feel free to give it any name that suits your project.
2. Onboard Some Essential Packages:
- These are the tools and libraries that will give our project wings.
pip install daphne==2.5.0 channels==2.4.0 channels-redis==4.1.0
pip install graphene-django==2.16.0
pip install django-cors-headers==4.2.0
pip install graphene-subscriptions==1.0.2
Daphne (daphne==2.5.0):
What's it all about?
- Daphne is an ASGI (Asynchronous Server Gateway Interface) server. In the Django world, it's mainly used to handle WebSockets, HTTP2, and other asynchronous protocols.
How do you use it?
- Once installed, you can use Daphne to serve your Django application instead of traditional WSGI servers like Gunicorn. It becomes especially important if you're using Channels for real-time functionalities.
Channels (channels==2.4.0):
What's it all about?
- Django Channels extends Django to handle WebSockets, which is useful for building real-time applications. Channels allow Django to manage WebSockets and background tasks, making it easier to develop applications that require instant communication.
How do you use it?
- After installation and some configuration, you can start writing consumers (similar to views but for handling WebSocket connections) and route incoming WebSocket requests to those consumers.
Channels-Redis (channels-redis==4.1.0):
What's it all about?
- Think of Channels-Redis as the unseen messenger in the backstage of a theater, seamlessly passing notes between actors. Here, the actors are parts of your application or different instances of your app on varied servers. This nifty tool employs Redis to ensure messages get to where they need to go, especially vital when diving into the realm of WebSockets.
How do you use it?
- Once you've got it set up, it's like having an efficient postal system within your app, making sure messages find their way across the landscape of your digital ecosystem.
Graphene-Django (graphene-django==2.16.0):
What's it all about?
- Imagine having a translator that helps your Django models speak the rich and nuanced language of GraphQL. That's Graphene-Django for you. It's like a bridge between the structured world of Django and the expressive versatility of GraphQL.
How do you use it?
- Set it up, and it'll turn your Django models into GraphQL maestros, enabling you to craft APIs that are both mighty and nimble.
Django-CORS-Headers (django-cors-headers==4.2.0):
What's it all about?
- The digital world has its borders, and browsers are like vigilant border guards ensuring no unauthorized messages cross over. But sometimes, you want to let specific messages through. Enter Django-CORS-Headers — it's like a VIP pass that tells the guards which messages (or domains) can enter the party.
How do you use it?
- Configure it to your needs, decide who gets the VIP treatment, and you're good to go.
Graphene-Subscriptions (graphene-subscriptions==1.0.2):
What's it all about?
- Imagine a radio that updates you instantly when there's breaking news. That's the essence of Graphene-Subscriptions. In the digital world, it lets your application broadcast updates, much like live news alerts, ensuring your users are always in the know.
How do you use it?
- Set it up, and then your app can send out real-time updates. Your users, on the other hand, can "tune in" to these updates, ensuring they're always connected to the latest happenings.
INFO: For this application we will also need Redis,if you don't have it installed follow the steps here for your specific platform.
After installation check if Redis is on with
redis-cli ping
# need to return PONG
If Redis is not activated then activate it in a new terminal with the command
redis-server
3. URL Configuration:
- Now, let's ensure our project knows which pages (or routes) to serve. Open the
urls.pyfile in your main project folder:
# Importing necessary modules from the Django framework
from django.contrib import admin
from django.urls import path

# Importing the GraphQLView from the Graphene-Django package, which allows us to handle GraphQL queries
from graphene_django.views import GraphQLView

# Defining the URL patterns for the Django application
urlpatterns = [
    # Linking the default Django admin interface to the URL path 'admin/'
    path('admin/', admin.site.urls),

    # Linking the GraphQL endpoint to the URL path 'graphql/'. The `graphiql` parameter set to True
    # provides an interactive in-browser GraphQL IDE, useful for testing and understanding our GraphQL API.
    path('graphql/', GraphQLView.as_view(graphiql=True)),
]
This urls.py file code is a configuration for URL routing in a Django application. In Django, URL routing determines how URLs map to views. The views then define what happens when a particular URL is visited.
Imports:
from django.contrib import admin: Imports Django's default administrative interface. Django provides a built-in admin interface that helps developers and site administrators perform CRUD (Create, Read, Update, Delete) operations on registered models without writing additional views and forms.from django.urls import path: Imports thepathfunction, a utility to define URL patterns for the app.from graphene_django.views import GraphQLView: Imports theGraphQLViewfrom the Graphene-Django library. This view is designed to handle and respond to GraphQL queries, which is a modern alternative to REST for APIs.
URL Patterns (urlpatterns):
- The
urlpatternslist defines the URL patterns for the Django application. path('admin/', admin.site.urls): Maps the/admin/URL path to Django's default administrative interface. This means when you navigate to<your_domain>/admin/, you'll access the Django admin site.path('graphql/', GraphQLView.as_view(graphiql=True)): This maps the/graphql/URL path to theGraphQLView. This allows your application to receive and respond to GraphQL queries at this endpoint. Thegraphiql=Trueargument provides an interactive GraphQL playground named GraphiQL at this endpoint. GraphiQL is an in-browser tool that allows you to write, validate, and test GraphQL queries, making it a powerful tool during development.
In essence, this code sets up the basic routing for a Django application, including the default admin interface and a GraphQL endpoint with a handy interactive interface.
4. Set Up Websocket Routing:
- Time for some real-time magic. Create a new file named
routing.pyin your main project folder:
# Importing necessary modules for Channels routing and URL pattern configuration
from channels.routing import ProtocolTypeRouter, URLRouter
from django.urls import path

# Importing the consumer for handling GraphQL subscriptions
from graphene_subscriptions.consumers import GraphqlSubscriptionConsumer

# Defining the main application routing
application = ProtocolTypeRouter({
    # Configuring WebSocket protocol to handle connections via a URL router
    "websocket": URLRouter([
        # Linking the WebSocket URL path 'graphql/' to the GraphqlSubscriptionConsumer
        # This consumer will handle WebSocket connections for GraphQL subscriptions
        path('graphql/', GraphqlSubscriptionConsumer)
    ]),
})
This routing.pycode is about setting up Django Channels' routing for WebSocket connections, specifically for GraphQL subscriptions using the graphene_subscriptions package.
Imports:
from channels.routing import ProtocolTypeRouter, URLRouter: Channels extends Django to handle WebSockets, and other asynchronous protocols.ProtocolTypeRouteris a router that dispatches based on the type of protocol, whileURLRouterallows URL routing specifically for asynchronous apps.from django.urls import path: This imports Django's standard utility for defining URL patterns.from graphene_subscriptions.consumers import GraphqlSubscriptionConsumer: Consumers are Channels' equivalent of Django views but are designed to handle asynchronous protocols like WebSockets. In this case,GraphqlSubscriptionConsumeris designed to handle WebSocket connections for GraphQL subscriptions.
Application Routing (application):
- The
applicationis a main entry point for Django Channels applications. It's a router that directs incoming protocol-specific connections to the correct handler/consumer. ProtocolTypeRouter: This outer router directs different types of protocol traffic to their respective handlers. In the provided code, we're only handling"websocket"traffic, but Channels can also handle other protocols like HTTP."websocket": URLRouter([...]): Here, we're telling Channels to direct all WebSocket connections to be managed by a specific URL router.path('graphql/', GraphqlSubscriptionConsumer): Within the URL router for WebSockets, we're routing all connections to the/graphql/path to theGraphqlSubscriptionConsumer. This means when a client tries to establish a WebSocket connection to the/graphql/endpoint, theGraphqlSubscriptionConsumerwill handle that connection. Specifically, this setup is commonly used to handle real-time data fetching with GraphQL subscriptions.
In essence, this code configures a Django Channels application to direct WebSocket connections made to the /graphql/ path to be managed by a consumer designed for GraphQL subscriptions, allowing real-time functionality in the app.
5. Create a Simple Model:
- In
app/models.py, let's design a straightforward task model:
# Importing the necessary models module from Django's ORM
from django.db import models

# Defining a Task model which inherits from Django's Model class
class Task(models.Model):
    # Defining a character field for the task title with a maximum length of 200 characters
    title = models.CharField(max_length=200)

    # Defining a boolean field to indicate if the task is completed or not; default is set to False (not completed)
    completed = models.BooleanField(default=False)

    # Overriding the default string representation method to return the title of the task
    def __str__(self):
        return self.title
The app/models.py code is a simple representation of a Django model named Task. A Django model is essentially a representation of a database table, and this model is designed to keep track of tasks.
Imports:
from django.db import models: This imports Django's Object-Relational Mapping (ORM) module, which allows us to define our database models in a Pythonic way, without writing raw SQL.
The Task Model:
- The
Taskclass represents a model (or table) in the database. Each attribute of the class represents a column in that table. title = models.CharField(max_length=200): Here, we define a column namedtitlein theTasktable. This column is of typeCharField, which is a character field used to store strings. Themax_length=200specifies that this string field can have a maximum of 200 characters.completed = models.BooleanField(default=False): This defines another column namedcompleted. It's a boolean field, meaning it can hold eitherTrueorFalse. Thedefault=Falsepart means that when a new task is created, it will be marked as not completed by default.def __str__(self):: This method overrides the default string representation of theTaskmodel. By doing so, whenever aTaskobject is printed or converted to a string, it will display the task's title instead of the default Django representation (which is usually the object's type and its ID).
In a nutshell, this code sets up a Task database table in Django with two columns: title and completed. The title holds the description of the task, while the completed column indicates whether the task has been completed. The __str__ method ensures a more human-readable representation of each task entry.
6. Catching Signals in Django:
- Django signals allow certain senders to notify a set of receivers that some action has taken place. They're essentially a mechanism for decoupling applications. In
app/signals.py:
# Importing necessary modules for Django model signals and Graphene subscriptions
from django.db.models.signals import post_save, post_delete
from graphene_subscriptions.signals import post_save_subscription, post_delete_subscription
from .models import Task  # Importing the Task model from the current directory's models module

# A custom callback function that is triggered when a Task model instance is saved.
def task_saved(sender, instance, **kwargs):
    # Printing out a message indicating the title of the task that was saved.
    print(f"Task '{instance.title}' has been saved!")

# Connecting the custom callback function to the post_save signal for the Task model.
# This ensures the task_saved function is called whenever a Task instance is saved.
post_save.connect(task_saved, sender=Task, dispatch_uid="task_saved_custom")

# Connecting the Graphene subscription's post_save_subscription function to the post_save signal for the Task model.
# This will inform any subscribers that a Task instance has been saved.
post_save.connect(post_save_subscription, sender=Task, dispatch_uid="task_post_save")

# Connecting the Graphene subscription's post_delete_subscription function to the post_delete signal for the Task model.
# This will inform any subscribers that a Task instance has been deleted.
post_delete.connect(post_delete_subscription, sender=Task, dispatch_uid="task_post_delete")
This app/signals.pycode snippet establishes connections between certain actions performed on the Task model and specific functions (or callbacks) that should be triggered in response to those actions.
Imports:
- Django signals:
post_saveandpost_deleteare signals provided by Django that are triggered after a model instance is saved or deleted, respectively. - Graphene subscriptions signals:
post_save_subscriptionandpost_delete_subscriptionare provided by Graphene Subscriptions, which will notify subscribers of changes to the model instances. - Task model: The model on which these signals and subscriptions are based.
task_saved Function:
- This is a custom function that serves as a callback. When a
Taskinstance is saved, this function gets executed. - Inside this function, it simply prints out a message indicating which task was saved using the task's
title.
Signal Connections:
post_save.connect(task_saved, sender=Task, dispatch_uid="task_saved_custom"): This line establishes a connection between thepost_savesignal (which fires after an object is saved) and thetask_savedfunction. Specifically, when aTaskinstance is saved,task_savedwill be executed.post_save.connect(post_save_subscription, sender=Task, dispatch_uid="task_post_save"): Here, after aTaskinstance is saved, thepost_save_subscriptionfrom Graphene Subscriptions is triggered. This will notify any subscribed clients about the saved task.post_delete.connect(post_delete_subscription, sender=Task, dispatch_uid="task_post_delete"): Similarly, when aTaskinstance is deleted, thepost_delete_subscriptionwill notify any subscribed clients about the deletion.
The dispatch_uid provided in each connection ensures that, for each combination of sender and receiver, there is only one connected handler. This is useful in scenarios like Django's AppConfig.ready method, where you might end up connecting signals multiple times if you're not careful.
In summary, this code uses Django's signaling mechanism to trigger specific callbacks when instances of the Task model are saved or deleted. One of these callbacks is custom (task_saved), which just prints out a message, while the others are related to Graphene Subscriptions, notifying clients of changes to the data.
7. Initialize Signals in Your App:
- In the
app/apps.pyfile, Django provides a way to execute startup code when the app loads. By importing our signals module in thereadymethod, we ensure that our signals are registered with Django:
# Importing the AppConfig base class from Django's apps module
from django.apps import AppConfig

# Creating a new configuration class for the app
class AppConfig(AppConfig):  # Notice: We are defining our AppConfig class which is derived from Django's AppConfig
    # Setting the name of the app to 'app'. This is used to uniquely identify the app within the Django project.
    name = 'app'

    # Defining the ready method. This method is called once Django has carried out initialization tasks.
    def ready(self):
        # Importing the signals module from the app. This is typically where signal handlers are connected.
        # By doing this here, we ensure that our signal handlers are connected when the app is ready.
        import app.signals
The app/apps.py code is a configuration setup for a Django application. In Django, applications can have configurations to allow you to set up things like signals, initializations, or other configurations specific to that application.
Imports:
AppConfigbase class: Imported fromdjango.apps, it's a class provided by Django to allow custom configurations for applications.
AppConfig Class:
- This class is your custom configuration class. However, it has the same name as Django's
AppConfig, which might lead to confusion. A different name for the class, likeMyAppConfig, could make the code clearer. nameattribute: This defines the name of the app for which this configuration applies. In this case, it's set to 'app'.
ready Method:
- This method is a part of Django's app lifecycle. It gets executed once all the apps are fully loaded. It's a hook that allows developers to run code after Django has finished setting up.
- Inside this method, the signals from the 'app' are imported. The reason for importing signals here, as opposed to at the top of the file, is to prevent any potential issues with circular imports and to ensure that the signals are connected only once the app is fully ready. By doing this, it ensures that when models in the app are saved, deleted, etc., the appropriate signals (like
post_saveorpost_delete) will trigger the connected signal handlers.
In essence, this code ensures that when the 'app' application is ready within a Django project, its associated signals are loaded and connected. This is a typical pattern when working with Django signals to make sure they're set up correctly.
8. Graphene Schema and Resolvers:
- In
app/schema.py, we're defining the GraphQL schema using the Graphene library. Graphene converts our Django models to GraphQL types and allows us to create queries, mutations, and subscriptions:
# Import the necessary modules from graphene, graphene_django, and the local models
import graphene
from graphene_django.types import DjangoObjectType
from .models import Task
from graphene_subscriptions.events import CREATED, DELETED

# Define the TaskType which is a representation of the Task model in GraphQL
class TaskType(DjangoObjectType):
    class Meta:
        model = Task

# Subscription for when a task is created
class TaskCreatedSubscription(graphene.ObjectType):
    task_created = graphene.Field(TaskType)

    def resolve_task_created(root, info):
        return root.filter(
            lambda event:
                event.operation == CREATED and
                isinstance(event.instance, Task)
        ).map(lambda event: event.instance)

# Subscription for when a task is deleted
class TaskDeletedSubscription(graphene.ObjectType):
    task_deleted = graphene.Field(TaskType)

    def resolve_task_deleted(root, info):
        return root.filter(
            lambda event:
                event.operation == DELETED and
                isinstance(event.instance, Task)
        ).map(lambda event: event.instance)

# GraphQL query to fetch all tasks
class Query(graphene.ObjectType):
    all_tasks = graphene.List(TaskType)

    def resolve_all_tasks(self, info, **kwargs):
        return Task.objects.all()

# GraphQL mutation to create a task
class CreateTask(graphene.Mutation):
    task = graphene.Field(TaskType)

    class Arguments:
        title = graphene.String(required=True)
        completed = graphene.Boolean(required=True)

    @staticmethod
    def mutate(root, info, title, completed):
        task = Task(title=title, completed=completed)
        task.save()
        return CreateTask(task=task)

# GraphQL mutation to delete a task
class DeleteTask(graphene.Mutation):
    task = graphene.Field(TaskType)

    class Arguments:
        id = graphene.ID(required=True)

    @staticmethod
    def mutate(root, info, id):
        task = Task.objects.get(pk=id)
        task_instance = Task(title=task.title, completed=task.completed)
        task.delete()
        return DeleteTask(task=task_instance)

# Aggregating all mutations
class Mutation(graphene.ObjectType):
    create_task = CreateTask.Field()
    delete_task = DeleteTask.Field()

# Aggregating all subscriptions
class Subscription(TaskCreatedSubscription, TaskDeletedSubscription, graphene.ObjectType):
    pass

# Creating the overall schema for GraphQL
schema = graphene.Schema(query=Query, mutation=Mutation, subscription=Subscription)
This app/schema.py code primarily sets up GraphQL schemas, types, queries, mutations, and subscriptions for the Task model in a Django application using graphene and graphene_django.
TaskType: Represents the Task Django model in a GraphQL type using the DjangoObjectType. This allows GraphQL queries to request for Tasks and get them in the structured format defined by this type.
Subscriptions:
- TaskCreatedSubscription: A subscription that listens for when a new task is created. The
resolve_task_createdmethod filters events to identify when aTaskobject has been created. - TaskDeletedSubscription: Similar to the above but listens for when a task is deleted.
Query:
- Query class: Contains the GraphQL queries. The
all_tasksquery fetches all tasks from the database.
Mutations:
- CreateTask: A mutation to create a new task. It accepts the title and completion status of the task as arguments, creates a new
Taskobject, saves it to the database, and then returns it. - DeleteTask: A mutation to delete an existing task based on its ID. It fetches the task with the given ID, makes a copy of its data (because it will be deleted), deletes the task from the database, and then returns the copied data.
Mutation and Subscription classes: These aggregate the individual mutations and subscriptions, respectively.
Schema: It consolidates everything — the query, mutation, and subscription classes — into one comprehensive GraphQL schema. This schema can then be used by a GraphQL server to execute queries, mutations, and subscriptions.
In essence, this code provides a GraphQL interface for CRUD (Create, Read, Update, Delete) operations on the Task model, along with real-time updates using subscriptions for creation and deletion events.
9. Main GraphQL Schema Setup:
- In
project/schema.py, integrate theappschema into the main schema for the project. This is useful when you have multiple apps and need a single entry point for all GraphQL operations.
# Import the necessary modules from graphene and the schema from the 'app' module
import graphene
import app.schema

# Define a Query class that inherits from the Query class defined in app.schema and graphene's ObjectType
class Query(app.schema.Query, graphene.ObjectType):
    pass

# Define a GraphQL schema with the above Query class as its query root
schema = graphene.Schema(query=Query)
The project/schema.py code is setting up a GraphQL schema using the graphene library for a Django application.
Imports:
graphene: A library to help build GraphQL APIs in Python.app.schema: This import suggests that there's an existing GraphQL schema or partial schema defined within the 'app' module. This typically contains various GraphQL queries, mutations, and perhaps types.
Query Class:
class Query(app.schema.Query, graphene.ObjectType): The newQueryclass is being defined that inherits from two sources: theQueryclass insideapp.schemaandgraphene.ObjectType. This means that all the GraphQL fields and resolvers defined inapp.schema.Querywill also be available in this newQueryclass.pass: Thepasskeyword in Python is used as a placeholder when syntactically some code is required, but you don't want to execute any code or command. In this case, it means that the newQueryclass doesn't add any additional fields or functionality over what's inherited from its parent classes.
Schema:
schema = graphene.Schema(query=Query): Here, a GraphQL schema is being defined using thegraphene.Schemaclass. The primary query root for this schema is set to be theQueryclass we've just defined. This means that when GraphQL queries are executed against this schema, it will use the fields and resolvers from theQueryclass (which, remember, includes everything fromapp.schema.Query).
In simpler terms, this code is a way of combining the GraphQL functionality defined in app.schema with a new GraphQL schema definition. This allows for modularity in GraphQL API design, where different parts of the API can be defined in separate modules and then brought together in a central schema.
10. Project Settings Configuration:
- The
project/settings.pyfile has configurations for Django and other extensions:
# code...

# Application definition: Lists all the installed apps that Django knows about.
INSTALLED_APPS = [
    'daphne',  # An HTTP, HTTP2, and WebSocket protocol server for ASGI.
    'django.contrib.admin',  # The built-in Django admin interface.
    'django.contrib.auth',  # The built-in authentication app.
    'django.contrib.contenttypes',  # For managing content types.
    'django.contrib.sessions',  # For managing sessions.
    'django.contrib.messages',  # Framework for storing simple messages for the user.
    'django.contrib.staticfiles',  # To manage static files.
    'channels',  # Enables WebSockets, background tasks, and more.

    'graphene_django',  # Adds Django support for Graphene (GraphQL framework).
    'app.apps.AppConfig',  # Refers to the 'app' application's configuration.
    'corsheaders',  # To manage Cross-Origin Resource Sharing headers.
    'graphene_subscriptions'  # Enables GraphQL subscriptions in the schema.
]

# Configuration for the Graphene framework.
GRAPHENE = {
    'SCHEMA': 'app.schema.schema'  # Points to the GraphQL schema defined in the app's schema module.
}

# Configures the channel layers for Django Channels.
CHANNEL_LAYERS = {
    'default': {  # Default layer configuration.
        'BACKEND': 'channels_redis.core.RedisChannelLayer',  # Using Redis as the backend for Channels.
        'CONFIG': {
            "hosts": [('127.0.0.1', 6379)],  # Specifies the Redis server's host and port.
        },
    },
}

# Defines the middleware used in the project.
MIDDLEWARE = [
    'django.middleware.security.SecurityMiddleware',  # Adds security measures to the application.
    'django.contrib.sessions.middleware.SessionMiddleware',  # Enables session support.
    'corsheaders.middleware.CorsMiddleware',  # Handles CORS headers.
    'django.middleware.common.CommonMiddleware',  # Provides various common utilities.
    'django.middleware.csrf.CsrfViewMiddleware',  # Provides protection against CSRF attacks.
    'django.contrib.auth.middleware.AuthenticationMiddleware',  # Provides user authentication.
    'django.contrib.messages.middleware.MessageMiddleware',  # Adds support for user messages.
    'django.middleware.clickjacking.XFrameOptionsMiddleware',  # Provides protection against clickjacking.
]

# Other code...

# Defines the routing for ASGI applications (like WebSockets) and WSGI applications (regular HTTP requests).
ASGI_APPLICATION = 'my_react_django_project.routing.application'
WSGI_APPLICATION = 'my_react_django_project.wsgi.application'

# Other code...

# Trusted origins for CSRF. Specifies which origins should be trusted for CSRF purposes. - React App Url
CSRF_TRUSTED_ORIGINS = ['http://localhost:3000']

# Configuration for CORS headers.
CORS_ALLOWED_ORIGINS = [
    "http://localhost:3000",  # Specifies which origins are allowed to access the resource.
]
CORS_ALLOW_CREDENTIALS = True  # Indicates that the actual request can include user credentials.
The provided code is from the settings.py. This file contains configurations and settings that Django uses to set up and run your application.
- INSTALLED_APPS: It lists all the applications that are included with the project. This includes built-in Django apps, third-party apps, and custom apps. Each app can have its models, views, templates, etc.
- GRAPHENE: Configuration specific to the
graphene_djangolibrary, which is a GraphQL integration for Django. Here, it points to the schema fileschemawithin theapp'sschemamodule. - CHANNEL_LAYERS: Django Channels adds support for handling WebSockets, which is a protocol for real-time communication. It requires a layer that allows multiple consumer instances to talk with each other. In this case, it's set to use Redis as its backend.
- MIDDLEWARE: These are classes that Django uses to process requests and responses globally before they reach the view or after they leave the view. They provide functionalities like security, session management, authentication, and more.
- ASGI_APPLICATION & WSGI_APPLICATION: Specifies the application configurations for both ASGI (Asynchronous Server Gateway Interface) and WSGI (Web Server Gateway Interface). ASGI is used for handling WebSockets and other asynchronous protocols, whereas WSGI is used for standard HTTP requests.
- CSRF_TRUSTED_ORIGINS: It lists the origins that are trusted for CSRF (Cross-Site Request Forgery) protection. In this case, it trusts requests coming from "http://localhost:3000".
- CORS Configuration:
- CORS_ALLOWED_ORIGINS: It defines which external origins are allowed to make CORS requests to the backend.
- CORS_ALLOW_CREDENTIALS: When set to
True, it indicates that the browser should include credentials in the request.
This configuration file is setting up the Django project for a combination of traditional web requests (using WSGI), real-time communications (using WebSockets and ASGI), and an external frontend (a React app running on localhost:3000)
11. Run Migrations:
- Execute the Django commands to create the necessary database tables based on the models:
python3 manage.py makemigrations
python3 manage.py migrate
12. Interact with GraphQL Endpoint:
- With everything set up, you can now interact with the GraphQL endpoint at
/graphql/. For example, to create a new task, use the following mutation:
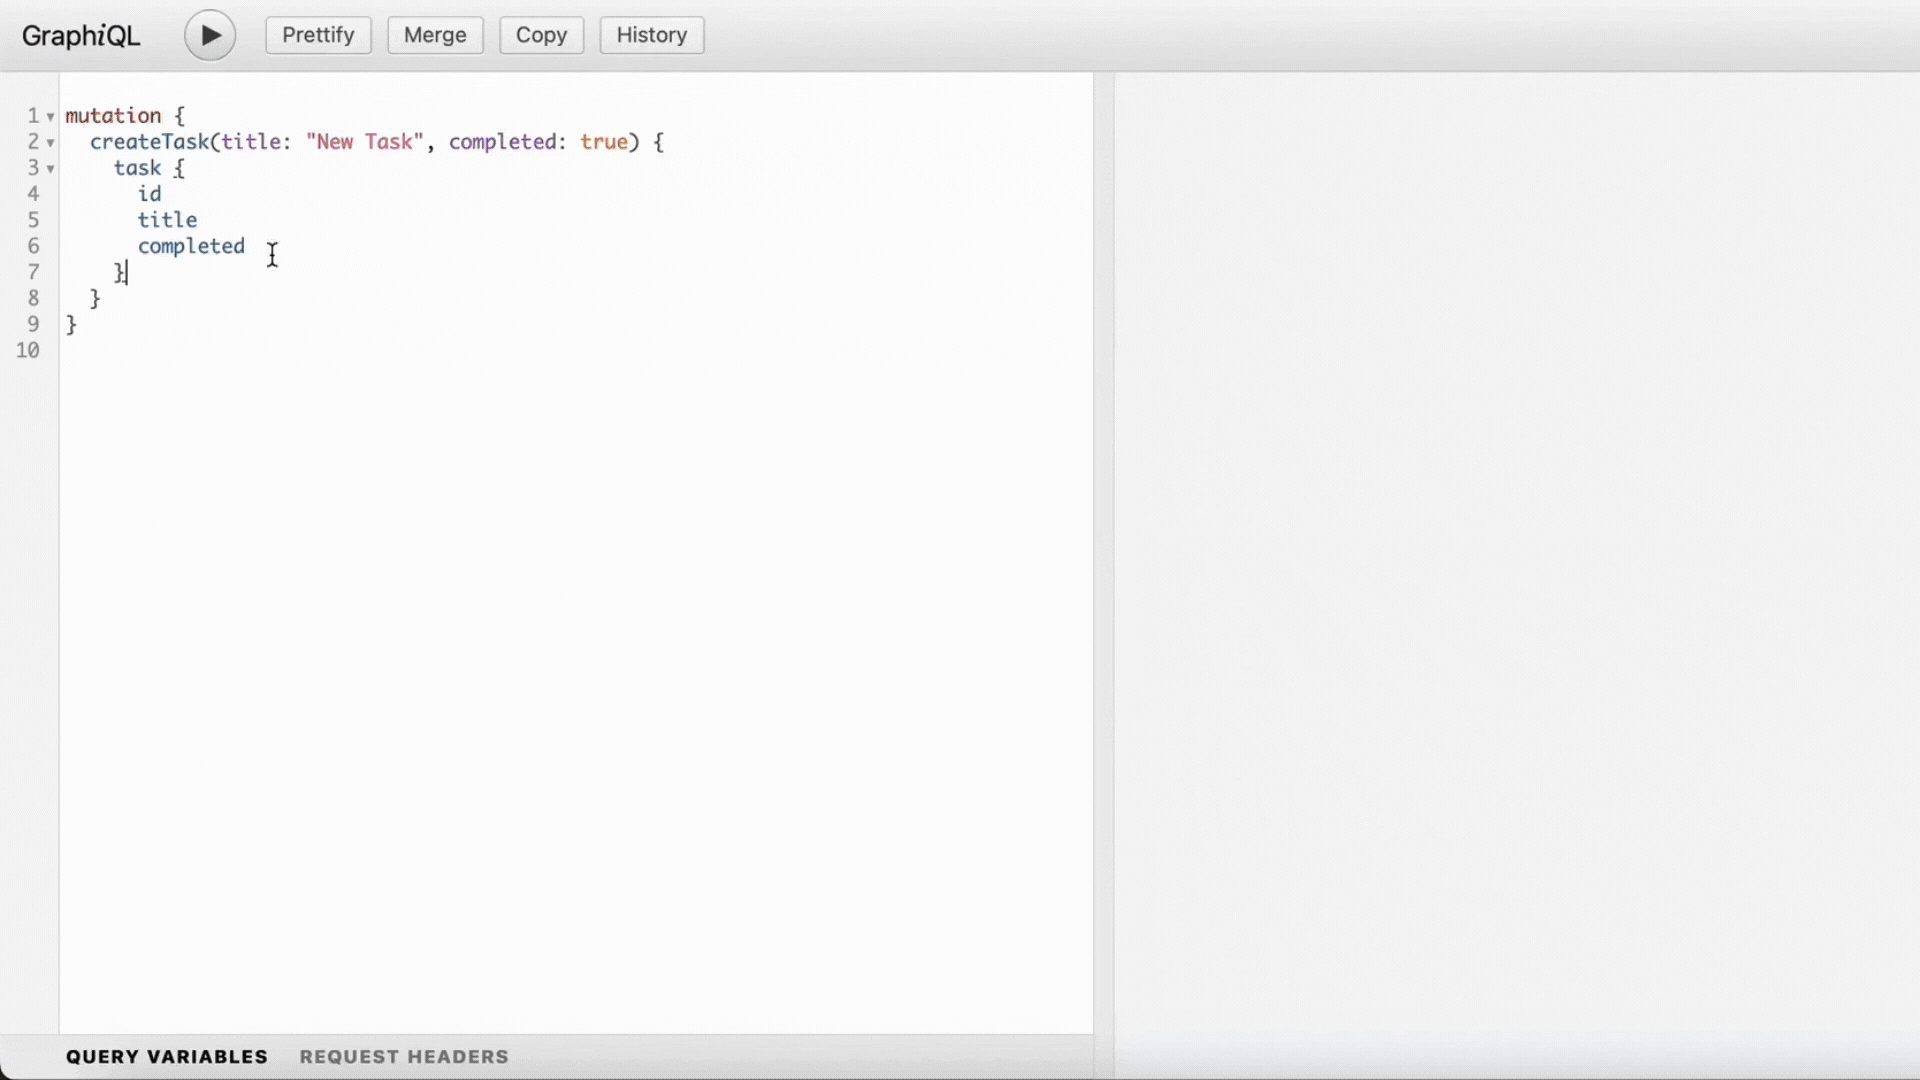
mutation {
    createTask(title: "Task 1", completed: true) {
        task {
            id
            title
            completed
        }
    }
}
13. Further Interactions: You can also perform other operations like querying all tasks or deleting them. Expand on the capabilities by modifying the app/schema.py file as needed.
Setting Up The React App
- Navigating to Your Frontend Folder:
- First, open your terminal or command prompt. You should navigate to the folder where your frontend files reside. You'd typically do this by entering the following command:
cd frontend
2. Installing Essential Packages:
- Next, you'll want to install some packages essential for the functionality of the app. You'll be using Apollo Client and a subscription transport for websockets. Run these commands one after the other:
npm install @apollo/clientnpm install subscriptions-transport-ws
3. Setting Up Apollo Client:
- Head over to the
frontend/src/directory. There, you should create a new file namedapolloClient.js. This file is crucial as it'll set up the connection between your React app and the backend GraphQL API.
// Importing required modules from Apollo Client library
import { ApolloClient, ApolloLink, InMemoryCache, HttpLink, split } from '@apollo/client';
import { WebSocketLink } from '@apollo/client/link/ws';
import { getMainDefinition } from '@apollo/client/utilities';

// HTTP link configuration for sending GraphQL queries and mutations via HTTP
const httpLink = new HttpLink({
    uri: 'http://localhost:8000/graphql/',
    credentials: 'include'
});

// WebSocket link configuration for GraphQL subscriptions over WebSockets
const wsLink = new WebSocketLink({
    uri: `ws://localhost:8000/graphql/`,
    options: {
        reconnect: true, // Reconnect if the connection drops
        connectionParams: {
            // Here you can include additional connection parameters if needed
            // e.g., authentication tokens
            // authToken: userToken
        }
    }
});

// ApolloLink to get the CSRF token from cookies and set it in the header for each request
const authLink = new ApolloLink((operation, forward) => {
    const csrfToken = document.cookie.split(';').find(n => n.trim().startsWith('csrftoken=')).split('=')[1];
    operation.setContext({
        headers: {
            'X-CSRFToken': csrfToken // Set CSRF token in request headers
        }
    });
    return forward(operation); // Pass the operation forward
});

// Use the split function to determine which link (http or ws) to use based on the type of GraphQL operation
const link = split(
    ({ query }) => {
        const { kind, operation } = getMainDefinition(query);
        // Return true if this is a subscription operation
        return kind === 'OperationDefinition' && operation === 'subscription';
    },
    wsLink, // Use the WebSocket link for subscriptions
    authLink.concat(httpLink) // Use the HTTP link for queries and mutations, but after setting the auth header
);

// Instantiate the ApolloClient
const client = new ApolloClient({
    cache: new InMemoryCache(), // In-memory cache to store query results
    link: link // Link to direct operations
});

// Export the configured client
export default client;
This script configures the Apollo Client for a frontend application to interact with a GraphQL backend server.
HTTP Link (httpLink):
- This link specifies the URI where the Apollo Client will send its GraphQL queries and mutations.
- The
credentials: 'include'option tells the Apollo Client to include cookies in its requests, which can be necessary for authentication or CSRF protection.
WebSocket Link (wsLink):
- Used for GraphQL subscriptions, which enable real-time functionality in the app.
- The
reconnectoption ensures that the client tries to reconnect if the WebSocket connection is lost. connectionParamscan be used to send additional parameters during the WebSocket connection initialization (like authentication tokens).
Authentication Link (authLink):
- This is a custom Apollo Link that intercepts all operations and adds an
X-CSRFTokenheader to each request. - It retrieves the CSRF token from the browser's cookies to include it in requests for protection against CSRF attacks.
Split Link (link):
- The
splitfunction is used to decide which link (HTTP or WebSocket) should handle an operation. - If the operation is a subscription, it uses the WebSocket link; otherwise, it first processes the request through the
authLinkto add the CSRF token and then uses the HTTP link.
Apollo Client (client):
- The main object that the frontend will use to send operations (queries, mutations, subscriptions) to the backend.
- It is configured to use the in-memory cache to store query results for performance benefits.
- The
linkis specified to determine how to process each operation.
Finally, the configured Apollo Client is exported for use in other parts of the frontend application.
4. Implementing Functionality in App.js:
- Your main app component resides in the
App.jsfile. Here, you'll:
import React from 'react';
import { ApolloProvider, useQuery, useApolloClient } from "@apollo/client";
import gql from 'graphql-tag';
import client from './apolloClient.js';
import './App.css';
import { useSubscription } from '@apollo/client';
const TASK_CREATED_SUBSCRIPTION = gql`
subscription onTaskCreated {
taskCreated {
id
title
completed
}
}
`;
function TaskUpdates() {
const client = useApolloClient();
const { data, loading, error } = useSubscription(TASK_CREATED_SUBSCRIPTION);
if (error) {
console.error("Subscription error:", error);
}
if (loading) return <div></div>;
if (data && data.taskCreated) {
const newTask = data.taskCreated;
// Try to read the tasks from cache
const cacheData = client.readQuery({ query: GET_TASKS });
// If the data exists in cache, update it
if (cacheData && cacheData.allTasks) {
// Check if the task is already in the cache
const taskAlreadyExists = cacheData.allTasks.some(task => task.id === newTask.id);
if (!taskAlreadyExists) {
client.writeQuery({
query: GET_TASKS,
data: {
allTasks: [...cacheData.allTasks, newTask],
},
});
}
}
}
return null;
}
const GET_TASKS = gql`
query GetAllTasks {
allTasks {
id
title
completed
}
}
`;
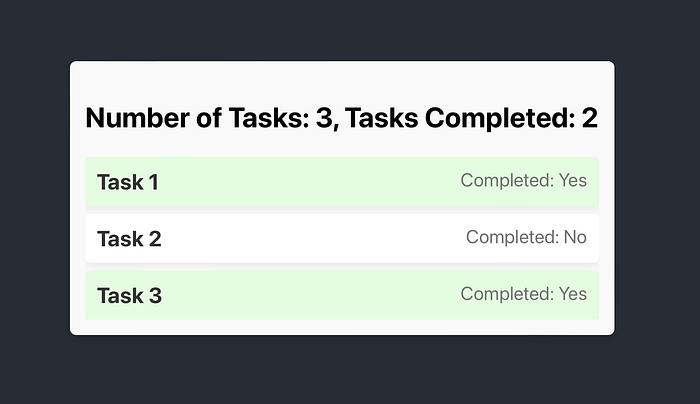
function TaskList() {
const { loading, error, data } = useQuery(GET_TASKS);
if (loading) return <p>Loading...</p>;
if (error) return <p>Error: {error.message}</p>;
const completedTasks = data.allTasks.filter(task => task.completed).length;
return (
<div className="task-list-container">
<h2>
Number of Tasks: {data.allTasks.length}, Tasks Completed: {completedTasks}
</h2>
<div className="task-scroll">
{data.allTasks.map(task => (
<div key={task.id} className={`task-item ${task.completed ? 'completed' : ''}`}>
<h3>{task.title}</h3>
<p>Completed: {task.completed ? 'Yes' : 'No'}</p>
</div>
))}
</div>
</div>
);
}
function App() {
return (
<ApolloProvider client={client}>
<div className="App">
<header className="App-header">
{/* ... existing content ... */}
<TaskList />
<TaskUpdates />
</header>
</div>
</ApolloProvider>
);
}
export default App;Imports:
- Necessary libraries, Apollo Client setup (
apolloClient.js), and styling (App.css) are imported.
TASK_CREATED_SUBSCRIPTION:
- This defines a GraphQL subscription. It will listen for new tasks being created in the backend.
TaskUpdates Component:
- Listens for updates from the
TASK_CREATED_SUBSCRIPTION. - When a new task is created, this component reads the current list of tasks from the Apollo Client cache.
- If the new task isn't already in the cache, it adds it. This ensures that your app's UI stays in sync with any new tasks created.
GET_TASKS Query:
- A GraphQL query to retrieve all tasks.
TaskList Component:
- This component fetches and displays a list of tasks.
- It displays the total number of tasks and how many of them are completed.
- Each task is displayed with its title and completion status.
App Component:
- This is the main application component.
- It wraps everything inside an
ApolloProvider, which makes Apollo Client functions available to all child components. - The main App's layout includes the
TaskList(to display tasks) andTaskUpdates(to listen for new tasks) components.
5. Styling with App.css:
- Styling plays an essential role in making your app visually appealing. Open the
app.cssfile. This is where you'll define styles that make your app look great.
/* other css style... */

/* new added */
.task-list-container {
  background-color: #f9f9f9;
  padding: 20px;
  border-radius: 8px;
  box-shadow: 0 4px 8px rgba(0, 0, 0, 0.1);
}

.task-list-container h2 {
  color: #000000;
}

.task-scroll {
  max-height: 300px;
  overflow-y: scroll;
  margin-top: 20px;
}

.task-item {
  padding: 15px;
  background-color: #fff;
  border-radius: 6px;
  margin-bottom: 10px;
  box-shadow: 0 4px 8px rgba(0, 0, 0, 0.05);
  transition: background-color 0.3s ease;
  display: flex;
  justify-content: space-between;
}

.task-item:last-child {
  margin-bottom: 0;
}

.task-item.completed {
  background-color: #e5fde1;
}

.task-item h3 {
  margin: 0;
  color: #333;
}

.task-item p {
  margin: 0;
  color: #777;
}
And there you have it, your live app!
This process makes sure that your React app is not only functional but also visually compelling. Remember, the blend of functionality and aesthetics is what often makes apps stand out. Enjoy building!
Don't forget to give me a follow if this article helped you and a clap.
And also if you want to be updated with the next articles and learn together I'm waiting for you in my discord group.
Thank you ❤️👋
In Plain English
Thank you for being a part of our community! Before you go:
- Be sure to clap and follow the writer! 👏
- You can find even more content at PlainEnglish.io 🚀
- Sign up for our free weekly newsletter. 🗞️
- Follow us on Twitter(X), LinkedIn, YouTube, and Discord.