
The Recall feature in Windows 11 is an AI-powered search tool that allows users to easily find past activity on their PC, including documents, websites, and more, using natural language queries. It works by taking periodic screen snapshots and using AI to understand the content displayed. This allows you to search for things you've seen in the past, like images, text, or even specific websites or applications, using natural language queries. With the recent Windows 11 KB5058411 (OS Build 26100.4061), Microsoft finally rolled out the Windows Recall feature to Copilot+ PCs. Let's take a look at how the Recall feature works on Windows 11
What Is Recall?
Recall is a new Windows feature that automatically captures snapshots of your screen while you use your PC. These snapshots are organized into a timeline, allowing you to revisit past activities easily. It's like having a personal assistant who securely and privately remembers everything you did on your computer.
How Recall Works:
- You can access Recall through a keyboard shortcut (Windows logo key + J) or via the taskbar icon.
- Recall takes snapshots of your screen as you navigate, keeping a record of what you've seen.
- The snapshots are analyzed locally on your PC using AI to identify content.
- You can search for content you've seen using natural language queries.
- When you find a relevant snapshot, you can use Click to Do to interact with elements within it.
System Requirements for Using Recall
Recall is available exclusively on Copilot+ PCs, and it requires specific hardware and software specifications, including 16GB of RAM, 256GB of storage, and 50GB of free storage
- A compatible Windows 11 PC (Copilot+ PC)
- Windows Hello enabled (facial recognition, fingerprint, or PIN)
- Secure Enclave or TPM for encryption
- Sufficient local storage for snapshots
- A supported web browser for website filtering
Make sure your PC is up to date and meets Microsoft's hardware specifications to access Recall.
How to Open and Use Recall on Windows 11
You can open Recall on Windows 11, using the keyboard shortcut Windows key + J, click the Recall icon on the taskbar, or find it in Start > All Apps.
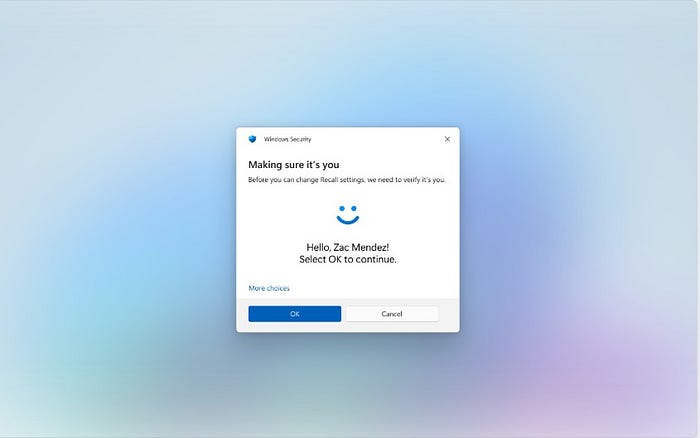
Each time you open Recall or change its settings, you'll be asked to verify your identity using Windows Hello. This ensures only you can access your saved snapshots.
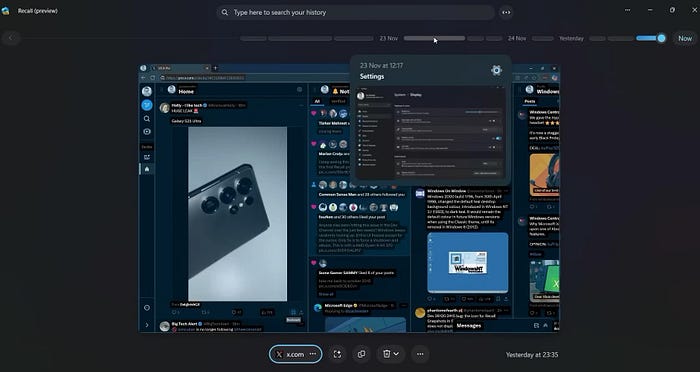
Once Recall is open, you'll see a timeline of your recent activity. This is made up of snapshots taken while you used your PC. Hover your mouse over the timeline to preview what was captured. Click on a segment to view the full snapshot and interact with its content.
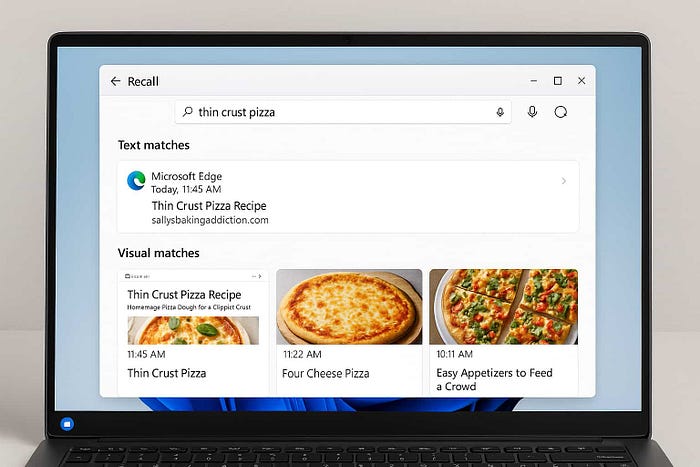
Looking for something specific? Use the search bar at the top. For example, searching "thin crust pizza" will bring up related screenshots. You can also speak your query using the microphone icon. Search results are categorized as:
- Text matches: Words that match your query
- Visual matches: Images similar to your query
- Close matches: Highly relevant results
- Related matches: Similar in context
Clicking on a result opens it with Click to Do — a smart tool that lets you interact with the content. You can copy text, edit images, or reopen the original app or website.

When Click to Do is active, your mouse pointer changes to a blue and white style. You can send content to apps like Notepad or Paint, and use more options such as copying, deleting, or jumping back into the original app.
To pause Recall from taking new snapshots:
- Click the Recall icon in the system tray
- Select Pause until tomorrow (snapshots resume at 12:00 AM)

To resume, click the icon again and select Resume snapshots (requires Windows Hello).
To manage what Recall captures:
- Go to Settings > Privacy & security > Recall & snapshots
- Add apps or websites you want to exclude from snapshots
- Use the Sensitive Information Filter (enabled by default) to block passwords, credit cards, and private info
Find something you don't want to keep? Click the three dots (⋯) next to a snapshot to:
- Copy it to your clipboard
- Delete it individually
- Delete all snapshots from a specific website or app
You'll also have the option to add that app or website to your exclusion list afterward.
Source: https://www.windowscult.com/recall-feature-on-windows/