
This is the second and final part of this article. If you haven't read the first one yet, I recommend doing so it will help everything make more sense. In this section, we'll take a look at how authentication, authorization, and exception handling work.
Authentication Process with JWT
Authentication in Spring Security verifies the user's identity, a process that takes place within the filters configured in the security chain. In a JWT environment, this means validating a token before granting access to protected resources.
One important thing to keep in mind is that, in order to authenticate a user using JWT, we need to configure our SecurityFilterChain, since Spring doesn't provide native support for this out of the box. The default chain and filters are designed for a session- and form-based authentication model. By configuring a custom filter chain as shown in the following code block, the application can support this type of authentication. In a REST API with JWT, the authentication model is stateless and does not rely on sessions.
@Bean
public SecurityFilterChain securityFilterChain(HttpSecurity http) throws Exception {
    http
        .csrf(csrf -> csrf.disable()) // 1. Disables CsrfFilter

        .authorizeHttpRequests(auth -> auth
            .requestMatchers("/auth/**").permitAll()
            .anyRequest().authenticated()) // 2. Defines rules for the AuthorizationFilter
        .sessionManagement(session -> session
            .sessionCreationPolicy(SessionCreationPolicy.STATELESS)) // 3. Configures SessionManagementFilter as stateless
        .authenticationProvider(authenticationProvider)
        .addFilterBefore(jwtAuthenticationFilter, UsernamePasswordAuthenticationFilter.class); // 6. Adds JwtAuthenticationFilter

    return http.build();
}
1. .csrf(csrf -> csrf.disable())
We disable the CsrfFilter because REST APIs that use JWT do not rely on cookies for authentication, which eliminates the risk of CSRF attacks. In traditional web applications with session-based authentication, this filter is essential.
2. .sessionManagement(session -> session.sessionCreationPolicy(SessionCreationPolicy.STATELESS))
This disables the use of HTTP sessions, telling Spring not to create, use, or manage them. By doing this, all filters that depend on sessions become inactive, such as DefaultLoginPageGeneratingFilter and DefaultLogoutPageGeneratingFilter.
3. .authenticationProvider(authenticationProvider)
Here we define the authentication provider responsible for handling the authentication process.
4. .addFilterBefore(jwtAuthenticationFilter, UsernamePasswordAuthenticationFilter.class)
This line inserts the JwtAuthenticationFilter into the filter chain before the UsernamePasswordAuthenticationFilter, ensuring that JWT validation happens first.
This is crucial in a stateless API, where there is no form-based login, no .httpBasic(), and no session to store authentication data.
As a result, the default authentication filters (UsernamePasswordAuthenticationFilter and BasicAuthenticationFilter) remain part of the chain but are not triggered or shown in debug logs. This happens because modern versions of Spring Security are smart enough not to list unused filters when the configuration is stateless and form login is disabled.
Once the JwtAuthenticationFilter validates the token and stores the authentication in the SecurityContext, the flow continues directly through authorization filters, exception handling, and other relevant components, without involving any session-based filters.
This behavior can be seen in the logs when the application starts with this configuration:
Will secure any request with filters:
DisableEncodeUrlFilter, WebAsyncManagerIntegrationFilter,
SecurityContextHolderFilter, HeaderWriterFilter, LogoutFilter,
JwtAuthenticationFilter, RequestCacheAwareFilter, SecurityContextHolderAwareRequestFilter,
AnonymousAuthenticationFilter, SessionManagementFilter, ExceptionTranslationFilter,
AuthorizationFilter
Now that we have discussed the necessary configuration, let's summarize the key elements mentioned in this authentication section. These are essential when working with authentication in Spring Security.
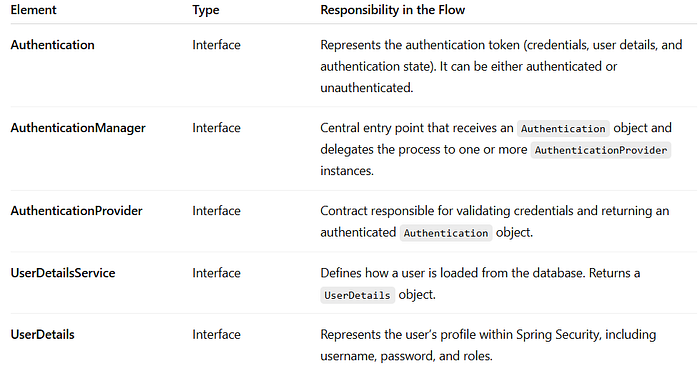

Clarification
In Spring, components such as SecurityContext and AuthenticationManager (along with others mentioned in the summary table) are interfaces, not concrete objects. They define behavioral contracts that their implementations (like SecurityContextImpl or ProviderManager) fulfill behind the scenes.
This design, based on the Dependency Inversion Principle, allows code to depend on interfaces rather than implementations, improving flexibility, interchangeability, and testability.
For educational purposes, I'll use "of type [interface]" alongside the concrete implementation (for example, UsernamePasswordAuthenticationToken of type Authentication) to show which implementation is being used. The official documentation, however, generally refers to the interfaces due to its more technical focus.
Login Process
During the login process (for instance, when the backend is already connected to a frontend), a user can access the /auth/** endpoint without being authenticated. This is possible because SecurityFilterChain is configured with .requestMatchers("/auth/**").permitAll(). The flow of this process works as follows:
The user sends their credentials, typically an email and password. Spring Security uses the UsernamePasswordAuthenticationToken class, which is of type Authentication, to encapsulate these credentials.
Although this object is an instance of Authentication, it is not yet authenticated, meaning its authentication state is false.
At this stage, even though it's an Authentication object, it does not represent an authenticated user. It simply carries the credentials to be validated.
This object serves as the entry point for passing the credentials to the ProviderManager, which is of type AuthenticationManager. The manager's job is to take the Authentication object, iterate through all configured AuthenticationProvider instances, find one that supports the given Authentication, and delegate the actual authentication task to it.

AuthenticationManager iteration process, adapted from the official documentation.Commonly, when querying the database and validating user credentials, Spring Security uses DaoAuthenticationProvider by default, which is an AuthenticationProvider (although the specific provider used depends on the project configuration).
This provider is responsible for the authentication process. It takes the Authentication object that contains the credentials and performs the necessary validations.
To do this, the provider uses UserDetailsService, which looks up the user in the database and returns a UserDetails object, essentially the user's profile within the Spring Security context.
It also uses BCryptPasswordEncoder to encrypt the password provided by the user and compare it with the one stored in the database.
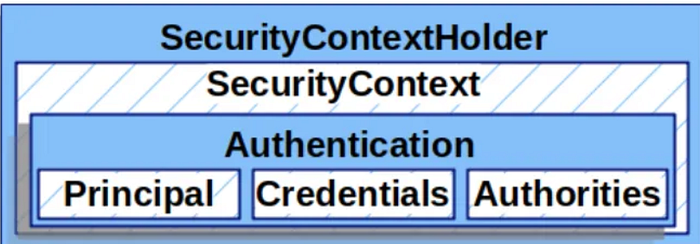
If the validation succeeds, the provider creates a new Authentication object that contains:
- principal: usually a
UserDetailsobject representing the authenticated user. - credentials: the credentials used for authentication (the password), which are typically cleared afterwards for security reasons.
- authorities: the user's roles or permissions (
GrantedAuthority). - authentication state: set to
true, indicating that the token has been successfully validated and represents an authenticated user.

Authentication object, adapted from the official documentation.This object represents the user's authentication data and allows the generation of a JWT associated with it. The token is then returned to the user so it can be used in subsequent requests that require authentication. (It's worth noting that the login process uses a dedicated service responsible for generating this token.)
The login flow concludes with the generation of a JWT, whose purpose is to let the server identify and validate the user in future requests.
Client → Credentials → Controller → AuthenticationService
    ↓
UsernamePasswordAuthenticationToken (unauthenticated)
    ↓
AuthenticationManager (ProviderManager)
    ↓
AuthenticationProvider (e.g., DaoAuthenticationProvider)
    ↓
UserDetailsService → UserDetails
    ↓
PasswordEncoder → Validation
    ↓
UsernamePasswordAuthenticationToken (authenticated)
    ↓
JWT Service → Token generated
    ↓
Client receives JWT for subsequent requests
Using the JWT generated during login
Once the user obtains a valid JWT from the login process, it can be used to access protected resources without repeating the entire authentication sequence. The flow proceeds as follows:
The user sends a request to a protected route, including in the request header a JWT:Authorization: Bearer <token>.
This request enters the FilterChain, which contains theDelegatingFilterProxy delegating to the FilterChainProxy, retrieves our SecurityFilterChain, and encounters a JwtAuthenticationFilter.
This filter, added using addFilterBefore (before the UsernamePasswordAuthenticationFilter), is used to authenticate the user via JWT.
The JwtAuthenticationFilter implements logic to:
- Validate everything related to the JWT.
- Check that the user hasn't already been authenticated by another filter, by consulting the
SecurityContext. - Authenticate the user and store the resulting authentication in the
SecurityContext.
If the JWT is verified as valid (meaning the request header includes a valid token), a new UsernamePasswordAuthenticationToken (an Authentication) is created with the user's information:
- Principal
- Role/Authority
- Authentication state
The password within this Authentication object is null for security reasons it is always null after a successful authentication.
Here comes an important part of the flow:
The created Authentication object must be stored in a SecurityContextImpl, which is of type SecurityContext.
The role of this SecurityContext is to hold an Authentication object in other words, it stores the authenticated user's details, allowing access to routes protected by authentication.
To store the Authentication within the SecurityContext, Spring Security uses the SecurityContextHolder class.
In simplified terms, SecurityContextHolder can be described as a holder for a SecurityContext object.
However, more accurately, it acts as an orchestrator that takes the Authentication and delegates it to a strategy called ThreadLocalSecurityContextHolderStrategy, which implements SecurityContextHolderStrategy.
This strategy is the one that actually stores the SecurityContext.
The ThreadLocalSecurityContextHolderStrategy class internally uses ThreadLocal, which allows each thread to have its own private local variable to store the SecurityContext. This ensures that each thread accesses only its specific SecurityContext, preventing other threads from viewing or modifying it. In this way, Spring Security avoids mixing security data between threads.
The SecurityContext for each thread contains an Authentication, which can be null (meaning the user has not yet been authenticated) or not null (indicating the user has already been authenticated). Once the request is completed, Spring Security clears this variable using the SecurityContextHolderFilter, ensuring no Authentication remains associated with the thread. The thread then returns to Tomcat's thread pool, ready to handle a new request.
When using JWT instead of sessions, the SecurityContext is not persisted anywhere. Instead, a new one is initialized for each request with an empty Authentication, and the filter later injects the created Authentication object. The flow is as follows: once the Authentication object is created, Spring calls the SecurityContextHolder, which uses its strategy to store the Authentication within the thread's local SecurityContext.
// Lifecycle in each request
Request starts → Empty SecurityContext
Valid JWT → SecurityContext populated with Authentication
Request ends → SecurityContext cleared
Thread returns to pool → Ready for next request
Once the user has been authenticated, the system must determine what actions they are allowed to perform and which resources they can access. This is defined by the authorities assigned to the user, either through roles (for example, ADMIN or USER) or through specific permissions that restrict their level of access. At this point, the authorization process comes into play, which we will explore in the next section.
Authorization Process
Introduction to Authorization
Authorization is the process that takes place immediately after a user has been authenticated by the server. Its purpose is to determine what actions the user can perform and which resources they can access, based on the roles or permissions assigned to them.
Just like authentication, authorization follows a well-defined architecture and relies on key components that manage these restrictions.
Authorities (Authorities)
In Spring Security, an authority represents a permission or role granted to a user within the server. These authorities are represented by objects of type GrantedAuthority, whose most common implementation is SimpleGrantedAuthority.
For example, if a user has multiple roles or permissions, several SimpleGrantedAuthority objects are created, one for each role or permission. These authority objects are then grouped into a single Collection (such as a List or Set). This collection of user authorities is passed to the Authentication object constructor to store that information.
The GrantedAuthority interface defines a single method, getAuthority(), which returns a String containing the name of the assigned role or permission.
// Creating an authority based on the user's role from the database
GrantedAuthority authority = new SimpleGrantedAuthority("ROLE_" + userRole);
The String passed to this object is stored as a general authority (either a role or a permission), since this implementation does not distinguish between the two. To make that distinction, additional mechanisms are used later.
Here's something interesting to note:
In Spring Security, there is a practical convention for differentiating roles from permissions: roles are identified by the prefix ROLE_ before the role name (for example, ROLE_ADMIN, ROLE_USER). Although not a strict requirement, it is a recommended best practice.
Because SimpleGrantedAuthority stores authorities (roles or permissions) as simple strings without distinction, methods such as hasRole() are used. This method accepts only the role name (for example, hasRole("ADMIN")) and internally looks for a ROLE_ADMIN among the authorities of the Authentication object.
If an authority does not include the prefix (for example, just "ADMIN"), hasRole() will not recognize it, and you must instead use hasAuthority("ADMIN") with the exact name defined. This approach ensures flexibility when handling both types of authorities in a clear and consistent manner.
Authorization Mechanisms
In Spring Security, there are several ways to define authorization rules, which are enforced by the AuthorizationFilter and other components.
- URL-based Authorization
Defining authorization at the URL level means setting rules directly in the
SecurityFilterChain, using theHttpSecurityobject.
@Bean
public SecurityFilterChain apiFilterChain(HttpSecurity http) throws Exception {
    http
        .authorizeHttpRequests(auth -> auth
            .requestMatchers("/api/admin/**").hasRole("ADMIN")
            .requestMatchers("/api/users/**").hasAuthority("READ_USERS")
            .anyRequest().authenticated());
    return http.build();
}
.authorizeHttpRequests configures the authorization rules for incoming HTTP requests.
.requestMatchers() defines which routes each rule applies to.
.hasRole() and .hasAuthority() verify whether the authenticated user has the specific role or permission required to access the URL.
.anyRequest().authenticated() requires all other requests to be authenticated without specifying additional rules.
Without this line, the default behavior is that any unspecified URL remains open to the public.
.permitAll() allows access to URLs for all users, including unauthenticated ones.
2. Method-level Authorization (Annotations)
This approach allows securing specific methods using annotations, providing more fine-grained access control in controllers or services.
To enable it, annotate your Spring Security configuration class with @EnableMethodSecurity, which activates support for method-level security annotations. Once enabled, you can use annotations such as @PreAuthorize, @PostAuthorize, or @PreFilter to define access rules based on roles, permissions, or custom expressions, protecting each method according to your needs.
For example:
@RestController
@RequestMapping("/api")
public class AdminController {
    @PreAuthorize("hasRole('ADMIN')")
    @GetMapping("/admin/data")
    public String adminData() {
        return "Admin data";
    }
}
@RestController
@RequestMapping("/api")
public class UserController {
    @PreAuthorize("hasAuthority('READ_USERS')")
    @GetMapping("/users/list")
    public String getUsers() {
        return "User list";
    }
}
@Configuration
@EnableMethodSecurity
public class SecurityConfig {
    @Bean
    public SecurityFilterChain apiFilterChain(HttpSecurity http) throws Exception {
        http
            .authorizeHttpRequests(auth -> auth
                .anyRequest().authenticated()); // Only requires authentication
        return http.build();
    }
}@PreAuthorizeis used for security checks before the method executes.@PostAuthorizeis used for security checks after the method executes.
The AuthorizationFilter
Once the user has passed through the authentication filter, the request continues down the filter chain until it reaches the AuthorizationFilter, which is responsible for authorization.
This filter accesses the SecurityContextHolder to retrieve the Authentication object, which contains the list of GrantedAuthority elements. The filter then compares the user's GrantedAuthority values with the authorization rules defined for the requested URL.
If the user has the correct permissions, the AuthorizationFilter allows the request to proceed to the DispatcherServlet. Otherwise, it throws an exception that is caught by another filter, the ExceptionTranslationFilter, which delegates error handling to the appropriate component to generate a standardized response for the client as discussed in a previous section.
Although AuthorizationFilter is the main filter responsible for handling authorization, in recent versions of Spring Security (starting from version 6.x), this filter internally uses an AuthorizationManager to evaluate access decisions. This new approach modularizes the logic, separating access control from the filter's implementation.
Thus, when we define authorization rules using authorizeHttpRequests(), we are essentially configuring an AuthorizationManager that the AuthorizationFilter will use to make its access decisions.
For more in-depth details (beyond the scope of this section), refer to the official Spring Security documentation.
Request → SecurityFilterChain → ... → AuthorizationFilter
    ↓
1. SecurityContext.getAuthentication()
    ↓
2. AuthorizationManager.check(authentication, request)
    ↓
3a. AUTHORIZED → filterChain.doFilter() → DispatcherServlet
3b. DENIED → throw AccessDeniedException → ExceptionTranslationFilter
Exception Handling
Introduction to Exceptions in Spring Security
In Spring Security, security-related exceptions are primarily grouped under two main base classes. On one hand, there is AuthenticationException, which encompasses all errors related to authentication, meaning when the user's identity cannot be properly verified. On the other hand, there is AccessDeniedException, which represents authorization failures, when an already authenticated user attempts to access a resource without the required permissions.
Both classes inherit from RuntimeException, which means they are unchecked exceptions and can be handled centrally by the framework without the need to explicitly catch them in the application code.
Authentication Exceptions
These exceptions are thrown in cases such as invalid credentials, nonexistent users, disabled, locked, or expired accounts, issues with the authentication provider, or invalid/expired tokens.
Common Subclasses of AuthenticationException:
BadCredentialsException: Thrown when the credentials (e.g., password) do not match. This is typically triggered by theDaoAuthenticationProviderafter a failed password comparison against the data retrieved by theUserDetailsService.UsernameNotFoundException: Occurs when theUserDetailsServicecannot find the user in the database. It is propagated directly by this component.AccountExpiredException,CredentialsExpiredException,DisabledException,LockedException: These exceptions are thrown when theAuthenticationProviderdetects that the account has expired, credentials have expired, or the user is disabled or locked, respectively, based on the state of theUserDetailsreturned by theUserDetailsService. Only if all these checks pass does the provider proceed to validate the password.
Authorization Exceptions
During authorization, the most common exception encountered is AccessDeniedException, which occurs when an authenticated user tries to access a resource without sufficient privileges. Unlike authentication, where you might encounter exceptions from both Spring Security and external libraries like JJWT, the hierarchy here is much simpler: the failure always means "you have an identity, but you're not allowed in."
ExceptionTranslationFilter: The Central Handler
The ExceptionTranslationFilter is a critical component located second-to-last in Spring Security's filter chain, right before the AuthorizationFilter.
It acts as an observer to capture and process security-related exceptions within the filter chain. This filter exclusively handles two types of exceptions: AuthenticationException and AccessDeniedException. Any other exceptions fall outside its scope.
As seen in the application logs:
o.s.s.web.DefaultSecurityFilterChain : Will secure any request with filters:
... (previous filters), ExceptionTranslationFilter, AuthorizationFilter
Why this specific position?
Because the ExceptionTranslationFilter:
- Can only catch exceptions thrown by subsequent filters (mainly the
AuthorizationFilter). - Cannot catch exceptions from earlier filters (such as a
JwtAuthenticationFilter).
This behavior becomes clear when you look at a simplified version of its internal code:
// Simplified version of the internal logic
try {
    filterChain.doFilter(request, response);
} catch (AccessDeniedException | AuthenticationException ex) {
    if (!authenticated || ex instanceof AuthenticationException) {
        startAuthentication();
    } else {
        accessDenied();
    }
}
Here's what happens: the ExceptionTranslationFilter executes filterChain.doFilter(request, response), which calls the next filters in the chain.
If any of those (for example, the AuthorizationFilter) throw an exception, specifically AuthenticationException or AccessDeniedException, the filter catches it in the catch block and translates it into an appropriate HTTP response (401 Unauthorized or 403 Forbidden).
From this filter, we can note that its logic depends on the nature of the exception and the authentication state stored in the SecurityContextHolder:
- If it catches an
AuthenticationException, it delegates directly to theAuthenticationEntryPointto generate an error response (for example, 401). It does not verify the authentication state since the exception itself already indicates an identity issue. - If it catches an
AccessDeniedException, the filter checks whether a validAuthenticationobject exists in theSecurityContextHolder. - If the user is authenticated, it delegates the handling to the
AccessDeniedHandler, resulting in an authorization error (for example, 403). - If
Authenticationisnull, anAnonymousAuthenticationToken, or!isAuthenticated(), the filter converts it into anInsufficientAuthenticationExceptionand passes it to theAuthenticationEntryPoint, treating it as an authentication failure.
The Critical Problem: JwtAuthenticationFilter vs ExceptionTranslationFilter
Here's an important point: when we have our custom authentication filter, JwtAuthenticationFilter, placed before the ExceptionTranslationFilter, the following behavior occurs:
SecurityFilterChain (execution order):
1. SecurityContextHolderFilter
2. HeaderWriterFilter
3. CsrfFilter (disabled)
4. LogoutFilter
5. JwtAuthenticationFilter ← OUR FILTER HERE
6. RequestCacheAwareFilter
7. SecurityContextHolderAwareRequestFilter
8. AnonymousAuthenticationFilter
9. ExceptionTranslationFilter ← CAPTURES EXCEPTIONS HERE
10. AuthorizationFilter ← GENERATES EXCEPTIONS THAT ARE CAPTURED
What happens here?
When our JwtAuthenticationFilter throws an exception, the Spring Security filter chain is interrupted. This exception is not caught by the ExceptionTranslationFilter, because it occurred before the filter was reached.
Request → SecurityContextHolderFilter
            ↓
        HeaderWriterFilter
            ↓
        LogoutFilter
            ↓
        JwtAuthenticationFilter
            ↓
        throw new BadCredentialsException("Invalid token") ← EXCEPTION HERE
            ↓
        EXCEPTION EXITS SPRING SECURITY'S FILTER CHAIN COMPLETELY
            ↓
        The following filters NEVER execute:
        - RequestCacheAwareFilter (❌ not executed)
        - AnonymousAuthenticationFilter (❌ not executed)
        - ExceptionTranslationFilter (❌ not executed)
        - AuthorizationFilter (❌ not executed)
Where Do Uncaught Exceptions Go?
This is one of the most important questions that arise: if the exception escapes Spring Security, who handles it?
When an exception "escapes" the Spring Security filter chain, it follows this path:
// Full exception flow:
1. JwtAuthenticationFilter.doFilter()
   └── throw new BadCredentialsException("Invalid token")
                    ↓
2. FilterChainProxy (Spring Security)
   └── ❌ No specific try-catch for SecurityExceptions
   └── Exception continues upward
                    ↓
3. DelegatingFilterProxy
   └── ❌ Only delegates between Spring and the Servlet Container
   └── Exception continues upward
                    ↓
4. Tomcat/Jetty FilterChain
   └── ❌ Other container filters also fail
   └── Reaches the servlet container
                    ↓
5. Servlet Container Error Handling
   └── ✅ Detects the unhandled exception
   └── Looks up error-page configuration
   └── Finds Spring Boot's automatic mapping: Exception -> /error
   └── Performs internal forward to /error
                    ↓
6. New Request to /error
   └── ✅ Now passes through filters and reaches the DispatcherServlet
   └── ✅ BasicErrorController.error() handles the response
The servlet container (Tomcat, Jetty, etc.) includes a standard mechanism for handling unhandled exceptions.
Spring Boot automatically registers an error-page mapping that routes any unhandled exception to /error.
/**
 * SPRING BOOT AUTOMATIC CONFIGURATION:
 */
@Configuration
public class ErrorMvcAutoConfiguration {
 @Bean
    public EmbeddedServletContainerCustomizer containerCustomizer() {
        return container -> {
            // Equivalent to <error-page> in web.xml
            container.addErrorPages(new ErrorPage("/error"));
        };
    }
}
Someone might ask:
"So, if an exception occurs, will it propagate to the DispatcherServlet and can I handle it with a global exception handler?"
The answer is no. If a filter throws an exception, the following filters are not executed, meaning that the DispatcherServlet is never invoked, and therefore, your @ControllerAdvice will not be triggered.
/**
 * REQUEST PROCESSING ARCHITECTURE:
 *
 * Servlet Container (Tomcat)
 *     ↓
 * 🔹 Servlet Filter Chain
 *     ├── Filter 1 (DelegatingFilterProxy)
 *     ├── Filter 2 (CharacterEncodingFilter)
 *     ├── Filter 3 (JwtAuthenticationFilter) ← EXCEPTION HERE
 *     └── Filter N...
 *     ↓
 * 🔹 Servlet (DispatcherServlet) ← NEVER REACHED IF AN EXCEPTION OCCURS ABOVE
 *     ↓
 * 🔹 Spring MVC (@Controllers, @ControllerAdvice)
 */
When the servlet container forwards the request to /error, a completely new request is executed.
It is important to clarify that if your SecurityFilterChain configuration requires authentication for all requests (including /error), this new request to /error will go through the entire Spring Security filter chain again. This means:
- The request to
/errorwill reach theAuthorizationFilter - Since there is no valid authentication, an
AccessDeniedExceptionwill be thrown - Now the
ExceptionTranslationFilterwill catch this exception - Your custom
AuthenticationEntryPointwill execute instead of theBasicErrorController
This behavior can be confusing, because your AuthenticationEntryPoint does execute, but not because of the original JWT exception. It runs due to the new exception raised when trying to access /error.
Real-world examples of exception flows with logs:
Case 1: Protected /error (confusing behavior)
# Original exception in JwtAuthenticationFilter
ERROR: SignatureException thrown. Message: JWT signature does not match...
	at com.proyectoUno.security.filter.JwtAuthenticationFilter.doFilterInternal(JwtAuthenticationFilter.java:75)

# Forward to /error
DEBUG o.s.security.web.FilterChainProxy : Securing GET /error

# New exception because /error requires authentication
ERROR c.p.s.e.CustomAuthenticationEntryPoint : Authentication error at /error:
Full authentication is required to access this resource
Case 2: /error Permitted (expected behavior)
# Same original exception in JwtAuthenticationFilter
ERROR: SignatureException thrown. Message: JWT signature does not match...
	at com.proyectoUno.security.filter.JwtAuthenticationFilter.doFilterInternal(JwtAuthenticationFilter.java:75)

# Forward to /error
DEBUG o.s.security.web.FilterChainProxy : Securing GET /error
DEBUG o.s.s.w.a.AnonymousAuthenticationFilter : Set SecurityContextHolder to anonymous SecurityContext
DEBUG o.s.security.web.FilterChainProxy : Secured GET /error

# CustomAuthenticationEntryPoint does NOT execute
# BasicErrorController handles the response normally
You can change this behavior simply by adjusting your SecurityFilterChain configuration:
@Bean
public SecurityFilterChain filterChain(HttpSecurity http) throws Exception {
    return http
        .authorizeHttpRequests(auth -> auth
            .requestMatchers("/error").permitAll() // ← ALLOW /error
            .anyRequest().authenticated()
        )
        .build();
}
This experiment clearly demonstrates that the CustomAuthenticationEntryPoint only executes when /error is protected, not because of the original JWT exception.
Exception handling in Spring Security requires a deep understanding of the filter chain architecture. Exceptions that occur before the ExceptionTranslationFilter escape the Spring Security ecosystem and are managed by Spring Boot's generic mechanisms, often resulting in unexpected behaviors.
The key is to prevent security exceptions from escaping the Spring Security filter chain, and instead handle them explicitly within the filters where they occur, implementing a solution that avoids anti-patterns within Spring.
This approach ensures consistent error handling, correct HTTP status codes, and preserves the centralized behavior expected from Spring Security.
Standardization and Customization of Exceptions
Although the default behavior is useful, it is best practice to standardize error responses. This allows us to define a consistent format and provide clear messages for those consuming our API. Spring Security lets you customize both the AuthenticationEntryPoint and the AccessDeniedHandler, adapting them to the specific needs of your application.
To use these classes, we configure the SecurityFilterChain to reference our custom implementations instead of the default ones. This is done as shown below:
@Bean
public SecurityFilterChain securityFilterChain(HttpSecurity http) throws Exception {
    http
        .csrf(csrf -> csrf.disable()) // Disable CSRF
        // Use our custom classes
        .exceptionHandling(exception -> exception
                .authenticationEntryPoint(authenticationEntryPoint)
                .accessDeniedHandler(accessDeniedHandler))
        .authorizeHttpRequests(auth -> auth
                // Public access for authentication routes
                .requestMatchers("/auth/**").permitAll()
                // Any other route requires authentication
                .anyRequest().authenticated()
        )
        // JWT, no HTTP sessions
        .sessionManagement(session -> session
                .sessionCreationPolicy(SessionCreationPolicy.STATELESS)
        )
        .authenticationProvider(authenticationProvider)
        .addFilterBefore(jwtAuthenticationFilter,
        UsernamePasswordAuthenticationFilter.class); // JWT filter
    return http.build();
}
With the following lines:
.exceptionHandling(exception -> exception
        .authenticationEntryPoint(authenticationEntryPoint)
        .accessDeniedHandler(accessDeniedHandler))
we instruct Spring Security to use our custom classes instead of the default ones.
The variables authenticationEntryPoint and accessDeniedHandler refer to the following definitions inside the configuration class:
private final CustomAuthenticationEntryPoint authenticationEntryPoint;
private final CustomAccessDeniedHandler accessDeniedHandler;
The custom classes for exception handling depend on how you want to process them. In this case, the code uses an ErrorResponse class that ensures all exceptions in the application return a standardized response.
Conclusion
This concludes the article. I have tried to carefully cover all the key aspects necessary to gain a solid understanding of how Spring Security works. Once you grasp these concepts, analyzing any implementation of Spring Security with JWT becomes much easier.
I hope this article helps you deepen your understanding and apply Spring Security effectively in your projects.