
At this point in my life, I don't get to play video games as much as I would like. Between tinkering in my home lab, work, and pickleball, I don't have the time I once had. However, if I get an idea that intersects homelabbing and video games, it immediately goes to the top of my To-Do list. Instead of continuing with my Active Directory series, I decided to take a break with something more fun.
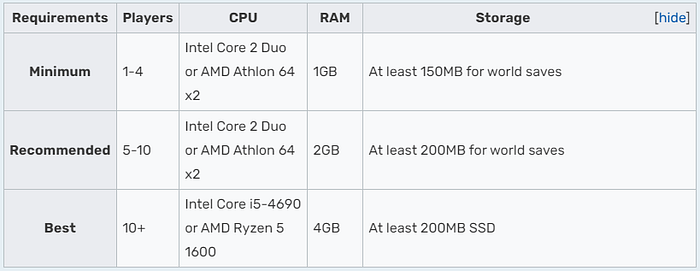
In this article, I will go over how to self-host your very own Minecraft server. I will use a VM on ProxMox, but any Linux host with sufficient specs will do just fine. The sufficient specs will vary based on how many players you will have connecting to your server simultaneously. I have included a chart from the Minecraft Wiki above to help you decide.
Note: The specifications pictured above are for the Minecraft server ONLY. You must allocate more resources to your server for the operating system and other programs you may use.
Installing Java Development Kit
In this article, I assume you can get a Linux server up and running. If you aren't sure where to start, check out my first article, Your First Linux Box. I showed how to get a Linux Desktop up and running in that article. The process is nearly identical.
Now that your Linux host is up, we need to install the Java Development Kit. This can be done by running the following command:
sudo apt install openjdk-21-jdk-headlessOnce that is complete, we need to install the Minecraft Server.
Installing the Minecraft Server
The Minecraft server can be installed via the command line and a web browser. To download the .jar file on the command line, enter the following commands:
sudo mkdir minecraft
sudo wget https://piston-data.mojang.com/v1/objects/450698d1863ab5180c25d7c804ef0fe6369dd1ba/server.jar
sudo mv server.jar minecraft/
To download the file from the web browser, you can find the download page here.
Accepting the EULA
Once we have the jar file in our Minecraft directory, we will start it up by running the command:
java -jar server.jar --noguiYou will know it starts correctly when a lot of text flashes by you in your CLI. If you scroll down, you will see that it failed due to:
Failed to load eula.txt
You need to agree to the EULA in order to run the server. Go to eula.txt for more info.
I guess we should do what it says.
If you look at our Minecraft directory, you will find a few new additions. Including eula.txt, let's open it.
sudo nano eula.txtThere is only 1 line in this file:
eula=falseChange this to true, and then press Ctrl + X, then Y, then enter to save.
Next we will create a script to make starting the server easier.
Creating a Startup Script
Before starting it up and playing, we want to create a script that allows us to start and stop the server. To create the script, we need to create a text file.
sudo touch startscript.shNext, we need to give the instructions for the script to work. I use these Java options and recommend them if you downloaded the Java JDK version 21 earlier in the article. You can confirm you have version 21 by running the following command:
java --versionNow for the script:
sudo nano startscript.shThen paste the following:
#!/bin/sh
cd /home/$USER/minecraft
exec java -Xms2G -Xmx6G -XX:+UnlockExperimentalVMOptions -XX:+UseZGC -jar server.jar --nogui
The 2 options that you will need to tweak are the -Xms and -Xmx options.
- Xms: This will control the amount of memory you allocate to the server on startup. This does not affect your performance once the server instance has booted up. This will affect your server's startup time. Allocate more memory to this option if the startup time is too slow.
- Xmx: This is the maximum amount of memory the server instance can use. Remember to consider your operating system and other programs when setting this.
The other options should be left alone.
File Permissions
Now that we have our script created, we need to set some permissions for it. We will configure the permissions settings so only the file owner can execute it. Only the user you created the file with can run the script.
chmod u+x startscript.shNow, to run the script we just created we will run the command:
sudo ./startscript.shAnd this will start booting up our server. You will see the flash of text again, and then a line of text that says:
[Server thread/INFO]: Done (14.015s)! For help, type "help"At this point, the server is operational. If you get any errors, retrace your steps and check for misconfigurations/mistakes.
To stop the server instance, simply type stop in the terminal you started it in.
Connecting To Your Server Locally
If you open your Minecraft client > Multiplayer > Add Server, we need to enter the local IP of your Linux box into the Server Address field. If you don't know the IP of your Linux box, run the command:
ip addressThis will show you your local IP address. If you have entered the correct IP, it should appear with a server limit of 20. There you have it. Your own locally hosted Minecraft server is ready whenever you need it.
Multiplayer
Playing Minecraft alone is all right, but playing with friends is where it shines. We need to complete a few more steps to enable others to connect to your server.
The first thing we want to do is enable whitelisting in our world. This will allow you to control who can connect to the server. This will prevent random bots/bad actors from joining your world.
Owner Rights
To do this, we need to add you as an admin. This will require you to have joined the server already. So, if you haven't, join and disconnect. This will allow the server to learn your UUID.
To make ourselves admins, we need to format our op.json file. I have created a simple template below:
]
  {
    "uuid": "",
    "name": "",
    "level": 4,
    "bypassesPlayerLimit": true
  }
]
Save the file with Ctrl + X, then Y, then enter.
Next we will run the cat command to get our profile information.
sudo cat usercache.jsonThis will display your account information (and others if anyone else has joined). Copy the UUID and paste it into the UUID field inside ops.json. Fill in your username for the name field and your permission level as 4.
The Permission levels are as follows:
- Level 1: Moderatorr — The player can bypass spawn protection.
- Level 2: GameMaster — The player or executor can use more commands and the player can use command blocks.
- Level 3: Admin — The player or executor can use commands related to multiplayer management.
- Level 4: Owner — The player or executor can use all of the commands, including commands related to server management.
Once you have entered the information, save and close the file with Ctl + X, Y, then enter.
Whitelisting
When you are in the game press T to open the text window. Enter the following command to enable the whitelist on your server:
/whitelist onNext we will add ourselves to the whitelist:
/whitelist add [YourUsername]If you have any friends you would like to add, you would use the same command with their username.
Port Forwarding
For the final step, we need to open up a port on our router to allow requests to join the server. To do this, we must navigate to your router's web GUI. This can be done by entering your router's IP address into your web browser. This can be found by running the following command:
ifconfigOnce you have accessed your router, you need to enable port forwarding. The GUI for each router is different, but the process is still the same. We must open port 25565 and forward those to our Linux box's IP address.
Once you have set up the port forwarding configuration, go to:
https://www.yougetsignal.com/tools/open-ports/This will tell you your router's public IP address (which you will need later) and a tool that will allow you to check if you opened the port on your router. The website will automatically populate the IP address field with your public IP, you just need to change the port to 25565 and hit Check.
If it says the port is open, the configuration works from this side. If you get a message saying the port is NOT open, check your router's documentation and try again.
Next, we must confirm that our router is forwarding to the correct host in your local network. The easiest way to do this is to have a friend try to connect to your server from OUTSIDE of the network your server is on.
They must open the Minecraft client > Multiplayer > Add Server and enter your public IP address. Alternatively, we can check ourselves by disconnecting your cell phone's WIFI and connecting via your cellular connection.
If they cannot connect, it could be your router forwarding to the wrong IP address or a whitelist issue.
You now have a private Minecraft server for you and your friends. If you need any help with the setup or in the future, check out the documentation here.