
If you're starting with Flutter, the most frustrating part isn't writing your first app — it's fixing the setup errors that stop you before you even begin.
When I first installed Flutter, I spent hours dealing with:
❌ Gradle issues ❌ Missing Android SDK ❌ Flutter doctor warnings ❌ PATH variable errors ❌ Emulator not starting
So in this guide, you'll learn how to fix the most common Flutter installation problems step‑by‑step — whether you're on Windows, macOS, or Linux.
By the end, running:
flutter doctorwill show ✔️ everything green.
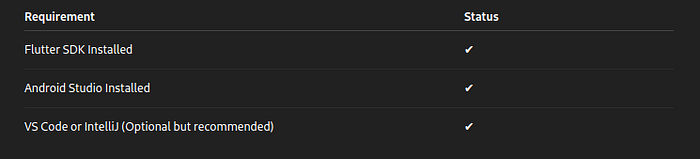
🧰 Prerequisites
Before we begin, make sure you have:
🧪 Step 1 — Fix Flutter PATH Issue
One common error looks like:
'flutter' is not recognized as an internal or external command✔️ Solution (Windows)
- Open Environment Variables
- Under User Variables, edit Path
- Add the path to Flutter
/bin:
C:\src\flutter\bin✔️ Solution (macOS / Linux)
Add this to .zshrc or .bashrc:
export PATH="$PATH:/Users/yourname/development/flutter/bin"Then apply:
source ~/.zshrc🛠 Step 2 — Fix Android SDK Missing Issue
Error example:
Android SDK not found. Install the Android SDK.✔️ Fix:
- Open Android Studio
- Go to: Settings → Appearance & Behavior → System Settings → Android SDK
- Install:
- Android SDK
- Android SDK Platform Tools
- Google USB Driver (Windows only)
Run again:
flutter doctor --android-licensesAccept all licenses by pressing Y repeatedly.
📌 Step 3 — Fix Gradle Errors
Common error:
Could not determine the dependencies of task ':app:compileDebugJavaWithJavac'✔️ Fix:
Update Gradle and sync:
Go to:
android/build.gradleUpdate:
classpath 'com.android.tools.build:gradle:8.1.0'Inside:
gradle/wrapper/gradle-wrapper.propertiesUpdate:
distributionUrl=https\://services.gradle.org/distributions/gradle-8.0-all.zip📱 Step 4 — Fix Emulator Not Running
Error:
No connected devices found✔️ Solution:
- Open Android Studio
- Navigate to Device Manager
- Create a Pixel 6 / Android 13 or 14 Emulator
- Enable:
✔ Virtualization in BIOS (Windows) ✔ Rosetta if M-series Mac
Then run:
flutter devices🎯 Step 5 — Fix Xcode / iOS Errors (macOS Only)
Error example:
Xcode installation is incomplete.✔️ Fix:
Run:
sudo xcode-select --switch /Applications/Xcode.app/Contents/Developer
sudo xcodebuild -runFirstLaunch
Then accept licenses:
sudo xcodebuild -license🧹 Step 6 — Clear Cache (When Nothing Works)
Sometimes Flutter caches broken builds.
Run:
flutter clean
flutter pub get
Or reset dependencies:
flutter pub upgrade --major-versions🧾 Final Checklist (Everything Should Be Green)
Run:
flutter doctorYour ideal output should look like:
[✓] Flutter
[✓] Android toolchain
[✓] Xcode
[✓] Chrome
[✓] Connected devices
[✓] VS Code
If everything is green → you're ready to build your first app 🚀
📌 Conclusion
Setting up Flutter might feel difficult at first, but once everything is configured correctly, development becomes fast and smooth — especially with hot reload, modern UI widgets, and cross‑platform capability.
Now that your environment is fully working, tomorrow we'll build:
➡️ Day 2: Stateless vs Stateful Widgets — with real examples