

Adventures in WSL
Introduction
As Windows Subsystem for Linux matures and gains more support across the industry, it is rapidly becoming an attractive alternative to traditional VM tools used for development work such as VirtualBox or VMware. An example of some of the great support WSL is getting, is from the creator of IntelliJ and PyCharm, JetBrains. In both of the IDE's, you can open and create projects within the WSL filesystem and you can open a WSL terminal right there within the IDE itself. To top it all off you can use tools installed in WSL, such as a JDK or Python interpreter; as the default for building or running configurations within the IDE.
I have recently been taking advantage of these new features to keep Windows itself clean and tidy by installing most of my development tools in WSL instead of using the Windows versions.
By using Docker we can quickly create a WSL distro that has all of the tools you need pre-installed and ready to use. The greatest advantage I have noticed so far is being able to treat my WSL installation as disposable! If I accidentally make some breaking changes to my installation I can quickly remove it and spin up a new one using a Dockerfile or an image. In this article I will go through this process step by step.
Let's get started
Prerequisites
To carry out the steps outlined in this guide you will need to have WSL2 enabled and working. These days it is pretty simple to install by just running "wsl --install" in PowerShell, but you can check out the installation method for your build of Windows here: https://docs.microsoft.com/en-us/windows/wsl/install
You will also need to have Docker Desktop installed and working on your machine. The latest version can be found here: https://www.docker.com/products/docker-desktop
Although I don't consider the steps involved difficult, some basic understanding of Docker and Dockerfiles will help to understand what is going on.
Installation
For my WSL installation, I am going to be using Ubuntu 20.04 as the base image and then I will add everything I need on top of that.
The Dockerfile
Since we are using the Ubuntu Docker image as the basis for our WSL distro it will be missing some standard tools like curl, wget, and vim. The images are stripped down to keep Docker containers using them as minimal as possible and use fewer resources. This is not an issue as we can simply add them back in with our Dockerfile and the stripped down image should actually result in a smaller WSL installation.
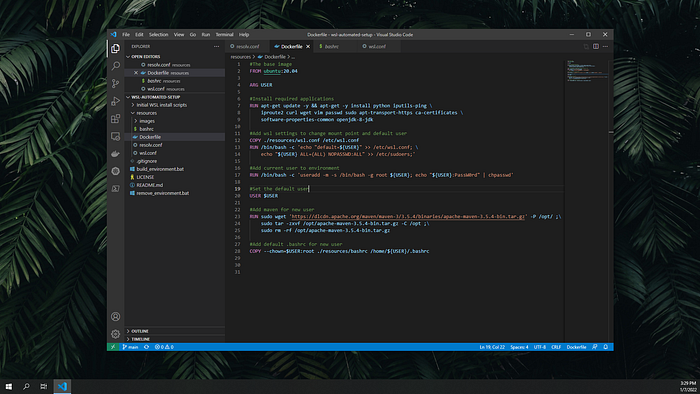
This is the full Dockerfile that I will be using to create my WSL distro, since we are not particularly worried about the size of the resulting image I felt it was easier to keep all the RUN commands separate for clarity. I will break it down and explain it below.
In this first half of the Dockerfile, we are focusing on installing all the tools and applications that we want in our WSL distro. If you are following along you can remove are add anything you want here.
In the first two instructions in this half, the FROM and ARG; we are declaring the base image to build upon and also declaring that there will be an argument to use during the build called "USER". This ARG will be passed in with the build command.
The second two instructions are both RUN. In both of these, I am installing any applications that I want to have in my WSL distro. Some of these are tools, such as wget and iproute2; that have been stripped from the Docker image to make it smaller so I am just adding them back in.
In the second RUN you can see that I am downloading a specific version of Maven and extracting it to its new home in "/opt", I thought I should add this in to show we are not restricted to installing tools that can be installed using apt.
In the second half of the Dockerfile, we are focusing on creating a new user and making it the default user for the WSL installation.
In the first RUN instruction we are using "useradd" to create a new user using the ARG we declared above. Once created we are setting a new password for the new user using "chpasswd".
In this example, we are setting the password to "PassW0rd" but we could also set it using another ARG like that of the USER.
The next instruction is a COPY, this copies over a ready-made wsl.conf. This file is a way for us to change some WSL specific settings. You can read about it more here: https://docs.microsoft.com/en-us/windows/wsl/wsl-config
The contents of the wsl.conf I am using is in the code block above. What these settings do are as follows.
Under "[automount]" we can set how our systems drives will be mounted in WSL. Using "root = /" we are setting the default mount point for our drives.
By default, this is set to "/mnt" which I have had issues with in WSL when mounting volumes in Docker containers and also with git. These issues are mostly caused when Docker or git is expecting a Windows path format like "/c/Users/nicholas/"
Again "options = metadata" fixes some issues with Linux permissions on Windows files.
The last line "[user]" is how we can set settings related to our user. We will populate these settings dynamically within the Dockerfile, which brings us to the next instruction in the Dockerfile.
An important thing to note here is that you need to ensure that wsl.conf has Linux style line endings instead of Windows. So LF instead of CRLF, this will cause it to be unrecognised by the Linux filesystem.
On line 6 in the above code block we are adding the default user value to the new wsl.conf. This user value is again populated using the USER argument. By doing this dynamically we can change our user name between installs or even share it with a friend or team member. In the same RUN instruction, we are also adding our new user to the list of sudoers so that we can use sudo.
The last instruction is something I personally find very useful. We are adding a default".bashrc" file to our new user. By setting our ".bashrc" this way we can pre-populate it with any aliases, functions and exports that you like and they will always be there when you run a new install. This last line is of course optional but as I stated previously I find it very useful to know I will always have my aliases and functions set up. Here is a default .bashrc for Ubuntu to use as a template for your own.
Ok let's actually install this now
If you have some knowledge of Docker, you will understand these commands but for those who don't, I will explain them. You can run these commands in CMD or PowerShell, I'll be using PowerShell.
There is nothing complex about them really, the first line is building the Dockerfile that we created above and turning it into an image ( this command should be run within the same folder as the Dockerfile ). As well as building the Dockerfile we are passing in our USER argument using the below
--build-args USER=NickYou can replace "Nick" with whatever name you want.
The last thing we are doing in this command is tagging the new image with the name "custom-wsl" this will make the following commands easier.
Once the build is complete we need to create a container using the new image. This is what the second command does, while also naming it "custom-wsl".
The last command exports the containers file system as a tarball and names it "custom-wsl.tar.gz"
This next set of commands will import the tarball created above as a new WSL installation.
The first command is simply setting the default WSL version to 2 so that the new installation will be WSL2. This will work with WSL1 also.
The next command does all the actual work. It imports the tarball and installs it in a new directory called ".\installDir" and names the new installation "custom-wsl". Feel free to change the name or the installation directory.
The last command sets the newly created installation as the default, but this is not necessary if you have other distros installed and want to keep them as your default.
Now to test your new WSL install simply type "wsl" into your PowerShell terminal and it should log into your new distro. If you did not set the default distro above "wsl -d custom-wsl" should do the trick.
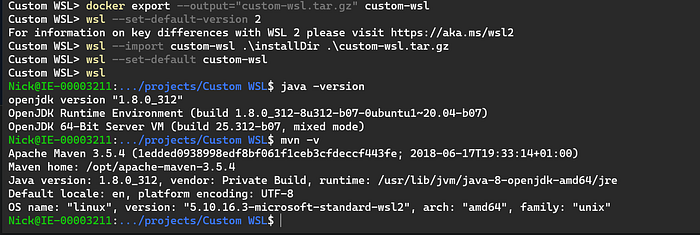
As you can see in the screenshot above I have imported the new distro and my specified version of Maven and Java are installed as laid out in the Dockerfile.
So what next?
If you ever want to remove the distro you installed it is an easy process. Just simply run the following commands and substitute your installation directory if different from above.
To re-install simply run the install commands again.
If you want to make the install process easier you can create a batch script that contains all the commands above and will install it for you in one go. The below batch file runs all the above commands with some extra clean up steps to remove the Docker container and image afterwards.
Adding this into a file named something like "build-wsl.bat" and running it in PowerShell will make the installation much easier. I have previously written an article about automating this whole process including the install and removal using the following GitHub repo: https://github.com/n-murray/wsl-automated-setup
Wrapping up
Using the above process you can begin to treat your WSL distro as disposable by just removing it whenever you break something and re-installing a fresh copy of it using your distro template ( Dockerfile )
You can add or remove anything you like from it as you go too, just update the Dockerfile and you are good to go!
If you managed to get this far thank you for reading and I hope you enjoyed the article! If you did enjoy it consider subscribing for updates on my future articles, also if you are not already a member on Medium you can join using my membership link