
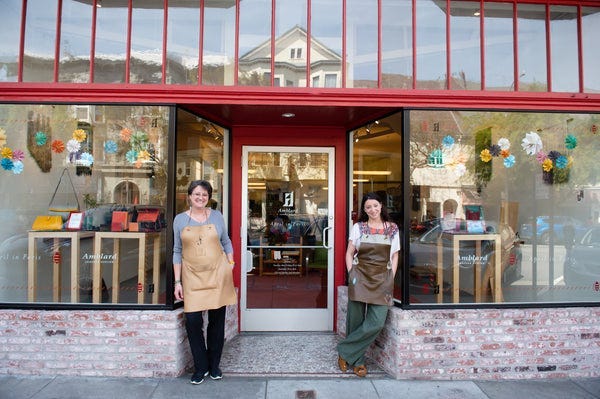
I'd walked past the Amblard Leather Atelier storefront in San Francisco at least a dozen times before I finally signed up. It was one of those "someday" things — interesting, aspirational, perpetually deferred.
What finally pushed me over the edge was burnout. I was exhausted from work, running on fumes, and my birthday was coming up. I decided to take the week off and do something completely different. Not a vacation where I'd check email anyway. Not rest that would just leave me restless.
I wanted to learn something new. I wanted to do something with my hands.
So I signed up for the 4-day intensive.
The Studio
Amblard Leather Atelier is, as far as I can tell, the only place in the country where you can learn centuries-old French leatherworking techniques the way they're actually practiced in luxury ateliers. The program was developed by Béatrice Amblard, a Hermès-trained master artisan with over 40 years of experience (along with Amelie and Misty). The curriculum is progressive and predetermined — you don't skip projects, because each one teaches a specific skill that builds on the last.
The program is broken into four levels of 12 classes each. The first 36 classes are entirely hand work using traditional French tools. The final 12 introduce machinery and how to incorporate it with the handwork you've mastered.
They teach exclusively on chrome-tanned leather — the same soft, draping material luxury houses actually use. It's far less forgiving than the vegetable-tanned leather in most YouTube tutorials. Veg-tan is firm and burnishes beautifully — you can literally rub the edges with wood or canvas to create a smooth, polished finish. Chrome-tan records every mistake. You can't hide rushed cuts or uneven edges. You can't burnish the edges; they have to be painted and sealed through a multi-step process.
Learning on easier materials would mean relearning everything later. So: sink or swim with the real thing.
Four Days of Learning to Slow Down
That birthday week intensive was exactly what I needed.
I started with the intensive format: Tuesday through Friday, 9am to 4 or 5pm. Four days of complete immersion.
I showed up knowing nothing. We worked through the first three or four projects: a card case, a notebook cover, the beginnings of a billfold. I was surrounded by other students at various stages, some further along, some also just starting.
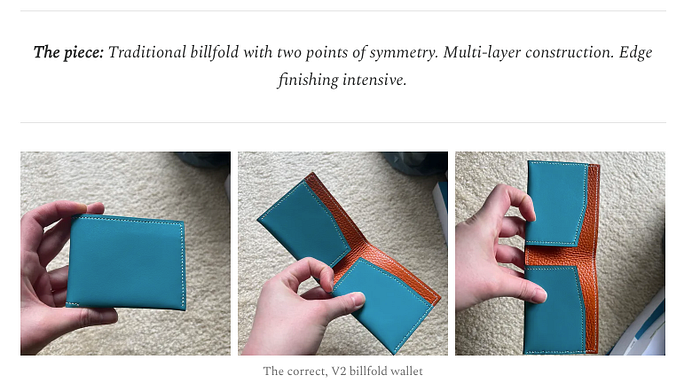
My first real project was a minimal bi-fold credit card wallet. Two internal pockets. One point of symmetry — meaning any deviation is immediately visible.
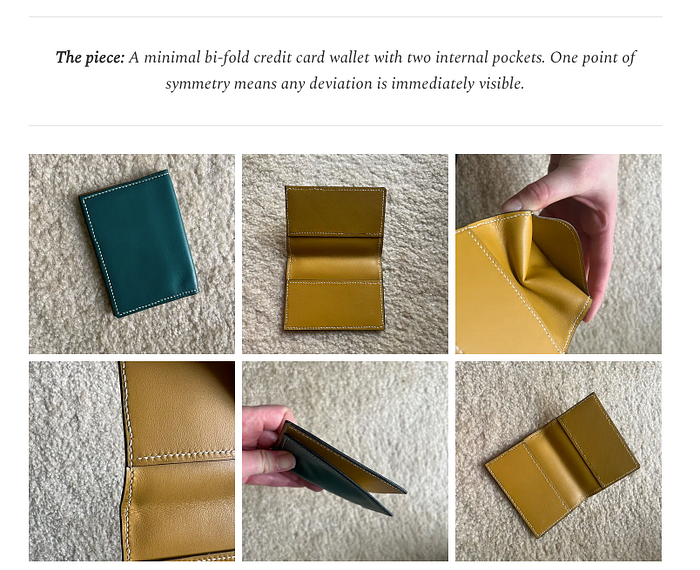
The materials alone were intimidating: Italian full-grain nappa smooth calf, prized for softness and color depth. MeiSi linen thread that produces a crisp, unyielding stitch where inconsistency shows immediately. Fiebing's Edge Kote for painting the edges.
I kept trying to keep up with people who'd been doing this longer, which meant I had to recut my patterns multiple times when my ruler slipped or my measurements drifted. My stitch tension wandered. The edge paint went on unevenly.
But I loved it. There's something meditative about hand-stitching leather for hours. The repetition, the focus, the tangible progress. By the end of each day I was tired in a different way than work tired.
Good tired.
That card case — imperfect as it was — became my baseline. Everything that followed would be measured against it.
The Long Middle
After the intensive, I shifted to evening classes. Two hours, one night a week.
Progress slowed dramatically. This wasn't the studio's fault — life kept interrupting. Work travel. My engagement. Pre-wedding celebrations. Weeks where I couldn't make it to class at all. A project that might take someone else a few sessions stretched across months for me.
But I kept showing up when I could. The curriculum doesn't rush you. Amblard is explicitly an "at your own pace" program. The number of pieces you complete depends entirely on you.
Over the course of the year, I worked through all of Level 1 (seven foundational projects), all of Level 2 (three projects), and started Level 3.
The Foundations
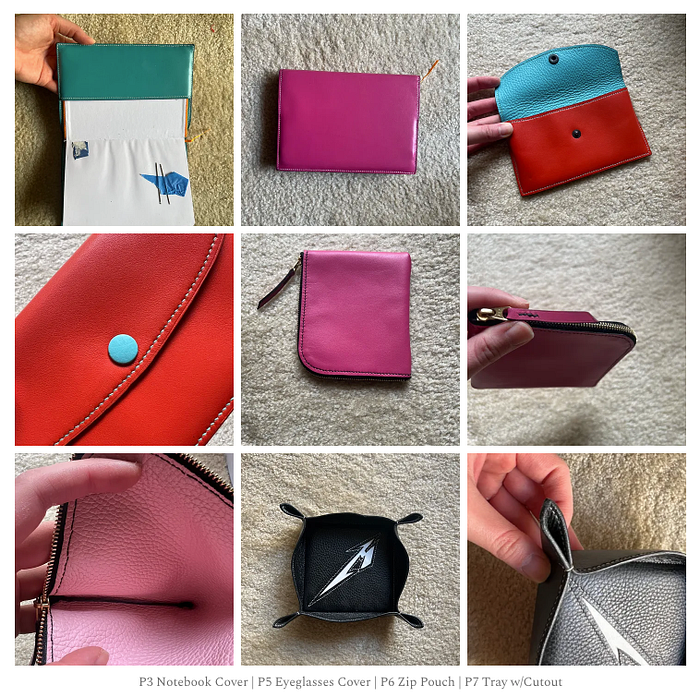
Level 1 consists of seven projects: card case, notebook cover, billfold wallet, eyeglass case, zip pouch, and leather tray.
Individually, these projects aren't exciting. Collectively, they're essential.
They don't build creativity. They build muscle memory. Saddle stitch consistency through repetition. Edge finishing until it becomes automatic. Hardware installation — snaps, zippers. Working with molds for shaped pieces. Learning to slow down under boredom.
The billfold taught me that two points of symmetry means errors compound visually because both sides mirror. The zip pouch taught me that zippers are a construction problem, not a hardware problem — the order of operations matters more than the hardware itself. The tray introduced appliqué for the first time.
The lesson across all of them: you don't get to skip fundamentals just because they're not exciting. Boredom is part of mastery.
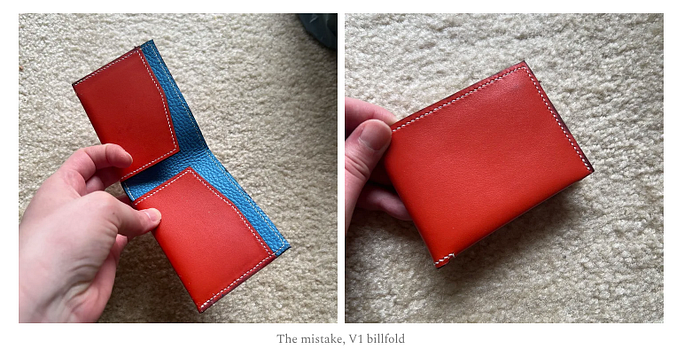
Failure #1: The Scar Project
The billfold wallet deserves its own section because it's where I made the mistake that changed how I approach every project since.
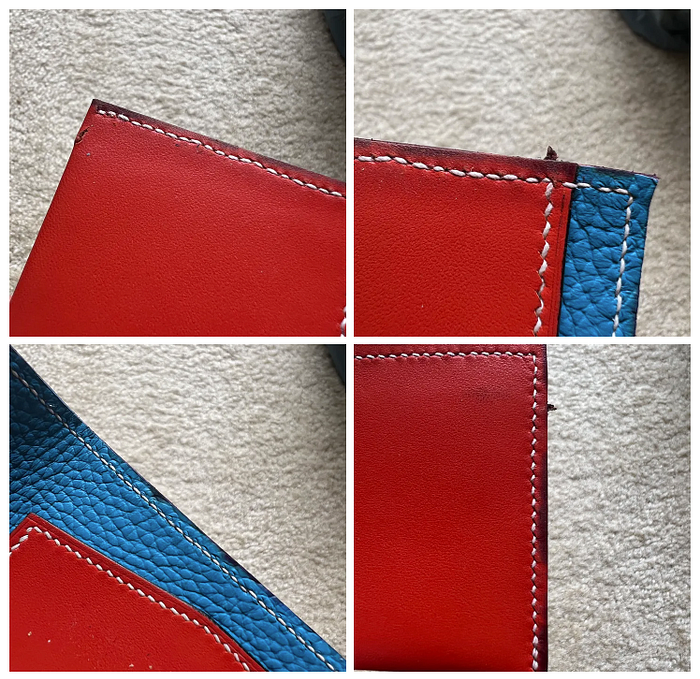
I was practicing the edge finishing sequence at home. Edge finishing on chrome-tanned leather is a multi-step process:
- Sand hard (220 grit)
- Apply edge paint (Layer 1)
- Apply wax
- Seal
- Sand soft (150 grit)
- Apply edge paint (Layer 2)
- Apply wax
- Buff
- Clean
- Light final buff
Each layer builds on the last. Skip a step or rush the drying time, and the finish fails.
I grabbed what I thought was edge paint.
It was leather dye.
These are not the same thing.
Edge paint coats, seals, and can be corrected. Leather dye stains fibers permanently. On smooth chrome-tanned leather, the dye bled instantly — into the surface, onto my fingerprints, into every attempt to clean it.
Soap spread it. Water made it worse. Acetone destroyed the original leather color entirely.
Once dye enters smooth chrome-tanned leather, it cannot be removed without destroying the finish. The piece was ruined.
I keep that wallet. It taught me that terminology matters, that testing on scrap is mandatory, and that chemicals behave exactly as designed. My proper tool stack now includes water-based edge paint, an edge applicator pen (not a brush — brushes leave streaks), a scrap testing workflow, and workspace protection.
Every clean edge I've produced since exists because of that failure.
Failure #2: The Bucket Bag
This wasn't a class project. It was something I attempted on my own, outside the curriculum, following a Domestika course and then heavily improvising beyond the instructions.
I also had a secondary agenda: I wanted to create content from the process. Document the build. Share the journey.
That made the failure sting more.
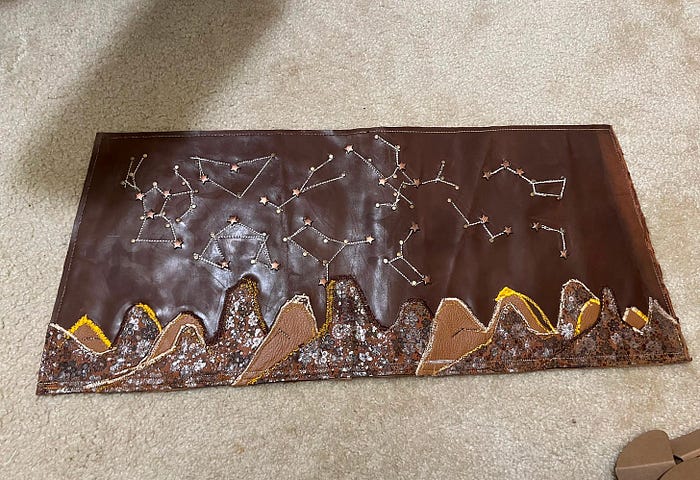
The concept was solid. I was inspired by Rebecca Minkoff's Edie bag — my first "nice" bag, with antique brass star studs arranged as constellations. By Min & Mon's landscape bags, with graphic, illustrative leather surfaces depicting mountains and terrain. By Greek constellation maps, with stars connected by imagined lines.
I wanted to build a bucket bag with decorative wave appliqué and constellation studs. Layered leather as visual terrain. Narrative surface design on a functional form.
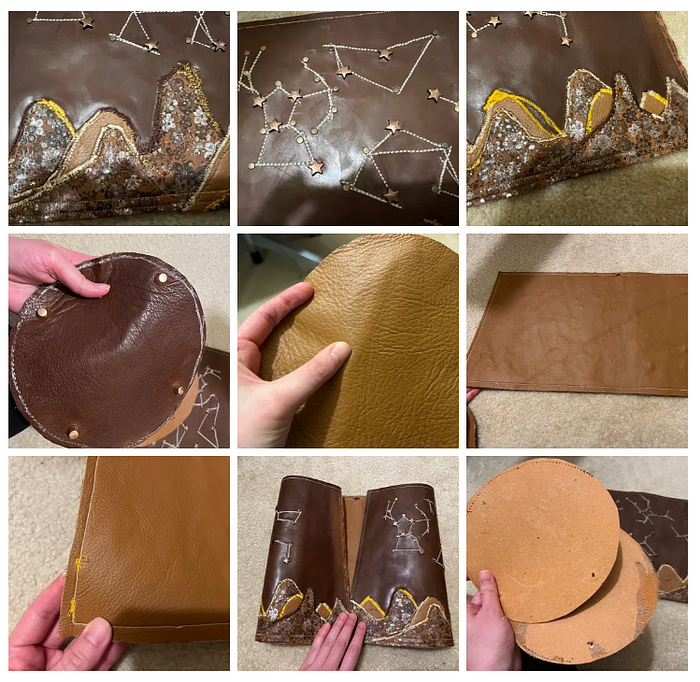
What went wrong:
I used materials and tools that weren't recommended. Scrap leather from Etsy with unknown origins — possibly upholstery leather, possibly faux, possibly mixed tanning methods. Contact cement not rated for structural lamination. No muslin mockup.
The trapezoidal body couldn't align with the circular base. Geometric incompatibility. The leather was too soft and spongy to split or skive properly — my splitter worked on firm leather but failed completely on this spongy grain. Adhesive failed. Panels lifted.
Hand-stitching was unscalable — one wave section took hours. I switched to machine zigzag stitching out of desperation. Broken needles. Thread snags.
The circular base pieces came out floppy and impossible to attach.
The project collapsed.
The Real Lesson
The design wasn't the problem. The sequencing was.
I was asking a beginner maker to execute a fully realized creative vision — at the same time.
This is when I realized I needed to build up "technical Miki" before trying to operationalize my work. The bucket bag concept is still waiting. But now I understand why it has to wait.
Learning builds and brand builds cannot be the same object.
That scar project wallet and that collapsed bucket bag taught me more than the projects that went smoothly. Failure is instructional, not shameful.
But failure isn't the whole story. Somewhere in that year, the work started to change. The edges got cleaner. The stitches got tighter. And I started making things I actually cared about.
Part 2: When the work starts to feel like yours →