

This time we will learn about how to handle a form in React with TanStack Form. In React you can use useState to handle form. However, the more complex the form, the more difficult it is to handle. To handle complex form you can use library like React Hook Form and Formik. Check this post if you using React Hook Form or Formik.
Prerequisite:
- Next App Router / React App
- Zod (for validation)
- TanStack Form
To install Zod and TanStack form run this command:
npm i @tanstack/react-form
npm i @tanstack/zod-form-adapter zod
1. Basic Form
- Using TanStack Form is very easy you just need to import
useForm - Make sure that component is client component
- Define default values with
useFormto variableform - Render with form with
form.Field
"use client"

import { useForm } from "@tanstack/react-form";

export default function Page() {
  const form = useForm({
    defaultValues: {
      firstName: '',
    },
    onSubmit: async ({ value }) => {
      console.log(value)
    },
  })


  return (
    <div className="w-fit p-4 bg-slate-100/10 rounded-lg border border-slate-800 mx-auto mt-40">
      <form
        onSubmit={(e) => {
          e.preventDefault();
          e.stopPropagation();
          form.handleSubmit();
        }}
      >
        <div className="flex flex-col gap-4 mb-6">
          <form.Field
            name="firstName">
            {({ name, state, handleChange }) => (
               <div className="flex flex-col gap-1">
                <label htmlFor={name} className="text-sm text-slate-600">Firstname</label>
                <input
                  className={`px-2 py-1 rounded-md text-slate-900 outline-none`}
                  name={name}
                  value={state.value}
                  onChange={(e) => handleChange(e.target.value)}
                />
              </div>
            )}
          </form.Field>
        </div>
        <button type="submit" className="bg-slate-800 px-4 py-2 rounded-md font-semibold">
          Submit
        </button>
        <div>
        </div>
      </form>
    </div>
  )
}
2. Validation
Form need to validate before send to API, to validate the form:
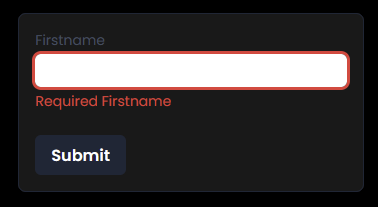
- Add props
validatorstoform.Fieldlike code below:
<form.Field
  name="firstName"
  validators={{
    onChange: ({ value }) =>
      value == '' ? 'Required Firstname' : undefined,
  }}>
  {({ name, state, handleChange }) => (
    <div className="flex flex-col gap-1">
      <label htmlFor={name} className="text-sm text-slate-600">Firstname</label>
      <input
        className={`px-2 py-1 rounded-md text-slate-900 outline-none ${state.meta.errors.length ? "ring ring-red-500" : ""}`}
        name={name}
        value={state.value}
        onChange={(e) => handleChange(e.target.value)}
      />

      {state.meta.errors ? (
        <p role="alert" className="text-sm text-red-500">
          {state.meta.errors.join(', ')}
        </p>
      ) : null}
    </div>
  )}
</form.Field>- If you using Zod you have to add props
validatorAdapter
// ...

import { zodValidator } from "@tanstack/zod-form-adapter";
import { z } from "zod";

export default function Page() {
  // ...
  <form.Field
    name="firstName"
    validatorAdapter={zodValidator()}
    validators={{
      onChange: z.string().min(1, "Required Firstname"),
    }}>
    {({ name, state, handleChange }) => (
      <div className="flex flex-col gap-1">
        <label htmlFor={name} className="text-sm text-slate-600">Firstname</label>
        <input
          className={`px-2 py-1 rounded-md text-slate-900 outline-none ${state.meta.errors.length ? "ring ring-red-500" : ""}`}
          name={name}
          value={state.value}
          onChange={(e) => handleChange(e.target.value)}
        />

        {state.meta.errors ? (
          <p role="alert" className="text-sm text-red-500">
            {state.meta.errors.join(', ')}
          </p>
        ) : null}
      </div>
    )}
  </form.Field>
}
3. Linked Fields
Validation field based on another field like password and confirm password
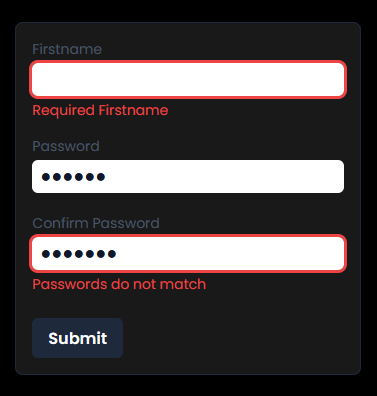
- Update default values by add field
passwordandconfirm_password - Add
form.Fieldforpasswordandconfirm_password - Add
onChangeListenTo: ['password']to trigger validation when fieldpasswordchange
export default function Page() {
  const form = useForm({
    defaultValues: {
      firstName: '',
      password: '',
      confirmPassword: '',
    },
    onSubmit: async ({ value }) => {
      console.log(value)
    },
  })

  return (
    <div className="...">
      <form
        onSubmit={(e) => {
          e.preventDefault();
          e.stopPropagation();
          form.handleSubmit();
        }}
      >
        <div className="...">
          {/* ... */}

          <form.Field
            name="password"
            validatorAdapter={zodValidator()}
            validators={{
              onChange: z.string().min(1, "Required Password"),
            }}>
            {({ name, state, handleChange }) => (
              <div className="flex flex-col gap-1">
                <label htmlFor={name} className="text-sm text-slate-600">Password</label>
                <input
                  type="password"
                  className={`px-2 py-1 rounded-md text-slate-900 outline-none ${state.meta.errors.length ? "ring ring-red-500" : ""}`}
                  name={name}
                  value={state.value}
                  onChange={(e) => handleChange(e.target.value)}
                />

                {state.meta.errors ? (
                  <p role="alert" className="text-sm text-red-500">
                    {state.meta.errors.join(', ')}
                  </p>
                ) : null}
              </div>
            )}
          </form.Field>

          <form.Field
            name="confirmPassword"
            validatorAdapter={zodValidator()}
            validators={{
              onChangeListenTo: ['password'],
              onChange: ({ value, fieldApi }) => {
                if (value == "") return "Required Confirm Password";

                if (value !== fieldApi.form.getFieldValue('password')) {
                  return "Passwords do not match"
                }

                return undefined
              },
            }}>
            {({ name, state, handleChange }) => (
              <div className="flex flex-col gap-1">
                <label htmlFor={name} className="text-sm text-slate-600">Confirm Password</label>
                <input
                  type="password"
                  className={`px-2 py-1 rounded-md text-slate-900 outline-none ${state.meta.errors.length ? "ring ring-red-500" : ""}`}
                  name={name}
                  value={state.value}
                  onChange={(e) => handleChange(e.target.value)}
                />

                {state.meta.errors ? (
                  <p role="alert" className="text-sm text-red-500">
                    {state.meta.errors.join(', ')}
                  </p>
                ) : null}
              </div>
            )}
          </form.Field>
        </div>

        <button type="submit" className="bg-slate-800 px-4 py-2 rounded-md font-semibold">
          Submit
        </button>

        <div>
        </div>
      </form>
    </div>
  )
}
4. Array Field / Dynamic Form
Dynamic form is form that you can add or remove from the form and sometimes you need to validate.

- Add Interface for form
- Update default value for field
hobbies - Add form.Field for hobbies with name
hobbiesandmode="array" - Looping sub field and add some validation
// ...

interface FormValues {
  firstName: string;
  password: string;
  confirmPassword: string;
  hobbies: {
    name: string;
  }[]
}

export default function Page() {
  const form = useForm<FormValues>({
    defaultValues: {
      firstName: '',
      password: '',
      confirmPassword: '',
      hobbies: [],
    },
    onSubmit: async ({ value }) => {
      console.log(value)
    },
  })

  return (
    <div className="...">
      <form
        onSubmit={(e) => {
          e.preventDefault();
          e.stopPropagation();
          form.handleSubmit();
        }}
      >
        <div className="...">
          {/*  */}

          <form.Field name="hobbies" mode="array">
            {(field) => {
              return (
                <div className="flex flex-col gap-1">
                  <label className="text-sm text-slate-600">Hobbies</label>

                  {field.state.value.map((_, i) => {
                    return (
                      <form.Field key={i} name={`hobbies[${i}].name`}
                        validatorAdapter={zodValidator()}
                        validators={{
                          onChange: z.string().min(1, "Required Field"),
                        }}>
                        {(subField) => {
                          console.log({ subField })
                          return (
                            <div className="flex flex-col gap-1">
                              <input
                                value={subField.state.value}
                                className={`px-2 py-1 rounded-md text-slate-900 outline-none ${subField.state.meta.errors.length ? "ring ring-red-500" : ""}`}
                                onChange={(e) =>
                                  subField.handleChange(e.target.value)
                                }
                              />


                              {subField.state.meta.errors ? (
                                <p role="alert" className="text-sm text-red-500">
                                  {subField.state.meta.errors.join(', ')}
                                </p>
                              ) : null}
                            </div>
                          )
                        }}
                      </form.Field>
                    )
                  })}

                  <button
                    onClick={() => field.pushValue({ name: '' })}
                    type="button"
                    className="bg-blue-500 px-4 py-2 rounded-md"
                  >
                    Add Hobbies
                  </button>
                </div>
              )
            }}
          </form.Field>
        </div>

        <button type="submit" className="bg-slate-800 px-4 py-2 rounded-md font-semibold mt-4">
          Submit
        </button>

        <div>
        </div>
      </form>
    </div>
  )
}
This is just some feature from TanStack Form that you can use for your project. If you want to see more details, you can check here. Thank you for read.